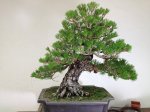
My trees got rejected for the National Show!

I am going to admit Adair I asked you for the pics of when you obtained the tree just to see where you had taken it. And it's 100% better. I knew it was as import and was really hoping you had a hand in its beauty. The nebari is showing its beauty but the main trunk was throwing me off. It looks to be completely straight to 2 o'clock position or so and then tapering off to the curvy apex. After comparing both pics, the refined canopy absolutely puts the icing on the cake. Nice improvent and worthy of the show. I, unfortunately do not have the money, nor time / money...etc to practice with a.bonsai great bUT it seems to be paying off. I can feel the passion that you bring the table , which reminds me alot of myself . Very nice work and you should be very pleased , and enjoy the years to come. !!!!:cool:
 
This was "my" fire a couple weeks ago...
image.png image.jpeg image.jpeg image.jpeg
Maiden flight on a new rocket my son and I built. Wind sent it sideways it and the ejection charge went about 2 seconds after it landed in (apparently) a very dry field across the street. By the time the second fire truck was able to get the fire out, it had burned about 3 acres. No property damage, nobody hurt, just my pride and a new rocket.
 
This was "my" fire a couple weeks ago...
View attachment 96299 View attachment 96300 View attachment 96301 View attachment 96302
Maiden flight on a new rocket my son and I built. Wind sent it sideways it and the ejection charge went about 2 seconds after it landed in an apparently very dry field across the street. By the time the second fire truck was able to get the fire out, it had burned about 3 acres. No property damage, nobody hurt, just my pride and a new rocket.
Ooopsy..
 
Oh man! I had an estes rocket when I was way younger... Brought the rocket charges on a plane, oh the 90s!!
 
I was very confused when I first read your post!! I thought your tree had already gotten in albeit "unofficially" last year. Well I am glad it was only a BAD joke. Congrats! Beautiful tree and well deserved! I look forward to seeing it in person in September! ;)
 
Congrats Adair, I look forward to carefully inspecting it.

Chris

I'm sure there will be better trees more deserving close scrutiny than mine at the show. But I found some "in progress" pictures you can review for errors now:

First, here's another early photo. The only thing that's been done is decandle. Everything!

June 2013:

image.jpeg


November 2013: After pulling needles and thinning, but before beginning wiring. Sorry, I was so excited to start work on it that I forgot to take a "before pulling needles picture". You can see many of the pulled needles on the soil!
image.jpeg


After wiring a couple branches, Nov 2013:


image.jpeg


Close up of a wired branch:

image.jpeg

See that big wire closest to the trunk? It's too loose. It seemed tight enough when I wired it, but when I bent the branch down, it loosened! I also should have made the first turns in tighter to the inside of the crotch. So, lesson learned.

Another branch:

image.jpeg

I'm learning how to make good "fish hooks" at the end of the branches.
 
You know I'm just having some fun with ya, right? :) Glad the tree got in, will you be attending? I know a lot of people send trees up with others, hope you'll be here.
 
image.jpeg
I'm sure there will be better trees more deserving close scrutiny than mine at the show. But I found some "in progress" pictures you can review for errors now:

First, here's another early photo. The only thing that's been done is decandle. Everything!

June 2013:

View attachment 96321


November 2013: After pulling needles and thinning, but before beginning wiring. Sorry, I was so excited to start work on it that I forgot to take a "before pulling needles picture". You can see many of the pulled needles on the soil!
View attachment 96322


After wiring a couple branches, Nov 2013:


View attachment 96323


Close up of a wired branch:

View attachment 96324

See that big wire closest to the trunk? It's too loose. It seemed tight enough when I wired it, but when I bent the branch down, it loosened! I also should have made the first turns in tighter to the inside of the crotch. So, lesson learned.

Another branch:

View attachment 96327

I'm learning how to make good "fish hooks" at the end of the branches.


I'll spare you more halfway done photos, and skip to the final "initial styling", June 2014, wiring completed:

image.jpeg

It looks like I pulled more needles then, too! Yes, as I said, I really opened up the apex to let sun in to induce backbudding. The bottom branches, I left denser. The tree will naturally try to grow tall, so it directs its energy there. Left by itself, the top will grow strong, and the bottom will get weak. To combat that, I pulled more needles from the top, and left more needles on the bottom. This keeps the bottom strong. Oh, I decandled the whole tree, too.

A top view of the wire:

image.jpeg


A view of the wired tree a month or so later with the summer candles just beginning to show needles:
image.jpeg

By the way, the trunk is a light grey when dry. Lighter in color than most. I think it's due to being watered with Sacremento water for a decade. They tell me it leaves a white residue. As you can see the apex is filling in strongly. It's about as strong as the bottom, but not any stronger. My "balancing" is working.

Now: it just needs time to develop ramification!
 
You know I'm just having some fun with ya, right? :) Glad the tree got in, will you be attending? I know a lot of people send trees up with others, hope you'll be here.
Oh, I know!!

Yeah, I've booked my room already. Working on the logistics: the tree is in California, I'm in Georgia...

After the show, I'm going to bring the tree home, and show it in the local show circuits for a year.

Then, it will time for major cut backs, some grafting, and some major bending! The key branch? It starts kinda in the rear. I need to pull it forward more.

It's going to take jacks and guy wires! Lol!!!
 
Super Dick Move!

And BVF....WTF!

Sorce
 
And glue the pebbles down really well so they don't spill over the edge.
I know you're teasing me , but for any beginners reading this thread, you could learn from this...

In looking at all the pictures I've posted of this tree, notice that the soil is flat in the pot. Not mounded. The "everyday" grey pot is a high quality Chinese container, and is a little too deep for show use. I now have it in one more suitable for showing:

image.jpeg

Now, if you look closely, you will see that not only is the level, it sits 1/4 to 1/2 inch lower than the edge of the rim. This serves two purposes: 1) soil does not wash away from the nebari; and 2) allows room for moss. When this tree gets shown, it will get a full moss cover. Having the soil a little low in the pot allows me to add moss and still have the top of the moss even with the top of the pot.
 
Adair,
Since I am sure you are devastated
and you are so very close I will step
up and help. Just PM an address &
I will cart off the offending tree. I
just know it must gall you to see it
daily languishing in all its beauty
and still rejected. Let me know and
I will bring a trailer to remove it and
any other "equally offensive" plants
you have laying about.
Cool! Next year, I'll have a fresh crop of Crepe Myrtle clippings! I'll be sure to call ya. I'd much rather you come haul them off rather than me have to burn the pile!
 
Cool! Next year, I'll have a fresh crop of Crepe Myrtle clippings! I'll be sure to call ya. I'd much rather you come haul them off rather than me have to burn the pile!
:eek:
:oops:
:rolleyes:
bring you a load of stuff to play with though.
 
I know you're teasing me , but for any beginners reading this thread, you could learn from this...

In looking at all the pictures I've posted of this tree, notice that the soil is flat in the pot. Not mounded. The "everyday" grey pot is a high quality Chinese container, and is a little too deep for show use. I now have it in one more suitable for showing:

View attachment 96345

Now, if you look closely, you will see that not only is the level, it sits 1/4 to 1/2 inch lower than the edge of the rim. This serves two purposes: 1) soil does not wash away from the nebari; and 2) allows room for moss. When this tree gets shown, it will get a full moss cover. Having the soil a little low in the pot allows me to add moss and still have the top of the moss even with the top of the pot.
Excellent point and good guidance.
 
What type of glue is best? Is a simple white glue like Elmers okay or should a two part epoxy work better?;)
Oh, the epoxy glue is much more water resistant! Use it. You don't want it to dissolve away when you water the tree! Even better, cover the entire surface with it. It holds the tree in the pot nice and tight! You don't have to worry when your cat knocks it off your TV set! It won't spill dirt everywhere! Make sure to keep it dusted, nobody likes a bonsai with house dust! It's in Naka's Bonsai Techniques 3, page 13.

If the pot breaks when the cat knocks it off the TV, be sure to get some gold duct tape to repair it. MRB tells me that the added value of the gold offsets the lost value of a broken pot, so it doesn't really matter if the pot is broken or not...
 
Bill will usually write and tell you why...Needs more ramification, Too juvenile...etc...
 
Back
Top Bottom