Sean’s Japanese Maples

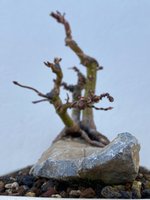
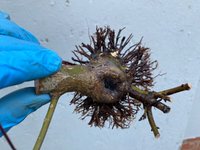
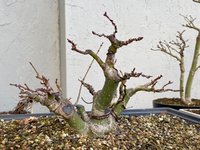
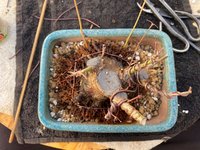
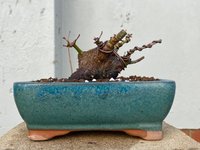
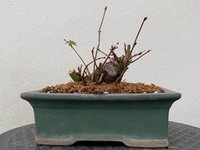
Took 2 weekends but finally got my most mature (not actually mature but just the one I’ve progressed the furthest) JM sorted for winter.
Planning on repotting into a bonsai pot in spring.

View attachment 556541
View attachment 556563
View attachment 556564

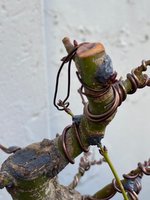
Needs a thread graft to add a branch towards the back in the upper trunk. I also plan on cutting the upper trunk back to 1 node further down to build better taper up top

View attachment 556572
Maybe you could use this right branch as the new crown ? what do you think ?
a93f8763-89f9-4567-b475-8e8037aeda29.jpeg
 
Maybe you could use this right branch as the new crown ? what do you think ?
View attachment 556732
@clem thats actually a really good option! I’ll have to have a look when I get home later. I hadn’t considered that but aren’t totally happy with the upper trunk above that branch so it could be a great solution 👌🏻

I’ll report back once I look in person
 
very nice tree and the stone is very good too with its movement.
Don't you prefer this back side for the front ? For me the nebari is far better on this side (more balanced, better movement of the roots) ? ->
The rock isn’t as good from that side and the trunks wouldn’t work as well. I’ll have a look when I’m home but I do prefer the current front at the moment
 
Amazingly that lowest right branch is a bud that grew from the base of the trunk. It popped sometime in the 2020-2021 growing season and put out just 2 leaves (1 internode) and then grew from there the next season.

Here’s the tree in August 2022, you can see how I wired movement into the little shoot that is now that lowest right branch.

View attachment 556721
Pretty cool and like where tree has gone in short time. Thanks for posting progress as it definitely helps
 
Very nice, do you have a pic of the back side to compare ? Maybe the stone isn't that good on the back side as you said 🧐
 
ok, i agree with you that the stone's front is on the front side and the main tree goes towards the viewer on the front side too.. so the actual front you chose it the best, imho :cool:
On the front, the weak point, for me, is this (too) big root (red circle) but with time, i guess all the roots will fuse together..
IMG_0335.jpeg
 
Repotting started on Sunday with 2 smaller JMs. I’ll snap some photos of them in the morning.
Today I repotted the layer I shared earlier in the thread. Roots were great, perfectly radial and the disk had done its job and made them perfectly flat. I reduced any high roots and create a single plane of roots.

IMG_0527.jpegIMG_0528.jpegIMG_0529.jpegIMG_0531.jpeg
 
Consistently radial roots - so jealous
 
During my lunch hour yesterday I performed a thread graft on 2 of my JMs to add back branches to each tree

IMG_0539.jpeg
IMG_0540.jpeg

@clem I also reduced the height of this tree, not quite as low as you suggested but low enough to hopefully improve the taper once the bits at the cut site start to grow in spring

IMG_0535.jpeg
IMG_0537.jpeg
IMG_0538.jpeg
 
@clem I also reduced the height of this tree, not quite as low as you suggested but low enough to hopefully improve the taper once the bits at the cut site start to grow in spring
Very good, fingers crossed to see this bud grow next spring 👍
 
Another repot today. This tree is the base of the very first JM I acquired back in 2020. I layered the top off last season. The base is completely barked up and nice and mature looking. I’ll now start building the canopy of the tree.

There was a bald spot in the root base directly in front of the tree so I did 2 root grafts under the trunk. Shout out to @markyscott for sharing this root graft technique. The base is completely healed over so this was the obvious choice. (I covered the grafts with putty cut paste after I took the photo)

IMG_0582.jpegIMG_0579.jpegIMG_0584.jpegIMG_0585.jpegIMG_0589.jpegIMG_0588.jpeg
 
There was a bald spot in the root base directly in front of the tree so I did 2 root grafts under the trunk. Shout out to @markyscott for sharing this root graft technique.
hello, i discover this technique thanks to you :cool:

Did you peel the bark of the scion and rootstock before to nail them together ?
So, if i see correctly the pic, there is a nail hammered in the middle of the trunk of the grafts ?
 
hello, i discover this technique thanks to you :cool:

Did you peel the bark of the scion and rootstock before to nail them together ?
So, if i see correctly the pic, there is a nail hammered in the middle of the trunk of the grafts ?
@clem I used a small saw and a chisel to cut the grooves under the trunk. The seedlings are then placed in the grooves. The grafting pins are not pushed through the seedling, they are placed to the side of the seedlings. A small amount of bark is gently scratched off of each seedling. The cut grooves are then covered with putty cut paste before the tree is potted.

This method of root grafting under the trunk will only work if the bottom of the trunk is fully healed over. There has to be living tissue (callous/cambium) under the tree where the groove is cut.
 
Thank you for this detailed answer. I didn't know this grafting technique yet.
It is logical that a graft can only take with 2 living parts (with living cambium)...

I'm interested to see how yours will evolve. :cool:
 
Next up on the bench is it he chunky potato I posted earlier

View attachment 393449

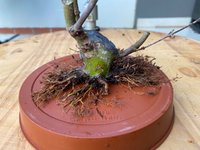
This one was screwed to a plastic disc when I separated the layer

View attachment 393450

A few roots sprouted way too high up right below one of the sacrifice branches :(

View attachment 393451

Soltuion: CUT THEM OFF!

I contemplated leaving them for a minute, but decided if I’m taking all this time and effort I might as well build these trees properly

View attachment 393456

Now I’m left with a bald spot so I scored the cambium and applied rooting hornone

View attachment 393453

Wired in

View attachment 393454

Ready for the season! I scored the cambium around the top wound and resealed. Hoping the sacrifices will thicken the base and help heal the wound

View attachment 393455

Future virt

View attachment 393459
This little air layer went into a pot today after 2 years in the ground. In hindsight I think digging JM up every year when growing smaller trees is a good idea, there weren’t many fine roots close to the trunk. I had to cut thick roots back quite hard and was left with very few fine roots. I did 4 root grafts to fill in some gaps. The roots on the left and right sides have started to fuse, making the base quite wide.
There are 2 scars that need to be healed and the heavy right branch needs to go sometime during the growing season.
I’ll give it a little trim tomorrow to remove some clusters of shoots and branches in bad places.

IMG_0705.jpegIMG_0707.jpegIMG_0709.jpegIMG_0710.jpegIMG_0713.jpegIMG_0714.jpeg

Spring 2022 before it went in the grow bed

IMG_2586.jpeg
 
Back
Top Bottom