Sean’s Japanese Maples

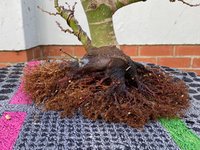
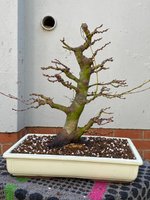
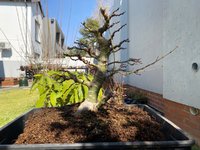
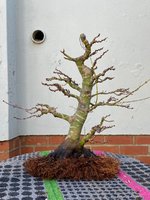
Very busy day of repotting today. Repotted my big JM and my multi trunk that started as an air layer.

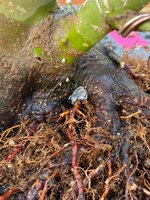
Did one root graft on my big guy. The pot is the best size I could find locally, I’d like to find a nice oval in the future but this pot it’s a good size and isn’t terrible.
IMG_0720.jpeg
IMG_0721.jpeg
IMG_0722.jpeg
IMG_0723.jpeg

Root graft to fill in a bald spot

IMG_0725.jpeg
IMG_0726.jpeg
IMG_0728.jpeg
 
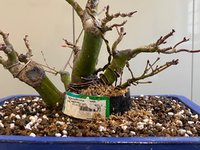
Here’s the multi trunk. I’ll take a photo of it in the pot tomorrow morning.
I added a small air layer (from the same parent tree) to add a 5th trunk. I had to add it a bit lower than I had planned as the base was actually a lot wider than I had anticipated. Funny how 2 years of growth since the last repot will do that 🤣
I drilled a small hole in the nebari and stuck the stub under the layer into the hole. I intertwined a few of the roots from the tree and the layer to hopefully get them to fuse and merge. (The new 5th trunk isn’t in these photos)

IMG_0738.jpeg
IMG_0739.jpeg

Spring 2022

IMG_2513.png

January 2021

IMG_5373.jpeg
 
Thread to document some of my Japanese maple projects.

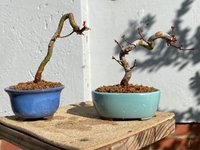
is an air layer off one of my bigger JMs that I separated last November. It’s a tall slender twin trunk. It was little more than 2 long twigs last August. Now it’s at least thickened up to be 2 small sticks in a pot 😂

View attachment 393150

When I separated the layer November 2020

View attachment 392959

I did the initial styling in our fall in June. Today I repotted.

Start of the repot

View attachment 392960
View attachment 392961

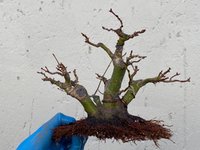
Nice little nebari is starting to form. Any heavy, crossing or misdirected roots were cut off. Bottom of the football was cut flat under the trunk.

View attachment 392962
View attachment 392963
View attachment 392964

Settled in and watered. This season I’ll start the primaries and next section of each trunk. I plan for this tree to be remain somewhat slender and have elegant upward reaching branches. I imagine it’s a tree right at the edge of a forest so it’s found a spot where it can reach up and out towards the sunlight from under some large hinokis or cryptomeria.

View attachment 392965

Some trees for inspiration (props to @kokufu_maples on IG)

View attachment 393151
View attachment 393153
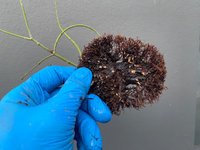
@henrykiser check out that root ball on the air layer pic. lookin like udon noodles <3
 
Here’s the multi trunk. I’ll take a photo of it in the pot tomorrow morning.
I added a small air layer (from the same parent tree) to add a 5th trunk. I had to add it a bit lower than I had planned as the base was actually a lot wider than I had anticipated. Funny how 2 years of growth since the last repot will do that 🤣
I drilled a small hole in the nebari and stuck the stub under the layer into the hole. I intertwined a few of the roots from the tree and the layer to hopefully get them to fuse and merge. (The new 5th trunk isn’t in these photos)

View attachment 560944
View attachment 560945

Spring 2022

View attachment 560946

January 2021

View attachment 560947
I wasn’t entirely happy with the job I’d done adding the small air layer as a 5th trunk so today before leaving for work I pulled it apart and did it properly.

Here’s what it looked like. The new trunk can be seen emerging from the soil on the front right. It was too low down, I wanted it emerging from higher up on the nebari

IMG_0743.jpeg

Air layer gently removed from the soil. It wasn’t attached to the trunk at all besides having some of its roots overlapped with the main tree’s roots.

IMG_0755.jpeg

General area where I want the trunk to emerge

IMG_0756.jpeg
IMG_0757.jpeg

Hole drilled

IMG_0758.jpeg

Bottom of the layer prepped.
I gently nicked the small ring of callous just below where the roots emerge from and shaped the stub to fit into the drilled hole

IMG_0759.jpeg

Positioned and wired securely into place. The stub was pushed firmly into the hole ensuring good contact of the exposed cambium on the nebari and the callous at the base of the layer.

IMG_0760.jpeg

Small plastic wall positioned around the graft site and filled with fine akadama and a layer of sphagnum

IMG_0763.jpeg

The finished operation

IMG_0764.jpeg
IMG_0765.jpeg

Now it’s just a waiting game. I’ll check on the graft in about 6-8 weeks, hopefully there will be some fusing taking place by then.
The roots of the layer will eventually be removed once the new trunk is grafted to the main tree.
The layer came from the same parent tree so genetics are identical
 
Quick repot after work before it got dark. This is the base of one of my first 2 Japanese maples that I bought when I was only 8 months into the hobby. A lady was selling some trees about 2 hours from my house in a town called Witbank. Back then I thought JMs were difficult to come by so my girlfriend and I took a trip to buy them. On the way home I had a blow out on the highway, we still laugh about that day now! 🤣
(Now I have more JMs than I know what to do with!)

I’ve taken 2 air layers off of this tree since then. 2 years ago I thread grafted a shoot low on the trunk when I repotted and did 2 root grafts to fill in a bare spot on the back of the tree.

IMG_0777.jpeg

I’ll cut the stub on the right of the trunk flat during the growing season. I did an Ebihara wedge cut last season when I started the trunk reduction. I also approach grafted a back branch last season but it hasn’t quite taken enough yet to separate.

IMG_0778.jpeg
IMG_0779.jpeg
IMG_0780.jpeg
 
Quick repot after work before it got dark. This is the base of one of my first 2 Japanese maples that I bought when I was only 8 months into the hobby. A lady was selling some trees about 2 hours from my house in a town called Witbank. Back then I thought JMs were difficult to come by so my girlfriend and I took a trip to buy them. On the way home I had a blow out on the highway, we still laugh about that day now! 🤣
(Now I have more JMs than I know what to do with!)

I’ve taken 2 air layers off of this tree since then. 2 years ago I thread grafted a shoot low on the trunk when I repotted and did 2 root grafts to fill in a bare spot on the back of the tree.

View attachment 561304

I’ll cut the stub on the right of the trunk flat during the growing season. I did an Ebihara wedge cut last season when I started the trunk reduction. I also approach grafted a back branch last season but it hasn’t quite taken enough yet to separate.

View attachment 561305
View attachment 561306
View attachment 561307
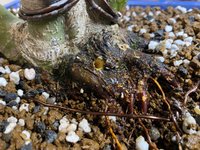
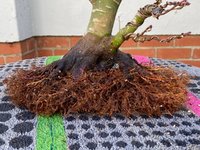
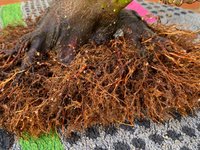
Comparison of the root ball from July 2022 to August 2024. The back side had zero roots so 2 root grafts were carried out back then and have completely filled the void.

What I hope to show with my posts/threads is that by trusting the process and carrying out proper technique each time you work on your trees they will progress and move towards what we (hopefully) all aspire to have on our benches.

(Sorry about the poor quality, screenshot from an Instagram story I posted at the time)

IMG_0785.png
IMG_0780.jpeg

This area of the root ball is all from the root grafts

2c037439-6a11-47e4-aba3-68820c46022a.jpeg

July 2022, you can also see the thread graft through the lower part of the trunk which is now the next section of trunk and the long branch extending to the left

IMG_2565.jpeg
IMG_0778.jpeg
 
Your threads consistently show me how little I know about building these from scratch and I really appreciate it
I had a local bonsai friend say the same thing to me yesterday over text. I told him what’s been very beneficial for me to really studying high level trees on social media, books, here on b’nut, YouTube etc. I try to find trees that I like and then figure out how they were built or what traits make them look good to me. I’m sure we all try to do that but sometimes we gloss over how the trunks or design was really built from the start.
 
Very busy day of repotting today. Repotted my big JM and my multi trunk that started as an air layer.

Did one root graft on my big guy. The pot is the best size I could find locally, I’d like to find a nice oval in the future but this pot it’s a good size and isn’t terrible.
View attachment 560937
View attachment 560938
View attachment 560939
View attachment 560940

Root graft to fill in a bald spot
View attachment 560941
View attachment 560942
View attachment 560943
Already removing some of the wire on this one, some branches have thickens quite substantially in 4 weeks

IMG_1096.jpeg
 
Back
Top Bottom