You are using an out of date browser. It may not display this or other websites correctly.
You should upgrade or use an alternative browser.
You should upgrade or use an alternative browser.
Kintsugi Pot Repair
- Thread starter lieuz
- Start date
-
- Tags
- kintsugi lacquer pot repair
lieuz
Chumono
rockm
Spuds Moyogi
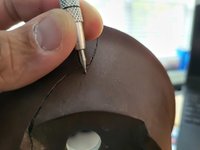
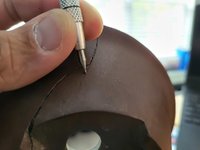
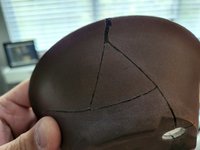
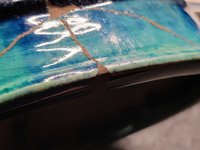
wow. beautiful work on a beautiful pot.Next is this Heian Kosen pot with a crack forming across half the long side of the pot. This repair is to water proof the break so that water won't seep further into the joinery to mitigate the crack from growing any further.
View attachment 493523
View attachment 493524
View attachment 493525
View attachment 493526
View attachment 493527
lieuz
Chumono
thank you!wow. beautiful work on a beautiful pot.
JudyB
Queen of the Nuts
Lovely work. If I ever break another pot I will be contacting you! 
I like how the work blends with the Chasan, but stands out on the Ino and the Kosen.
I like how the work blends with the Chasan, but stands out on the Ino and the Kosen.
lieuz
Chumono
You have a good eye. I like when the gold bulges out. But it's a preference as some like the flush look. I have a consultant whom I work with who does an amazing job at flush kintsugi. It's otherworldly, as if someone just painted gold onto the surface.Lovely work. If I ever break another pot I will be contacting you!
I like how the work blends with the Chasan, but stands out on the Ino and the Kosen.

It's not really for bonsai pots I feel because this is a ton of polishing that needs to happen. Polishing it that much on a bonsai pot can strip the patina and sometimes the glazing which is problematic.
lieuz
Chumono
My mentor lost one of his most cherished trees during the pandemic. What's worse, he lost the pot that held the tree as well. He asked if I would repair it for him, of course I will.


Taping this was easier this go around. I was able to finish 75% faster and pretty much 100% accuracy. I'd tape the edge and have some tape overflow, then I'd take a filer and file the tape against the edge of the joinery site and it'll make a crease and perforated edge so it's pretty much exact.
Next step is to apply the urushi adhesive.
lieuz
Chumono
Attachments
lieuz
Chumono
The bushuan pot is back together and is filled in. The pot had quite a few missing pieces; however, overflow and a piece of binchotan allowed me to file the filler material down to the profile of the missing pieces and a preliminary fill and filing really helped. It's essentially 90% filled with holes and cracks all along the glazed area. The unglazed part is fairly uniform and all filled in with no holes or pockets.
lieuz
Chumono
Here's the pot back together and filled.

Here's the back.

Here's the three areas on the lip that were missing pieces.

Middle missing pieces.

The right missing piece.

Left missing piece.

Here's the front where the broken pieces meet. This was such a deep void I had to fill this space the best I could with a lot of filler material. This is to ensure it'll be watertight.

This is the before. Note the deep void.

Not bad creating the profile from nothing.
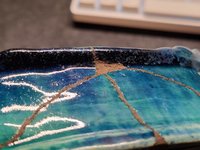
The back.

Going to let these rest for a few days. I'll go back in and fill the remaining holes with filler material and go back with a softer charcoal for a nice polish. Binchotan is like a hard filer and your regular charcoal from a fire pit is great to polish and buff out lacquer.

Here's the back.

Here's the three areas on the lip that were missing pieces.

Middle missing pieces.

The right missing piece.

Left missing piece.

Here's the front where the broken pieces meet. This was such a deep void I had to fill this space the best I could with a lot of filler material. This is to ensure it'll be watertight.

This is the before. Note the deep void.

Not bad creating the profile from nothing.

The back.

Going to let these rest for a few days. I'll go back in and fill the remaining holes with filler material and go back with a softer charcoal for a nice polish. Binchotan is like a hard filer and your regular charcoal from a fire pit is great to polish and buff out lacquer.
Attachments
lieuz
Chumono
The antique Chinese pot has been fully repaired. I consulted with a kintsugi friend, and we both agreed that the appropriate metal pairing would be silver based on the celadon glaze color and the unglazed clay color. The silver won't be trying to fight the warm celadon or the unglazed portions to be noticed. The silver will be very apparent and as the silver oxidizes and naturally tarnishes, the silver should blend well with the pot and patina, aging with the pot.
The client doesn't like an extremely thick repair line; however, when the pot broke, the glazing also seemed to have ruptured outward at some regular frequency throughout the break like Morse code. It's like hairline cracks and then pockets of glazing missing and then it goes back to hairline cracks all around the pot. It was decided it'd be more appropriate to just repair the joinery in a uniform-ish thickness all-around manner.

The interior had a few hairline cracks which I filled in with filler. They were missed initially.

Lessons learned:
- This pot broke at a site where I was able to polish it well without disturbing the patina. Charcoal is hard enough to sand away the patina and there are spots that show this but was hidden under the lacquer and silver.
- When the pairing is correct, it's quite pleasing to the eye. Not all repairs need gold.
- It was interesting to feel the clay body of antique pots. This is one soft pot, compared to Sara Rayner, her pot's clay body is like diamonds. It was very hard to file down an edge.
- The pressure of repairing this pot was serious. Really glad I can take on repairing older pots without causing too much detriment to the patina.
The client doesn't like an extremely thick repair line; however, when the pot broke, the glazing also seemed to have ruptured outward at some regular frequency throughout the break like Morse code. It's like hairline cracks and then pockets of glazing missing and then it goes back to hairline cracks all around the pot. It was decided it'd be more appropriate to just repair the joinery in a uniform-ish thickness all-around manner.

The interior had a few hairline cracks which I filled in with filler. They were missed initially.

Lessons learned:
- This pot broke at a site where I was able to polish it well without disturbing the patina. Charcoal is hard enough to sand away the patina and there are spots that show this but was hidden under the lacquer and silver.
- When the pairing is correct, it's quite pleasing to the eye. Not all repairs need gold.
- It was interesting to feel the clay body of antique pots. This is one soft pot, compared to Sara Rayner, her pot's clay body is like diamonds. It was very hard to file down an edge.
- The pressure of repairing this pot was serious. Really glad I can take on repairing older pots without causing too much detriment to the patina.
lieuz
Chumono
This pot I'm repairing for my mentor is now fully filled and polished. There were quite a bit of missing pieces due to blowout when impacted. The missing pieces were so fun to create and once polished, it's indiscernible by touch. This pot is by Touinken (Tong Yin Xuan) Yixing quality Chinese bonsai handmade pot. Next step would be to gild the piece in gold.
Note the lower portion filled and polished. That site was missing ceramic material.

Note the top missing piece, after polishing, it's so smooth.


Note the lower portion filled and polished. That site was missing ceramic material.

Note the top missing piece, after polishing, it's so smooth.


lieuz
Chumono
You learn something new everyday. For the most part, my kintsugi polishing process uses a good majority of natural items to sand or polish surfaces. Binchotan is my go to for filing down excess filler material, a softer charcoal is employed to polish the filling material. I have learned there's another sanding material that can be used to polish the finishing lacquer, which means it's much softer than charcoal. Rather than filling the smallest holes with filling material, a finishing lacquer is used to allow for it to seep in and fill. Once filled, I can use the dried up parts of a plant called "tokusa" which is known as the "rough horsetail" or Equisetum hyemale. Seeing it in the wild, I was able to grab all the dried bits and processed them into small little short 2 inch cylinders. I'm currently awaiting this piece to have its finishing lacquer to cure. Once fully fured, I will be applying the tokusa plant to it to see how it measures up to say, 400 grit sand paper. I'll go back over with a red lacquer for this piece will recieve gold dusting.
Here is the plant. Note the dried up segments.

The dried up segments will naturally dry with ridged grooves in them which probably makes for a good sanding/polishing surface.

Here is the plant. Note the dried up segments.

The dried up segments will naturally dry with ridged grooves in them which probably makes for a good sanding/polishing surface.

lieuz
Chumono
The painting of the first layer of finishing lacquer and sanding filled in the smallest of cracks. The surface is now very very smooth after sanding with charcoal, the tokusa plant was great as a polishing material. Here's a side by side of what the surface looks like.
A fairly thick glob of the lacquer was allowed to sit and cure on the surface and after sanding and polishing, the joinery is invisible to the touch.

A fairly thick glob of the lacquer was allowed to sit and cure on the surface and after sanding and polishing, the joinery is invisible to the touch.

lieuz
Chumono
I've been made aware of this handy tip from a friend, that there's a proper way to test to see if a surface painted with refined lacquer is ready for metal powder application. Rather than touching it, breathing on it with a breath of condensation will reveal how ready a surface is. You can time this down to the minute of when a surface is fully ready. Condensation won't form on a surface where the lacquer is still wet. So when it's not ready, I just put it back into the humidity chamber and just wait for it to cure some more and this can be in a matter of minutes.
Wet/Dry


Wet/Dry


Wet/Dry


Wet/Dry


Wet/Dry


Wet/Dry


lieuz
Chumono
Finished repairing this contemporary Chinese Touinken (Tong Yin Xuan) pot with traditional kintsugi methods. My mentor was kind enough to include me and asked as the repairer to sign, I don't sign repairs usually so I placed it on the inside than on the exterior. This repair was super fun and pays respect to my mentor who lost the root stand and tree that lived in this pot that was his favorite trio. He said this will be only used for display now.


You are very talented and your patience level is off the charts for sure. I have to assume that you just really enjoy the challenges of doing this with the accuracy and determination that you do it with, and you deserve a high metal for your research and sharing this with the community. I just don't know what % of bonsai folks would put a favorite tree in a repaired pot and display it. No offense meant Lieuz, but I would not be able to do that.
lieuz
Chumono
None taken. Thank you for your kinds words. I bet that percent is quite small, some either don't live in an area where frosts happen or the pot is quite small but generally speaking, traditionally repaired pots are quite strong in a hot and humid environment. I'm also not sure if I'd want to put a prized tree into a repaired pot; however, I did for research and I will report back!You are very talented and your patience level is off the charts for sure. I have to assume that you just really enjoy the challenges of doing this with the accuracy and determination that you do it with, and you deserve a high metal for your research and sharing this with the community. I just don't know what % of bonsai folks would put a favorite tree in a repaired pot and display it. No offense meant Lieuz, but I would not be able to do that.
rockm
Spuds Moyogi
"I just don't know what % of bonsai folks would put a favorite tree in a repaired pot and display it."You are very talented and your patience level is off the charts for sure. I have to assume that you just really enjoy the challenges of doing this with the accuracy and determination that you do it with, and you deserve a high metal for your research and sharing this with the community. I just don't know what % of bonsai folks would put a favorite tree in a repaired pot and display it. No offense meant Lieuz, but I would not be able to do that.
You'd be surprised...
Similar threads
- Replies
- 44
- Views
- 3K
- Replies
- 20
- Views
- 3K


