Kintsugi Pot Repair

Repairing this antique Chinese pot. The bottom literally fell out and is in 2 pieces. Gave this pot quite a bit of thought on how to approach the repair. There is a stapling method but I decided against doing that as I think it's a one-or-the-other approach vs a combination approach. I used mugi urushi to bind the two pieces together and to ensure the piece is tight, I used the string and chopstick securing method to ensure the two pieces were tightly compressed.

20230309_224122.png

20230309_224147.png

20230309_224206.png

20230406_013834.jpg

20230406_013857.jpg

20230406_013912.jpg

Oozing of the mugi urushi is a welcomed sight as I'd want the bond to be tight.
 
is it generally OK for kintsugi bonsai pots to be put back into use
I asked Ryan Neil about this. As long as "cement" is organic compound it will soften/break down from H2O exposure😖. H2O proof epoxy/cement will not😌.
 
Repairing this antique Chinese pot. The bottom literally fell out and is in 2 pieces. Gave this pot quite a bit of thought on how to approach the repair. There is a stapling method but I decided against doing that as I think it's a one-or-the-other approach vs a combination approach. I used mugi urushi to bind the two pieces together and to ensure the piece is tight, I used the string and chopstick securing method to ensure the two pieces were tightly compressed.

View attachment 480822

View attachment 480823

View attachment 480824

View attachment 480825

View attachment 480826

View attachment 480827

Oozing of the mugi urushi is a welcomed sight as I'd want the bond to be tight.
Just wanted to tell you that I'm enjoying your journey so much, thanks for sharing.
 
Just wanted to tell you that I'm enjoying your journey so much, thanks for sharing.
Kintsugi is such a waiting game, I keep thinking to myself that if I don't set the bones, it won't heal. The earlier I set it, the sooner I can do the next step. Waiting can sometimes be 3 weeks so you'll likely seen a burst of repairs and then a period of nothing for a while haha.
 
Next on the docket is this Shigeru Fukuda (Bushuan) pot that broke into 4 pieces. This pot is fairly new and did not develop a patina yet; therefore, it allows me to be a bit more aggressive when polishing lacquer.

The Bushuan pot needing repair. The break is pretty much down the middle. What you don't see are the glaze pieces that shattered and not recoverable.
336185023_1358090521619021_809635980047002887_n.jpg

Holding the pieces together by hand just to assess reconfiguration and missing pieces.
336345662_725045705753658_4705459511386994491_n.jpg

As I feared, here are some broken pieces of glaze.
336484275_591947892818462_5727411539576292887_n.jpg

More breaks in the glaze.
336488549_180580134752324_9009472889578268683_n.jpg

This is a huge hole. Filling will be interesting. Will probably have to consider a different mix of filler material for added strength and shortened curing time.
336528228_599051268924472_661397702549097131_n.jpg

After filing the edges down, you can clearly see fault line. Tape was added and pieces were put back together to ensure after sanding pieces didn't shift.
338273266_221862070429024_4561100888608535097_n.jpg

Applied a generous amount of urushi and pieced the pieces back together. Tape was used to secure the two smaller pieces in place all while using the string and chopstick to lock in the pieces tight in place.
338168515_165313043082030_3096584477896166313_n.jpg

Another angle.
338281616_207049808615348_859406649334368152_n.jpg

Bottom chopsticks are there to allow for the pot to sit on another pot and so string doesn't touch the urushi underneath.
338256127_194763933267349_2736258685380632311_n.jpg

Here's the muro (humidity chamber filled with repaired pieces. 4 pots and 3 plates.
338361943_219847277395766_855163969731886435_n.jpg
 
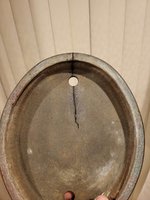
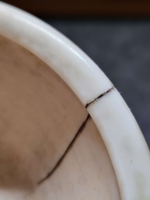
I have a 15" x 7" or so oval Nakawatari Chinese pot I got from Matt O. a while back. Got it at a discount because it has a five to six inch long crack in one side of it. It's not come apart, but I'd like to keep it in one piece. Do you do repairs like that?
 
I have a 15" x 7" or so oval Nakawatari Chinese pot I got from Matt O. a while back. Got it at a discount because it has a five to six inch long crack in one side of it. It's not come apart, but I'd like to keep it in one piece. Do you do repairs like that?
Sure can. I scribe the crack to widen it slightly which helps to impregnate the fault line with lacquer when I apply the initial round of lacquer. Those are easy fixes and in the grand scheme of things, holds up better. Is the crack on the inside or outside?
 
Returning back to the Heian Kosen pot. After the initial taping, I realized it taping didn't stop the flow of the raw urushi. Some of it seeped out and caused an uniform line.

340444449_1665756393859716_5626256609213311581_n.jpg

339796838_735590531382882_6730131028801684695_n.jpg

340285010_1403178586892029_3563893146198231104_n.jpg

A light sanding was applied to help with the removal of urushi stain on the unglazed surface. I struggle a bit on unglazed surfaces but they generally get buffed out and fades.
 
After a day of letting the raw urushi set. I retaped the crack and created a general channel for the filling urushi to set in. This takes about 2-3 days for it to set enough for me to remove the tape, revealing the set outline. The results are clean and to my liking, the next step would be to sand down the filler material and reapply the filler material.

340394604_1433336050773347_2110562204940920608_n.jpg

340385185_883313549426575_6098124094071945802_n.jpg

340470264_781023796552144_7270342875867997351_n.jpg

340244004_170077885947367_1344719243007498922_n.jpg
 
I started the Sara Rayner pot on the 20th of March. Since then I had to reshift a few pieces as the curing process had made some of the pieces go out of alignment. But it's 3 weeks since the repair and the urushi has hardened enough to proceed. I used a small hand chisel and removed a lot of the excess urushi that oozed out of the joinery.

Here is an overview. The shape is uniform, everything seems to be in alignment. The urushi on the unglazed is harder to control as there are a lot of textures and uneven planes that can carry the liquid urushi away from the main site.
339936992_768897161410450_8233099273207822528_n.jpg

The joinery is clean on the glaze.
340536448_3506758426206073_5529623575396555309_n.jpg

There is a previously undiscovered hairline crack that after further assessment it was discovered.
340774792_637574934847950_6964344852213796565_n.jpg

I had to use a scribing tool to open up the crack on the surface level. Will apply raw urushi in to seal the crack. Then it will be treated as part of the repaired joinery filled with sabi urushi which is the filler lacquer.
340512597_254465373595694_5430533529502579888_n.jpg

Some sites will require larger filling. These sites will be taped off so that I can sculpt the missing pieces.
340810569_259160579784929_4901188458839252485_n.jpg

Lines are cleaned using 400 grit sand paper at first, and then a lump of charcoal as a follow up. The charcoal was much better at removing the urushi vs sand paper. It also doesn't damage the glaze which is good.
330137034_195124516319959_409147882610310768_n.jpg

The next steps are to fill, using sabi-urushi (clay-infused lacquer).
 
A study group member has a porcelain pot by Heian Koso but painted by Chazan. There was a large crack that formed on both the interior and exterior. Unfortunate that it cracked; however, fortunate it cracked where it bypasses what appears to be the main painting with some kanji and a character. This appears to be the front of the pot and can still be used. It's not cracked all the way.

20230409_230753.jpg

20230409_230756.jpg

20230409_230742.jpg

20230409_230805.jpg

These are considered to be the easiest of repairs because it didn't crack all the way to be considered broken so I won't have to use the urushi adhesive to glue the pieces back together which means less time to wait for curing. I'll likely use a fine-scribing tool to dig into the crack to expose it a bit more so I can use raw urushi to seal the interior before applying filler material. There is a crack needing sculpting but it's so small it should be formable all while filling.
 
Hoping back over to the Chazan pot.

After scribing I prepped the area with a thin layer of raw urushi in hopes it will penetrate the crack.

1682836546883.png

1682836574946.png

I was also sort of hoping to see if the urushi will really seep into cracks and since this is porcelain, maybe it'll show up.
 
So, proof of concept here, scribing and letting the urushi sit for a few minutes has proved to be helpful. Note how a faint dark line appeared from the other side where I applied the urushi.

1682836865638.png

This means i'll have to rescribe further down to account for this crack. I mean it makes sense because on the other side, the crack goes down pretty far down.
 
Next step is to fill in the prepped space with sabi urushi which is the filling material. This stuff goes on pretty thick to ensure there's enough material to sculp the chipped lip.

1682836963309.png

1682837010979.png

1682837032630.png

1682837051724.png

This will be left to cure for a few days before proceeding to the next step which is sanding/polishing.
 
After a few days, I can proceed with sanding/polishing. I use a lump of unspent charcoal which has proved to be good and it works well. I will probably have to retry the binchotan, but I'm a little apprehensive because binchotan is quite hard. It's almost like sanding with a rock.

1682837225957.png

This honestly came out looking pretty damn good. It's definitely filled in, with a few gaps here and there. Also, note how I cleaned away some of the patina. Couldn't be helped...damn it.

1682837270773.png

The structure from head on looks pretty spot on; however, the bottom up looks off. If you run your hand across, it doesn't feel seemless which is a flaw if left as is.

1682837360248.png

The lip is also a bit off. Polshing polished off some of the filling material. I'll have to refill the gaps with a second round of filling with sabi urushi.

1682837454806.png
 
Readdressed the boundary lines for the filling material to be applied to with masking tape.

1682837575405.png

For uniformity, I'm applying the next round of sabi urushi down the entire length of the crack.

More to come!
 
Back
Top Bottom