Kintsugi Pot Repair

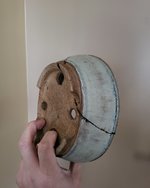
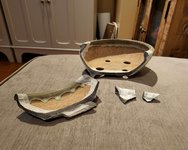
Here's another repair. A friend asked if I wanted more practice, he'd be down to give me his Sara Rayner pot to repair. I accepted. If nothing was done, he would probably hold onto the pieces until he had to throw them out. This pot broke when he was walking backward and bumped into a table and this pot fell and broke. I gave him the disclaimer that this might be a display pot from now on and he understood the conditions.
20230320_222921.jpg

So I accessed it and filed down the edges so I can get more surface area for the urushi to settle into.

image (1).png
VS
image.png
This is definitely an exaggeration but it is visible once pieced together.
 
I didn't want to get the pot messy with the urushi so I decided to tape the entire pot to avoid messing with the patina. This way there's less for me to clean up if I had to clean anything up later.

20230320_222543.jpg

20230320_222618.jpg

20230320_222640.jpg

20230320_222720.jpg
 
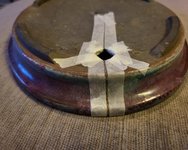
I mixed the adhesive and applied it and pieced the pot back together. To avoid movement of the pieces, a strip of support tape was used to bind the pieces together as it cures in the muro (humidity box).

20230322_013151.jpg

20230322_013157.jpg

20230322_013202.jpg

20230322_013211.jpg

20230322_013224.jpg

20230322_013229.jpg
 
When the repaired pots broke under your weight tests, did the joins fail or did the ceramic break? Ceramic is supposed to be strong in compression but relatively weak under tension
 
That Sara R pot is going to be awesome after the gold dust gets installed… thanks for sharing these! I did a very amateurish version of kintsugi with a shallow tosui using epoxy with gold dust mixed in so as a one step process. The only thing that I dislike about it is the glue oozing out and I didn’t minimize them before it hardened. No drips just a bit more dimensional than nice and flat. But I have been using the pot for a few seasons now and it’s holding up just fine.
 
The
When the repaired pots broke under your weight tests, did the joins fail or did the ceramic break? Ceramic is supposed to be strong in compression but relatively weak under tension
The joints failed. Overall the pieces were extremely solid.
 
That Sara R pot is going to be awesome after the gold dust gets installed… thanks for sharing these! I did a very amateurish version of kintsugi with a shallow tosui using epoxy with gold dust mixed in so as a one step process. The only thing that I dislike about it is the glue oozing out and I didn’t minimize them before it hardened. No drips just a bit more dimensional than nice and flat. But I have been using the pot for a few seasons now and it’s holding up just fine.
I think so too. I did let the people know who are getting these repaired that there is a condition and that it really should be a show pot vs a forever home for trees.
 
I can fill cracks and adhere broken pieces, my biggest challenge is sculpting what isn't there @JudyB .
 
This Heian Kosen pot developed a crack on the bottom that spread to one side of the pot that split it completely on one side. Repairs are underway to stop the crack from developing further. First order of business is to use a scribing tool that has a carbide tip and that is used to run along the cracked areas to create a notch. In theory, the notch is intended to allow for more surface area for the urushi to grab onto; therefore, making a stronger bond. There is a thought that more urushi means more strength, there is another school of thought that counters this. I think the difference is slab thickness, this technique will work with bonsai pots that aren't made of porcelain which can be as thin as 2mm. Thankfully, for bonsai, most pots are fairly thick.

Here is the concept illustrated.

Untitled.jpg
The left is a crack but hasn't gone all the way through the slab wall. The right shows what happens when a scribe tool is run along the crack. A notch is created to hopefully funnel in raw urushi into the crack site.

In practice this is how it looks.
338165827_1298099091061945_6912713209963598354_n.jpg

338188854_6612511968776494_7496264058585713638_n.jpg

338455160_188382936995542_5629815105096543112_n.jpg

339657701_143421165116004_2680471328549855322_n.jpg
 
The scribed area will then be taped tightly along the notched groove. This should allow for a clean line of urushi to form on an unglazed surface. Urushi on unglazed is trouble because it's near impossible to remove with sanding, this is what I want to avoid at all possible.

338294252_1931726053879455_64900479022281932_n.jpg

338261088_254199773608080_8265014833868364400_n.jpg

338218914_1364822710918452_8534890979860703074_n.jpg

I can liberally add a good amount of urushi without worrying it'll go all over the place. Next step is to add the raw urushi.
 
Here is the added urushi. I let it sit for about 5 minutes and then wiped it off ASAP. Urushi tends to turn dark very quickly and becomes super tacky, if I don't remove it, it can be a pain to removed when filling material is applied.

339617544_611525737502498_1243953877942598084_n.jpg

338196669_899380467961796_184086777482233021_n.jpg

338172559_604143581754777_7503570086866548462_n.jpg

338266623_1327588964823728_7543778945960131899_n.jpg

This went back into the (muro) humidity box for a day to let the urushi set. The tape will come off to assess the crack, I'll likely run a cotton swab with turpentine to remove excess urushi. Next step is to add in filler material.
 

Attachments

  • 338218914_1364822710918452_8534890979860703074_n.jpg
    338218914_1364822710918452_8534890979860703074_n.jpg
    28.3 KB · Views: 2
Yeah, putting 4 pieces back together was a logistical nightmare. This would have given me anxiety attacks constantly. That's very unfortunate your Tosui broke :(.
It wasn't that bad, I did it in sections. Then put the sections together. It really came out great stability wise, no wobbles. Just not happy that it has such a higher bead than the pot surface in places. Have thought about trying to sand it down, but worry it might be worse after, so I just leave it alone.
 
Dave,
I can understand the reasoning of trying to keep the repairing process traditional. But they used those bonding materials most likely because it was what they had available during the conception of the process. We've advanced a lot since then and epoxy would be a far superior bonding agent. Have you not considered using epoxy for the repairs? From my understanding many professionals in Japan now are now using epoxy as it provides a stronger bond and dries a lot faster.

Keep up the great work! I really enjoy seeing your repairing pics.
That is definitely a fair point, I actually appreciate you asking me that. Also thank you for the encouragement, coming from someone I know who definitely does good work. While I know epoxy is the better obvious choice to go with regarding strength, I am just drawn to the traditional way. It's not really describable. The process and the feel for it, the philosophy behind it is too intoxicating. I will say, as a counterbalance, I have set a threshold as a limit for myself, any repair of a pot over the size of 7 inches to me is considered risky. I won't consider using lacquer for a pot over that size. The other factor is probably fear, epoxy seems such a hard substance to work with. Lacquer is forgiving and slow and that has its benefits. I can adjust even after a week if I had to.
 
I think, as my skills improve with lacquer, I can 100% see epoxy being the base structural repair with lacquer coming from behind and doing the finishing touches. The polishing of lacquer is the true art because that's how you get very smooth surfaces for the gold to adhere to.
 
Back
Top Bottom