HENDO
Shohin
Hey All,
Sorry if I'm resurrecting an old thread here, but I thought the previous posts were quite helpful so wanted to share my system I just set up using mostly Dig/Mister-Landscaper components.
SOAKER HOSE CONFIGURATION:
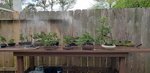
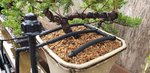
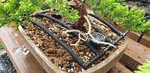
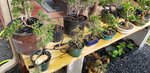
Using the 1/4" soaker hose and going with a "grid pattern" rather than the "ring" around the trunk you usually see, I've managed to get good soil coverage. This method also has the added benefit of not requiring you to break a 1/4" connection to remove the soakers or move the tree - you simply slide the open grid pattern off the soil. You can see the old soaker hose in the picture is still curves, but I will be working to flatten it more so it is flat on the soil - 1/4" stakes will help with this.
OVERHEAD WATERING/MISTING:
Misters are set up in-between the soaker hose junctions at intervals, for foliage wetting in the summer and redundancy for the soakers/soil.
SUPPLY HOSES:
The 1/2" supply hoses are run under the gravel to the junctions under the benches, then up to the bench height and across the length, hidden between the two center 2x4s.
DRIPPERS:
My first attempt using drippers can be see in the second last picture. It works well for my trees still in organic soil.
TIP:
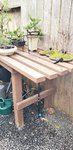
Run a permanent test line on ground level by teeing off of your main supply. Split it into two lines with another tee. Use two 1/4" inline valves for each split. Use these to test run any different types of irrigation component you may want to try out, before plumbing into the main system. This will prevent moving trees around and potentially damaging something in the main system, which takes much longer to set up. Shown in the last picture.
I'll be refining/expanding this system over the next week or so, and will update if I discover any significant opportunities for improvement. So far so good!
Sorry if I'm resurrecting an old thread here, but I thought the previous posts were quite helpful so wanted to share my system I just set up using mostly Dig/Mister-Landscaper components.
SOAKER HOSE CONFIGURATION:
Using the 1/4" soaker hose and going with a "grid pattern" rather than the "ring" around the trunk you usually see, I've managed to get good soil coverage. This method also has the added benefit of not requiring you to break a 1/4" connection to remove the soakers or move the tree - you simply slide the open grid pattern off the soil. You can see the old soaker hose in the picture is still curves, but I will be working to flatten it more so it is flat on the soil - 1/4" stakes will help with this.
OVERHEAD WATERING/MISTING:
Misters are set up in-between the soaker hose junctions at intervals, for foliage wetting in the summer and redundancy for the soakers/soil.
SUPPLY HOSES:
The 1/2" supply hoses are run under the gravel to the junctions under the benches, then up to the bench height and across the length, hidden between the two center 2x4s.
DRIPPERS:
My first attempt using drippers can be see in the second last picture. It works well for my trees still in organic soil.
TIP:
Run a permanent test line on ground level by teeing off of your main supply. Split it into two lines with another tee. Use two 1/4" inline valves for each split. Use these to test run any different types of irrigation component you may want to try out, before plumbing into the main system. This will prevent moving trees around and potentially damaging something in the main system, which takes much longer to set up. Shown in the last picture.
I'll be refining/expanding this system over the next week or so, and will update if I discover any significant opportunities for improvement. So far so good!
Attachments
-
 20200314_170651.jpg184.7 KB · Views: 151
 -
 20200314_170727.jpg214.6 KB · Views: 163
 -
 20200314_171022.jpg202.6 KB · Views: 156
 -
 20200314_171114.jpg206.7 KB · Views: 158
 -
 20200314_171134.jpg237.3 KB · Views: 158
 -
 20200314_172501.jpg225.8 KB · Views: 150
 -
 20200314_170741.jpg267.1 KB · Views: 147
 -
 20200314_174340.jpg293.2 KB · Views: 144


