lieuz
Chumono
Update on this pot repair. I’ve added the design back into the repair.

Here it is gilded with tin.

Now to wait for it to cure.
Here it is gilded with tin.
Now to wait for it to cure.
Nice job! I have Jim Flanagan pot similar to this one. Really like the Southwestern designs on them. Glad you reconstructed it.Update on this pot repair. I’ve added the design back into the repair.
View attachment 548619
Here it is gilded with tin.
View attachment 548620
Now to wait for it to cure.
I'll smooth it down considerably, the string's fibrous material is what I'm after to create a strong bond. Eventually, it'll look like a band around the handle.I like the string added to the handle, will it remain when the repair is complete?
Thank you! I got a chance to see him at the PBA show, he explained his design concepts to me and I showed the repaired piece to him and he was quite content in seeing it being repaired.Nice job! I have Jim Flanagan pot similar to this one. Really like the Southwestern designs on them. Glad you reconstructed it.


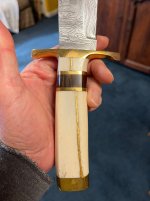
Are you going to cover the string or treat it with something for coloration? I like the texture it adds.The cup handle is officially cured and rock hard. I had sanded down the mugi-urushi string reinforcement to reveal the string fibrous material very secured into the mugi-urushi. It's now very hard and able to take on quite a bit of weight. So far, the tested weight is 10 lbs. That's pretty substantial and enough for this cup since nothing will be in the cup that'll be 10 lbs or more.
Here's what sanding revealed. The string has bounded to itself and to the mugi-urushi.
View attachment 551667
The are more frayed fibers but I've burned it off to keep things tidy for the next step.
View attachment 551668
The underside was a bit harder to sand. I left the underside a bit more bulky for support, less sanding than the top.
View attachment 551669
Fairly uniform, the string is going to provide a great amount of support. Note the ight side is curved a bit, I sanded it a bit too much and will have to come back with filler anyway to level it out. No worries.
View attachment 551670
Next step would be to tape this back up and reapply sabi-urushi to bind the entire top together before I buff the area out with charcoal. Should look pretty good! Going to bring this to work to show my coworker the work in progress.
Yeah, I'm going to cover it up. The texture is pretty cool. I've seen a lot of examples where the texture is preserved too. I'll have to see how it looks once I polish it down with charcoal.Are you going to cover the string or treat it with something for coloration? I like the texture it adds.


maybe I could send you my pot that was done with epoxy to see what you might be able to do for it… warning, it’s a lot of seams!After this repair, I'll keep it focused it on just bonsai pots haha.

Sure if you're interested! I'll DM you to talk.maybe I could send you my pot that was done with epoxy to see what you might be able to do for it… warning, it’s a lot of seams!


Love it. It adds instead of distracts.After a few more rounds of polish and sanding, I'm ready to call it done before I apply the lacquer for gilding. I gave it a lot of thought @JudyB about your comment about the texture. I think you're right that texture adds something to this repair. I asked the owner and he said he's up for anything. I gave it more thought and wanted to try the texture idea. I didn't want to use the ribbed texture, although, I think that'd be a great texture for gripping. I wanted it to be organic like the cup design. It dawned on me that the lacquer itself can create some naturally interesting designs.
Generally speaking, this is a taboo no no when it comes to kintsugi repair, mainly because it shows impatience. Basically, if you load up polishing lacquer and you apply it to the surface, if the outside lacquer cures quickly, it'll contract within and create these very weird striations. They're not always the same striations, but it's in general a wrinkly looking texture. So it shows that you can't control lacquer application and, you can't control the humidity well enough. Amateur hour, if you will. However, if you're intentionally doing so to get an effect, this is an awesome technique.
View attachment 557246
View attachment 557247
I can't wait to see what it looks like gilded.