Ebihara maples

No, I never thought of that... my gut tells me, that doing so might make the robins even happier!... ha ha!

I could always "thief proof" the top of the soil with chicken wire, but I think the birds are much more of a help than a hinderance as they are foraging... I'll try a tree or two as you suggest next spring... it might work.

Thanks.

Well - maybe give it a try. Can't promise they'll leave it alone, but we have robins and the haven't bugged the trees with sphagnum more or less than the others. Just take your largest sieve and rube the sphagnum through it. You'll end up with a soft pile of milled sphagnum - no good for birds nests at all. Spread that on your tree.

Scott
 
I see you used the double helix wiring technique!
I saw that Peter Warren shows that "double helix" method of wiring in his book....
It looked strange to me at first, every other wiring tutorial I've seen shows the wires touching each other....guess it doesn't much matter.
 
I saw that Peter Warren shows that "double helix" method of wiring in his book....
It looked strange to me at first, every other wiring tutorial I've seen shows the wires touching each other....guess it doesn't much matter.

Usually that's what you do - it looks neater. But when you're putting a big bed in a lignified branch, separating the wire provides more support and helps prevent splitting.

Scott
 
That was a fascinating video, Scott! There were lots of little techniques to pick up on. Does leaving the "floating wedge-shaped" branch up on top aid in healing then? I definitely got the impression it's going to be cut off later.
 
Yes. Leaving it on allows the healing above to begin. And prevents die back.

It will be removed later. Maybe next year.
 
That was a fascinating video, Scott! There were lots of little techniques to pick up on. Does leaving the "floating wedge-shaped" branch up on top aid in healing then? I definitely got the impression it's going to be cut off later.

He does a lot of good work on this tree. The idea behind the wedge cut is to help close the wound before the branch is finally removed - it's a smaller cut and you have the additional growth of the partially removed branch to help promote the healing. Looks like this picture from Ebihara's garden, doesn't it?

Scott
 
Last edited:
He does a lot of good work on this tree. The idea behind the wedge cut is to help close the wound before the branch is finally removed - it's a smaller cut and you have the additional growth of the partially removed branch to help promote the healing. Looks like this picture from Ebihara's garden, doesn't it?

Scott
That grafting method is insane!
Ebihara was truly a great mind in the bonsai world.

Aaron
 
He does a lot of good work on this tree. The idea behind the wedge cut is to help close the wound before the branch is finally removed - it's a smaller cut and you have the additional growth of the partially removed branch to help promote the healing. Looks like this picture from Ebihara's garden, doesn't it?

Scott

Thanks for the reminder. :) I HAD seen that technique before! I probably need to re-read this full post to refresh my memory of other things as well.
 
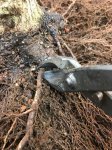
I worked the top of the soil down first, scraping radially away from the trunk with bent nosed tweezers
2C1BB492-E538-4C53-83D2-8D839481E5D3.JPG

As I worked the soil down, I found occasional upward growing roots. These should be eliminated. This one:
6591A64F-8BA8-49DC-A80B-28428B736BC5.JPG

Clearly too high and too strong. It'll need to come off:
7E542CF6-D9B0-4D5E-80C8-3FB3AABCA475.JPG

Scott
 
Bottom of the rootball looks good, but roots had clearly squeezed between the treen and the board. There's been some callousing which pushed the tree away from the board. Between that and the deterioration of the board over time gave some room for roots to squeeze in there. You can see them in this picture:
1997AA43-B224-4761-92E3-35F13B9DC067.JPG

I worked the rootball flat again, eliminating all downward growing roots.
34E31684-DC2F-47CE-ACC7-0DC9C029AF57.JPG

Remember, the goal is to produce roots that emerge from the tree all at one level. So when you're working the bottom of the nebari flat, it's a good time to cut roots that emerge from the nebari too low.
 
Then, screw the tree down to the prepared board. I use 2 1/2" star drive exterior deck screws. I used three screws to attach the tree firmly to the board. Here's the board - solid pine and a couple inches smaller than the Anderson flat it will be potted in.
87F37805-5322-46CC-93F4-B5F247A18C1B.JPG

Here's the tree attached to the board. I should have done this before. It's nice to have a measure with a scale for reference.
169A851F-7D31-43AB-A099-164F45BD1FC6.JPG
 
Bottom of the rootball looks good, but roots had clearly squeezed between the treen and the board.
Somebody tried to convince us that the small roots fuse - I'd say this is pretty good evidence that they don't really fuse.
There's been some callousing which pushed the tree away from the board. Between that and the deterioration of the board over time gave some room for roots to squeeze in there.
Man, I bet you wish you would have started with an air layer. I'm sure this trouble wouldn't happen with an air layer.

Thanks Scott. This is an interesting thread.
 
Back
Top Bottom