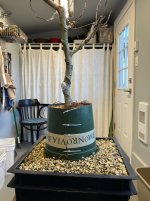
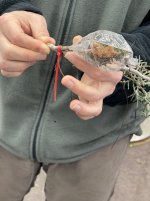
What did you do today? Show us Pic Required

Working on a copper beech that needed some nebari improvement. The major roots were directed downward from typical landscape nursery development. I chose to attempt to improve surface roots with a ground layer approach. Here are the results after a two year wait with this approach. The root ball is now 2 1/2 inch depth down from 7 inch. With a nice radial display of roots to be developed. This allows for proper repotting and selection of a suitable bonsai pot next time around. Lots of other work to complete on this project but a sizeable improvement on the nebari. One trick I employed was to drill small holes where roots were desired and stuff in a bit of sphagnum soaked in root gel. Worked like a charm. Note the picture with heavy roots cut flat at the bottom. this shows the diameter of the downward roots from being kept too long in a nursery pot before upsized. Problem fixed can now work towards a proper sized and much shallower bonsai pot.
 

Attachments

  • IMG_3962 2.jpeg
    IMG_3962 2.jpeg
    439.1 KB · Views: 116
  • IMG_3961 2.jpeg
    IMG_3961 2.jpeg
    551.5 KB · Views: 64
  • IMG_3959 2.jpeg
    IMG_3959 2.jpeg
    788.3 KB · Views: 56
  • IMG_3958 2.jpeg
    IMG_3958 2.jpeg
    484 KB · Views: 54
  • IMG_3955 2.jpeg
    IMG_3955 2.jpeg
    519.7 KB · Views: 53
  • IMG_3953 2.jpeg
    IMG_3953 2.jpeg
    326.7 KB · Views: 81
Had a bit too much fun repotting one of my pomegranate stumps. I found a better root ball than I expected and have been wanting to try this technique, so I went for it.

Not my best work but not my last, and I'm happy to have the experience. I guess I'll finish cleaning up the chop in spring as I clearly got distracted...
 

Attachments

  • pomegranate-2-photo-3.jpg
    pomegranate-2-photo-3.jpg
    124.5 KB · Views: 68
  • DSCF9517.JPG
    DSCF9517.JPG
    179.3 KB · Views: 58
  • DSCF9519.JPG
    DSCF9519.JPG
    398.6 KB · Views: 54
  • DSCF9527.JPG
    DSCF9527.JPG
    132.3 KB · Views: 60
Had a bit too much fun repotting one of my pomegranate stumps. I found a better root ball than I expected and have been wanting to try this technique, so I went for it.

Not my best work but not my last, and I'm happy to have the experience. I guess I'll finish cleaning up the chop in spring as I clearly got distracted...
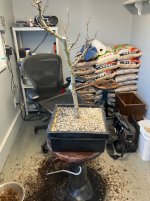
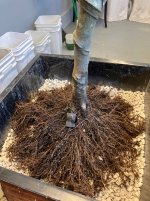
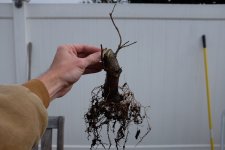
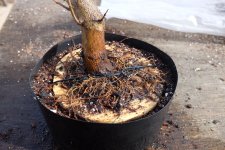
Easy way to do this is drive a small stainless screw through the wood and into the base of the tree, can drill a couple holes and wire the wood down easily as well.

Photo tax, mail delivered 22 Anderson flats, these new 14ish inch pots that were much more affordable as well, some seedling pots, and 60x 10 inch bulb pots.
20250117_200702.jpg
 
Better half and I had John Eads (@JEads) come up to do a grafting workshop. 2 days/13 folks in the workshops.

View attachment 580600
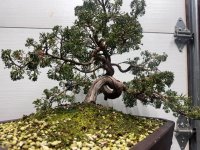
I'll try to remember to come back and add a new picture to this thread later. Be careful with the long cut to make sure its straight. It could be the angle of the picture, but this one looks curved. The curvature creates separation which is the opposite of what you want to ensure the graft takes. I didn't get pictures, but Boon found a new technique (new to him at least) that ensures this cut is straight, but I don't have pictures of it yet, and it may not work on all species.
 
Be careful with the long cut to make sure its straight. It could be the angle of the picture, but this one looks curved.

…. I didn't get pictures, but Boon found a new technique (new to him at least) that ensures this cut is straight, but I don't have pictures of it yet, and it may not work on all species.

Pictures can be deceiving.. that’s for sure. In any event this was a practice cut. Regretfully couldn’t take an image of an actual cut as there was no time to do so.

…Wondering, does Boon still finish off his grafts with a zip tie around the graft?

Cheers
DSD sends
 
Too cold for hike, and dog park so winter pruning and wiring this trident maple. Top is still too simple and probably a bit too tall, but a work in progress. Going to let it grow wild next season on the apex branch to see if I can get some thickness added.
IMG_6424.jpegIMG_6425.jpeg
 
Going to let it grow wild next season on the apex branch to see if I can get some thickness added
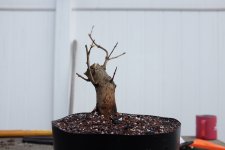
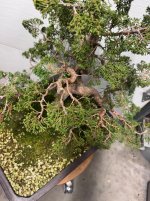
Spot on, simple comment revealing excellent development technique. At the same time a bit more length on the left will add to the overall unity I think.
Nice tree.
 
[QUOTE="River's Edge, post: 1167943, member: 23025"At the same time a bit more length on the left will add to the overall unity I think.
Nice tree.
[/QUOTE]
Excellent suggestion, thank you Frank.
 
Pictures can be deceiving.. that’s for sure. In any event this was a practice cut. Regretfully couldn’t take an image of an actual cut as there was no time to do so.

…Wondering, does Boon still finish off his grafts with a zip tie around the graft?

Cheers
DSD sends
Depends. Here’s one of the example Scion grafts.
 

Attachments

  • IMG_3802.jpeg
    IMG_3802.jpeg
    247 KB · Views: 42
IMG_20250120_213237359.jpg

In spring, my little freeloaders are being banished to the porch, permanently. The grow light is like 6 inches from them. Hope the evergreens will make it until then.
 
Put just a bit of wire on this tree, but I think I need some guidance from mentors on where to go. And probably wait until it warms up just a bit more for the bigger bends.

Next club meeting is a wiring workshop, so maybe I’ll bring this one and a few of my hemlocks.
 

Attachments

  • IMG_4780.jpeg
    IMG_4780.jpeg
    787.7 KB · Views: 62
  • IMG_4779.jpeg
    IMG_4779.jpeg
    523.2 KB · Views: 69
Back
Top Bottom