You are using an out of date browser. It may not display this or other websites correctly.
You should upgrade or use an alternative browser.
You should upgrade or use an alternative browser.
Seed Sowing Successes
- Thread starter CapeCodBonsai
- Start date
CapeCodBonsai
Shohin
CapeCodBonsai
Shohin
CapeCodBonsai
Shohin
CapeCodBonsai
Shohin
CapeCodBonsai
Shohin
CapeCodBonsai
Shohin
CapeCodBonsai
Shohin
Srt8madness
Omono
jason biggs
Chumono
CapeCodBonsai
Shohin
Japanese Larch
(Larix kaempferi)
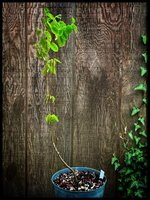
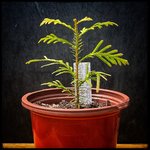
Through the first two growth seasons this little seedling languished for so long, I thought for sure it was a goner. Then last growing season it seemed to find its feet. I was hoping to up-pot this Spring but, life got in the way and I missed my window of opportunity.
Seed Planted: February 11, 2021
Seed Source: Sheffield’s Seeds
(Larix kaempferi)
Through the first two growth seasons this little seedling languished for so long, I thought for sure it was a goner. Then last growing season it seemed to find its feet. I was hoping to up-pot this Spring but, life got in the way and I missed my window of opportunity.

Seed Planted: February 11, 2021
Seed Source: Sheffield’s Seeds
stewarjm192
Mame
Great work folks!
For those of you who grow species that need a cold stratification, how do you do it? I’ve been soaking my seeds in warm water(125F) for 24 hours. The sinkers then get placed on moist paper towels. They are folded into the towel and placed in a ziplock bag and put in the fridge for 30-60 days. That being said, I tend to have a lot of issues with white mold. I have even dusted the paper towels with a small amount of anti fungal spray, both Infuse and copper fungicide, with little change in the white mold. I’d like to have better results next year…….this cuts my seed viability by 50% already, not to mention the number of seeds I have that die in the first leaf pair stage from damping off issues.
I grow seed durring the winter indoors in a grow tent if this helps
CapeCodBonsai
Shohin
I honestly believe the best method (short of a controlled laboratory) would be to mimic nature. If you live in a temperate zone, sowing your seeds that require stratification into a soil mix, outside, in the fall would work the best.species that need a cold stratification, how do you do it?
Having said that, I’m not set up to have a bunch of seed pots in an area protected from rabbits, squirrels, rats, field mice, insects, and competing weed seeds. Plants put out a lot of seeds for a reason . . . it’s perilous out there!
For what it’s worth, here is what I do. I have success (although mixed) and it’s convenient for me. I wash my hands first and sometimes even use a little rubbing alcohol, hydrogen peroxide, or even bleach as I scrub up. I soak the seeds for the recommended amount of time. I only use warm/hot water if I’ve read somewhere that it will increase my success rate. My go to source for this information is Sheffield’s Seed’s.
I use zip lock bags and moist sphagnum moss. Although, there are better choices for the environment, it’s convenient and I have success. I’ve read that sphagnum moss has some natural antiseptic properties and that it restricts bacterial growth due to its acidity. I don’t know how truthful that is . . . I just accepted it as fact. I think keeping your seeds too moist without any air flow is a recipe for mold. The pillowy, sponge-like nature of sphagnum moss provides a good balance of moisture and air. A lot of seeds (if not all) require an exchange of gasses in order to change the chemistry inside the seed so that growth can occur.
I soak the Sphagnum in tap water in a large clean mixing bowl. I use warm water (but only because it feels a little nicer to reach your hands into). I wring out the saturated moss pretty thoroughly to where I am only getting a few drips from my clenched fist. I toss the moss wad into a colander suspended over another large mixing bowl so I can separate and “fluff up” the sphagnum before I start filling the zip lock. I place about an inch of wetted moss into the bottom of the baggie. Using my index finger, I pack some sphagnum into each corner so I don’t end up with any air pockets full of seeds that have filtered to the bottom. I don’t like my seeds clumped together (which I believe promotes mold) so, I spread several seeds in a layer and then add another inch of moss. I continue to layer seeds and moss until I get about 3/4 full (+/-) always ending in a top layer of moss. I don’t squeeze the air from the bag (still wanting to maintain a balance of moisture & oxygen).
Pop them into the beer fridge, set some reminders on my phone, go about life, and let the magic happen!
The Warm Canuck
Chumono
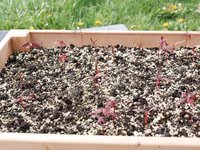
Here's about 500 Japanese Maple seeds and a handful of Manitoba Maple Acer negundo, that I sowed in the fall. The maple seeds where collected off a tree in the fall, soaked for a few days in water, then sowed in some Promix soil. (I sowed the seeds regardless if they floated or not). The Manitoba Maples where just thrown in the mix for my daughter, I doubt they will make suitable Bonsai.




gooeytek
Shohin
I have several large pots on the ground beside my deck that I just dump organic scraps in, and cover with regular soil.
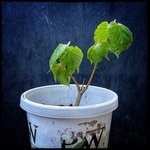
Last year around the end of summer, I found that 3 mango seedlings germinated from one of the pots, so I decided to put them in their own containers. This is one of them. Not sure what I'm going to do with them since they won't thrive in my zone, might have to put them in my girlfriend's greenhouse.

Last year around the end of summer, I found that 3 mango seedlings germinated from one of the pots, so I decided to put them in their own containers. This is one of them. Not sure what I'm going to do with them since they won't thrive in my zone, might have to put them in my girlfriend's greenhouse.

CapeCodBonsai
Shohin
That looks like a simple and effective set-up. I’ve wanted to build custom grow boxes with fitted covers for years now. The only thing I’ve taken the time to put together is an Anderson flat with a 1/4” mesh covering. I sowed seed into two Anderson flats late last fall but, had only bent up one fitted cover before I got interrupted. I had every intention of bending the second cover but, it fell by the wayside. This Spring, I notice some sprouts in the uncovered flat so, I moved the one cover I had onto the sprouting A-flat. I told myself, I’ve got to get around to finishing that second cover. The following morning I returned to a littering of open seed casings covering the surface of the newly unprotected container.Here's about 500 Japanese Maple seeds and a handful of Manitoba Maple Acer negundo, that I sowed in the fall. The maple seeds where collected off a tree in the fall, soaked for a few days in water, then sowed in some Promix soil. (I sowed the seeds regardless if they floated or not). The Manitoba Maples where just thrown in the mix for my daughter, I doubt they will make suitable Bonsai.
View attachment 545559View attachment 545560View attachment 545561View attachment 545562View attachment 545563View attachment 545564View attachment 545565
Maybe next year.
CapeCodBonsai
Shohin
The Warm Canuck
Chumono
Vermin have killed more of my trees than maybe me, well maybe..That looks like a simple and effective set-up. I’ve wanted to build custom grow boxes with fitted covers for years now. The only thing I’ve taken the time to put together is an Anderson flat with a 1/4” mesh covering. I sowed seed into two Anderson flats late last fall but, had only bent up one fitted cover before I got interrupted. I had every intention of bending the second cover but, it fell by the wayside. This Spring, I notice some sprouts in the uncovered flat so, I moved the one cover I had onto the sprouting A-flat. I told myself, I’ve got to get around to finishing that second cover. The following morning I returned to a littering of open seed casings covering the surface of the newly unprotected container.
Maybe next year.
Mad Tabby
Yamadori
That’s why I gave up on chickens at our old place. I got tired of running a predator buffet. Last straw was when they chewed the door to my coop apart, I didn’t hear anything until they were through and by the time I got to the door, I don’t even know who did it.I wish I had taken the time to put up more protection over the years. Sometimes I feel like I propagate from seed just to feed the rabbits and field mice.
These days I’ve managed to fence a small area and have erected some shelving.
CapeCodBonsai
Shohin
Similar threads
- Replies
- 6
- Views
- 700


