Rookies sorting out roots Ebihara don’t look!

Deep Sea Diver

Masterpiece
Messages
4,537
Reaction score
9,511
Location
Bothell, WA
USDA Zone
8b
Nicely done.
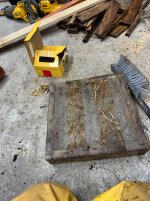
Built my first couple of training pots this week.Seems mine have less drainage than some other pots but maybe also less future repot woes.

Interesting point.

When designing the deck of these boxes , I weighed two competing “goods” …drainage and box integrity.

My goal was to have similar drainage to an Anderson flat, while making the box as light yet sturdy as possible for the least amount of money.

Achieving as close to Anderson flat like drainage, with a sturdy, slimmed down profile and ease in assembly/disassembly became the key objectives.

Ease in tree removal didn’t make my list as a key item. Perhaps it should have been given more consideration… we will know for sure in a couple years!

Cheers
DSD sends
 

clem

Chumono
Messages
780
Reaction score
1,877
Location
Normandy, France
Built my first couple of training pots this week.Seems mine have less drainage than some other pots but maybe also less future repot woes.


View attachment 481203

On my new wood boxes, there is less openings than yours, but no problem with drainage at all. I use no screen, just wood and at the bottom of the box, i let just 2-3 milimeter of space between the wooden planks in order to not let the akadama or pumice particles (3-6mm) fall down (pass through) ->
caisse-IMG_2465.JPG
caisse-IMG_2467.JPG

This wooden box is very large, maybe too large, but it is possible to build smaller ones of course ^^
 

Deep Sea Diver

Masterpiece
Messages
4,537
Reaction score
9,511
Location
Bothell, WA
USDA Zone
8b
Nice likely’ll work well. There is more then one way to skin a cat.

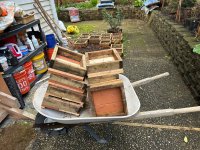
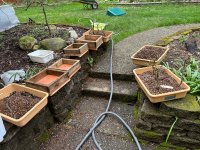
The other boxes I made a couple years ago we decided to just bore big holes and install screws.… and added handles as a go faster option! Built for big clumps.

IMG_4286.jpeg…. IMG_4288.jpeg

Cheers
DSD sends
 

clem

Chumono
Messages
780
Reaction score
1,877
Location
Normandy, France
Very nice wood boxes. Why did you change your boxes bottom now ? (screen at the bottom of your new boxes instead of wood + holes)
Is the garden with the big greenhouse yours ? are you a pro (Bonsai pro /nurseryman) ?
 

Deep Sea Diver

Masterpiece
Messages
4,537
Reaction score
9,511
Location
Bothell, WA
USDA Zone
8b
Very nice wood boxes. Why did you change your boxes bottom now ? (screen at the bottom of your new boxes instead of wood + holes)
Good question. Didn’t like the aeration of the original design. So I was trying to emulate an Anderson flat, maxxing out the aeration factor while creating a box with stability.

Anderson Flats are way too large for what I was trying to do, grow out the little trees in a properly sized box.
IMG_1406.jpeg Anderson flat.

Here are three slightly different designs Scott Eisner, made in Portland.
IMG_1407.jpeg
Is the garden with the big greenhouse yours ? are you a pro (Bonsai pro /nurseryman) ?

No, it was a friends greenhouse in the valley who runs a grow operation. Ours are very much smaller.

cheers
DSD sends
 

KiwiPlantGuy

Omono
Messages
1,051
Reaction score
1,353
Location
New Zealand
USDA Zone
9a
Hi,
If it is of help, I make a variety of box sizes from 6 inch to 12 inch square ( plus custom sizes for my forests). I use insect netting and a few slats on the bottom to hold media and raise the boxes of the concrete or benches etc. I still have most of my boxes still in use 4 years later (treated pine). Also when repotting I take one side off the box, and use a crappy pruning saw to slice the roots off the mesh. 1 or 2 times out by of 50 odd I mangle the mesh and simply rubbish to broken mesh and staple new as it was. Screws, wood, staples and put together reasonably fast.
Charles.
 

pandacular

Omono
Messages
1,715
Reaction score
3,114
Location
Seattle, WA
USDA Zone
9a
Hey DSD, curious if size was the only distinction between a flat and a grow box that was relevant to your needs. If they made Anderson flats in the size you needed, would you have gone with those? Regarding size, how close should I aim to keep the size of the training container to the size of the final pot?

I'm also curious in your thoughts on the main drivers of what make grow boxes/flats successful for tree growth.
 

Cajunrider

Imperial Masterpiece
Messages
6,911
Reaction score
14,166
Location
Louisiana
USDA Zone
9A
Hey DSD, curious if size was the only distinction between a flat and a grow box that was relevant to your needs. If they made Anderson flats in the size you needed, would you have gone with those? Regarding size, how close should I aim to keep the size of the training container to the size of the final pot?

I'm also curious in your thoughts on the main drivers of what make grow boxes/flats successful for tree growth.
  1. The grow boxes and flats make it easy to grow flat root base for bonsai.
  2. Tie downs for branch shaping are easy to do with grow boxes.
  3. Grow boxes provide excellent protection for temperature swing, keeping temperatures at the roots stable.
 

Deep Sea Diver

Masterpiece
Messages
4,537
Reaction score
9,511
Location
Bothell, WA
USDA Zone
8b
If they made Anderson flats in the size you needed, would you have gone with those?
Good question. Of course if Anderson flats were available in sizes that would be convenient, that might be a go to for some hobbyists. In this case there aren’t any in the sizes needed.

In practice Anderson flats can be fragile, especially in the cold. It’s quite common to see used flats with chipped or broken sides.

Properly constructed wood boxes aren’t so fragile, but these can rot pretty fast depending on the surface they are are placed on. The ones built at PBM are on benches and are well into their third year now and are in good shape.

Anderson flats don’t breathe on the sides like wood boxes do. This attribute of wood creates a distinct advantage for wood boxes imho.

That said, if one if doesn’t have the equipment and skill to make a wood box, I’d say they should improvise. My favorite is to use cut down nursery pots with holes bored in the bottom and sides…but we’ve access here to many different sizes of these pots.

Regarding size, how close should I aim to keep the size of the training container to the size of the final pot?
The guide I use is the diameter of the roots when flared out plus a couple inches all around. This allows the roots to grow horizontally for a good distance before meeting the sides and diving into the soil (if on the ground) or wrapping around the sides.
I'm also curious in your thoughts on the main drivers of what make grow boxes/flats successful for tree growth.
@Cajunrider has done a great job of answering this question, so I’ll leave this one alone as I have to board a plane now.

Cheers
John sends
 

pandacular

Omono
Messages
1,715
Reaction score
3,114
Location
Seattle, WA
USDA Zone
9a
thanks so much for the answer. have a safe flight, and an easy journey home! SeaTac has been crazy this summer (if you're flying into there).

I've done some searches on threads about grow-boxes, but I couldn't find the thread you mentioned with CJR. I have one of his bald cypresses arriving today, and the rot issue is the exact reason I'm avoiding a wooden box for that thirsty beast of a tree.
 

Deep Sea Diver

Masterpiece
Messages
4,537
Reaction score
9,511
Location
Bothell, WA
USDA Zone
8b
Update 3.2024

This year we are going to leave the roots alone for JP and Tridents, except to trim off any protruding roots under the boxes. This will keep the nebari of each tree flat.

The top hamper will be adjusted for each tree to correct any previous errors and build a superstructure. So biting the bullet.

About 1/3 have mistakes made early on which will require a cut down to the point we are either only on t(e second level up, or .cut back all the way to two small branches. This isa hard lesson to learn, but also the price of early ignorance and good horticulture.

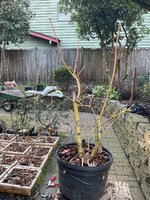
Fist a laggard Pacific Fire Vine Maple was discovered that needed to be boxed up.

Tree before cut down

IMG_0142.jpeg

Adjusting the nebari and all boxed up.

IMG_1019.jpegIMG_1020.jpeg

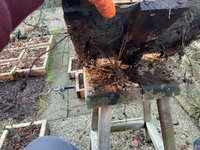
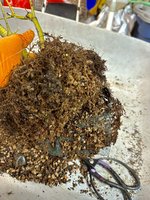
On to the others. Trimming the roots off of the metal screening of the box. Some have only a little protruding roots, some more.
IMG_0138.jpegIMG_0144.jpeg

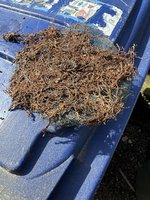
Nothing like those found on the test nylon screening!

IMG_1017.jpegIMG_1022.jpeg

All boxes cleaned and ready to go back on t( evround!

IMG_0139.jpegI

That’s all for now.

Next steps. Near term plan, grow the trees out with top sacrifices. Next spring, work the roots and trim / adjust superstructure.

cheers
DSD sends
 
Top Bottom