Rookies sorting out roots Ebihara don’t look!

Deep Sea Diver

Imperial Masterpiece
Messages
5,226
Reaction score
10,845
Location
Bothell, WA
USDA Zone
8b
We got tired of our fledgling maples etc tossing out roots wherever and decided to see what could be done.

29 trees later we think we’ve got the basics. Now we are only hoping these lil guys will take the pummeling they received!

Here’s just a few shots of the trees. Not necessarily the best examples, but the phone kept slipping out of my hands so I put it away after a bit,

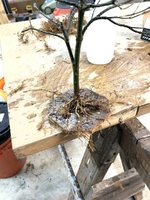
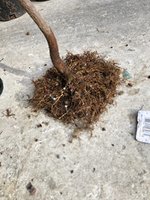
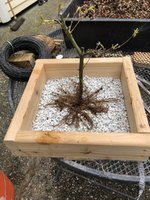
Spread out roots before tie down. Half done here. I think this was one of the tridents? Maybe not...!
C491C788-244A-4B38-98F7-EBCC66653BF5.jpeg

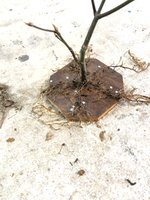
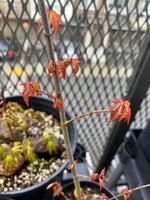
We found our Japanese maples seemed to put out a better halo of roots from the getgo compared to our Trindents
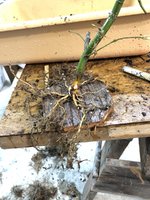
B62EB6C3-93AD-4F27-98DF-EF90A2ECA7D6.jpeg


E114113A-0959-4FF7-A683-6CEF6C27E3E1.jpeg

28E94170-C820-4F48-8BEA-9ABF629190EF.jpeg

This cherry was more obliging, yet it got a severe root whack! Ready for a tie down...
1584887B-BA7B-4B3B-95E4-BB17D787F0D4.jpeg

Miyasama (sp?) trident getting put back into the pot.
4318A6BF-4340-4832-8E44-56C428BBD8DC.jpeg

We put a layer of whole sphagnum moss on top of the surface, just as a precaution as e are still getting near freezing temperatures. Then into the cold frames they went. Got our fingers crossed.

If they survive, the plan is to take a peak at the roots next spring, possibly slip pot the littlest into bigger digs and rework all in the second year. Don’t think the plywood will last more that anyways. Next time they get worked it will be cedar.

As it is our first time at technique, any constructive comments are most welcome.... next event for us repotting a couple dozen azaleas!

Cheers
DSD sends
 

Attachments

  • 2E40EEFA-6BD3-47EA-897B-FCCA087861A2.jpeg
    2E40EEFA-6BD3-47EA-897B-FCCA087861A2.jpeg
    225.7 KB · Views: 364
  • 692C951D-85A5-4966-8ED2-7181428DD969.jpeg
    692C951D-85A5-4966-8ED2-7181428DD969.jpeg
    227.1 KB · Views: 419
Last edited:
Did you cut the roots back to the edge of the wood, or did you leave them long?
 
Follow up. The record breaking Heat Dome event the final week in June/early July last year wrecked havoc though many reworked bonsai in Puget Sound. Not surprisingl, these little maples did well, only a couple succumbed to the 110-114 heat. A larger percentage of the larger ones went down in flames. Experiments can be costly when Mother Nature gets her dander up.

It’s time to pull last year’s maple’s out of the pot to inspect and up pot. Pushing the power curve on repotting! We finished up on 15 yesterday

All now have lots of roots and many pushed off their plate. Need to install new base plates
27E78E08-FE50-44B0-AF77-18AF92BD50B0.jpeg

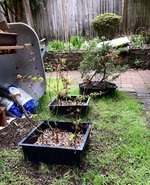
Next step plant groups on plates in Anderson flats to build girth.

DD991E0B-1320-4105-AEC2-5BEB31ED0ED2.jpeg.
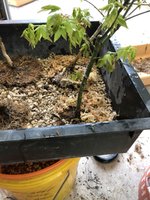
Adding Sphagnum moss to areas that need more roots (scratch the bark too).
7366093E-7CCB-4D07-AE8B-E532AC04958D.jpeg9DB8AB25-6703-41FE-B4FD-D564FECDF852.jpeg

Trying out Biochar this year on select trees. These join the Guinea Pigs!
C7C54797-F9DA-4C71-B45E-8B87A0E1750F.jpeg

Watered in and bedded down for the next months.
375DE5DD-9B0D-46C4-8A39-E8485231176C.jpeg
Future plan. Grow out at least a year. Inspect next year. Then maybe less per pot, or if room put in ground with larger plates.

cheers
DSD sends!
 
Final day of root work on 21 young maples.

Had to make pots out of cut down 3gal pots, idea from @HamburgerTrain used 2 of his from azaleas he kindly give me that were moved to Tokoname pots.

Sloppy cut down, but in a hurry for daughter’s birthday party today.
24F4E82D-D10D-44F9-91E7-F40BA32F3D3D.jpeg

Modification: Drilled holes in bottom.
60F8D432-28AF-43E7-83C2-0B9799171F5F.jpeg

Unpotted trimmed and repositioned roots on the last three maples.
2B84276C-C029-4C61-8D56-A9203E68FF53.jpeg

Positioning and tying down
BBE24390-24BD-45B2-9831-D8F8C96C5E89.jpeg

Adding Sphagnum at weak areas and places where roots cut bak hard. (Pretty much all over 😉).
385A4A5B-F21E-46D2-A95A-2A1B79EBC13C.jpeg

Added top media etc.… and Bob’s your Uncle

We’ll be pulling these out of the media again next year and inspecting their nebari. We should be in good shape and possibly uppotting each situation.

From now on the focus is on health and styling.

cheers
DSD sends
 
Tons going on in your garden and looking good. Will you be setting up the roots to self-prune?
 
Thanks. Lots more to do, but I’m grounded for a couple weeks, so most things will have to wait until then.

Yep, sort of 😎

Cheers
DSD sends
 
Follow up. The record breaking Heat Dome event the final week in June/early July last year wrecked havoc though many reworked bonsai in Puget Sound. Not surprisingl, these little maples did well, only a couple succumbed to the 110-114 heat. A larger percentage of the larger ones went down in flames. Experiments can be costly when Mother Nature gets her dander up.

It’s time to pull last year’s maple’s out of the pot to inspect and up pot. Pushing the power curve on repotting! We finished up on 15 yesterday

All now have lots of roots and many pushed off their plate. Need to install new base plates
View attachment 428161

Next step plant groups on plates in Anderson flats to build girth.

View attachment 428160.
Adding Sphagnum moss to areas that need more roots (scratch the bark too).
View attachment 428158View attachment 428159

Trying out Biochar this year on select trees. These join the Guinea Pigs!
View attachment 428162

Watered in and bedded down for the next months.
View attachment 428163
Future plan. Grow out at least a year. Inspect next year. Then maybe less per pot, or if room put in ground with larger plates.

cheers
DSD sends!
The heat dome was awful in Bothell. I lost a handful of maple seedlings and one of my more advanced mugo pines. The mugo was a tough loss. Isee the sphagnum moss in directly on top of the roots on the board, as well as on top of the soil after you finish repotting. This helps root growth as well as moisture retention on top I'm guessing?
 
Gosh it was! I ran out misting every couple hours. Seemed almost as bad as dancing at a July 4th party in a Scottsdale parking lot at high noon!

That’s what it does. I scratch the trunk and pack sphagnum where I want to promote the roots. Also pack on cut ends.

The rest is just to entice the roots to push outward before diving.

The process worked really well last year especially if you look back and see how minimal the roots were the first year and the view this year.

I have more maples to dig up and work on next year now I know the technique is solid on seedlings… give I have time late next winter.

Cheers
DSD sends
 
Last year I was freshly still job hunting post military career and I was watering twice a day, a few times three times, ON TOP of the misting like you. I'm worried about this summer....since I currently have a job.

I completed all my in the past four weeks as I wanted to do it before the buds opened. I have a few that next year I'll be ready to do this method to start moving the roots laterally, so thanks for the pics/documentation.

Given our current climate, do you think it's too late to repot this trident I picked up two weeks ago at the monthly PSBA meeting? The buds have just leafed out, but only just barely. My brother advocated patience and just hit it next year, but it is in a seedling/propagation mix of peat/perlite. I didn't want to waste a year that I could get a start into better substrate. I figured I could go ahead and plant it on a slant to plan for the future trunk chop as it is telephone pole straight (another reason I hesitate at waiting until next year).

trident 1.jpgtrident 2.jpg
 
Very nice. I want to try this too - set one up in a box last year that I’m going to leave alone for a couple more years, but there’s no way I didn’t do it wrong I think
 
Hmm…. It’s a bit of a conundrum. I was pushing the power curve on time, but for an experiment.

The risk is that we get early heat and the roots haven’t recovered enough to support the leaves, the the entire tree crashes. The other side is that it could use a repot. Yet I’ve seen worse… and the trident will certainly get stronger faster in the nursery mix if you keep it in the peat/perlite. Even if the tree is rootwashed, minimally root pruned, then put into a deep pot with bonsai media you wouldn’t gain as much as if the tree was kept in the nursery mix until next year … I’ve done it.

I’d wait. The weather right now is iffy at night, 33 forecast in a couple nights, which means ice in the wheelbarrow in the morning at my house…and the leaves are already pushed. There isn’t much you can do about the trunk anyways short of planting it on an angle if you work the roots next year and chopping it once it calibers out anyways. I do feel your pain, though, having many sticks in pots myself!

Otherwise, what you could do, given garden space, so sorry I foget if you are in an apartment, is plunk the tree in the ground on a bit of an angle for a couple years to get the caliper first, pull in two years, work the roots, and put it back in the ground. Then work the roots each year/chopping as indicated until you get the primary structure solid…

Anyways, that’s my two bits. Let me know how this tree goes btw.

We were out of town last meeting, but I‘ll look forward to meeting you at the next meeting!

cheers
DSD sends
 
That’s reasonable advice, thank you. I’ll stop mucking up your thread now and look forward to seeing these repots next year with the results!
 
Thinking it’s time for this little experiment to take on a new twist…. To expand my repertoire

Entering the Land of little Boxes!

Ok, boxes are not so special or anything new to BN’ers, but newish for me and its a project that features a bit of my very own craftsmanship… or as my very close friends call my wood work, wood butchering!

Outside I counted up all the maples I would need boxes for and arrived at a round number, 16. Next I developed a design I liked… nor sure how great it is, but it featured lots of cutting, rule of thumb measuring, stapling, screwing, screening and most of all lots of power tools. What’s not to like?

I wanted to keep things as simple as possible, so down to the big box store. There I discovered 16’ 5/4 cedar decking the same price per linear foot as the crummy cedar fencing. So I bought a bit of both. Cedar decking for the frame and runners, cedar fencing for the bottom board(s), aluminum screening for the bottom, staples for tacking stuff down tight and best of all decking screws. (So I could use two more power tools, drill and impact driver, of course!)

After sorting these items out in the garage, I powered the table and chop saw. As we all know,the main rule of wood butchering is cut before you plan. So… the next couple minutes involved cutting, hacking and what not, including a few quaint descriptive expressions sailors love and other listen to in awe…. Then I sat down with a tape measure and planned four box sizes for the maples presently residing clustered together in Anderson flats.

Here’s a refresher photo from last year.
IMG_6609.jpeg

Now with planning completed, the saws, drills and what not were put into action. Dust flew, holes were drilled, screens stapled and eventually, at a rate of four boxes completed per hour…little boxes arose from the murky depths of the garage.

The Little Boxes Arrive!

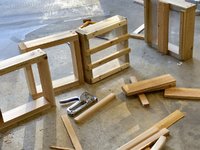
Frames together - Cross pieces on. The pile grows - Maples in back. .… more piles of little boxes
IMG_8423.jpeg………… IMG_8421.jpeg ……………. IMG_8449.jpeg

All 16 done. It was time for a late lunch and a survey of the work done and next steps. That’s when I went out and looked through all the nooks and crannies and discovered…. Who would have guessed? More little trees needing boxing. 5 more.

Ok….At this point anyone who knows me knows sometimes I get caught up in the excitement of a project and overdo things… a wee bit. Some folks would actually say perhaps none of the new candidates for boxing really didn’t need to be boxed. (Others, more skeptic, would say none of those wee trees actually needed boxing) … but no matter, I was a bonsai hobbyist on a mission!

Four more boxes emerged from the dark depths of the garage. It really should have need five, but I made a command decision on the fly and decided to cluster some trees in a group. So four gave a couple extras for other projects soon to be.

By this time it was too late to start boing up the little guys. So the next morning for two days I boxed up the little trees...

Repotting Little Maples

First out of the box. Selecting a box to fit. Crossing the wires on bottom. Lower Layer and Tie down
IMG_8441.jpeg ………. IMG_8442.jpeg…….. IMG_8443.jpeg……… IMG_8436.jpeg

… and so the process went. One tree after another.

Last 3 for the day. 18 done for now - 2 for other projects
IMG_8457.jpeg …….. … IMG_8458.jpeg

Covering up the Lot

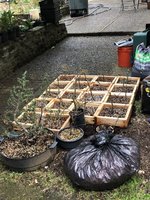
At this point nature stepped in. All trees had to be put on the ground & covered. Unseasonable warning hail & snow warning.

…which it did with a vengence…. Morning after. Trees buried under tarp
IMG_8474.jpeg…………… .. IMG_1388.jpeg

Aftermath
The little maples are done for now. Likely it will be a couple years before the JM’s are looked at again. Tridents may be pulled next year and looked at.

But… there was more wood left! And 8 Ezo Spruce seedlings sitting around… sooo…

25x13.5” ovalish box. Little Ezo Spruce
IMG_8473.jpeg ……… IMG_8478.jpeg

But that’s a whole ‘nother story!

Cheers
DSD sends
 

Attachments

  • IMG_8439.jpeg
    IMG_8439.jpeg
    285.1 KB · Views: 228
Last edited:
I am curious about your mesh bottom boxes. do the roots not grow into the mesh? or (now that I think of it) who cares, it'll get pruned off in the next stage
 
I am curious about your mesh bottom boxes. do the roots not grow into the mesh?
Yes, similar to Anderson flats, but with a bit of an airspace under the pot due to the runners to help inhibit downward grow, yet still close enough to keep in moisture from the ground. I’ve used this design for really big boxes on benches (put in pumice over winter) and interested see how this design works out on the ground.
or (now that I think of it) who cares, it'll get pruned off in the next stage
That’s for sure.! 😉

Cheers
DSD sends
 
Back
Top Bottom