You are using an out of date browser. It may not display this or other websites correctly.
You should upgrade or use an alternative browser.
You should upgrade or use an alternative browser.
Keep it or Cut it?
- Thread starter Brian Van Fleet
- Start date
-
- Tags
- bvf japanese maple progression
just.wing.it
Deadwood Head
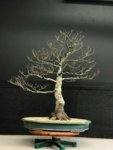
Woah!Well, I finally “Cut It”...took over 15 years.
View attachment 172050
Edit:
The suspense is killing me!
Dav4
Drop Branch Murphy
- Messages
- 13,488
- Reaction score
- 32,201
- USDA Zone
- 6a
Well, it's about time! I guess you're going to have come up with a new name for the this thread now.Well, I finally “Cut It”...took over 15 years.
View attachment 172050
Let's see it!
Brian Van Fleet
Pretty Fly for a Bonsai Guy
just.wing.it
Deadwood Head
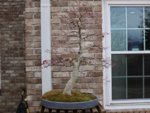
Oh, had me fooled.Ok...so I didn’t cut the one...it was an old branch growing from the crotch and above the first left branch when I got the tree in 2002. Cutting it made way for the thread graft to become the second branch up on the left.
View attachment 172132
Brian Van Fleet
Pretty Fly for a Bonsai Guy
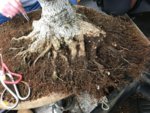
Repotted this one today. I knew it was going to take a while because I had to do a conservative repot last year. It took a while just to get the thing liberated this time. I let the moss stay on all winter because so many roots had grown up into it, that it had become a mess, but I also wanted to get a good look at what had developed before I started ripping.


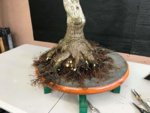
Once out, I prepared the pot with a single layer of medium akadama.


Once out, I prepared the pot with a single layer of medium akadama.

Brian Van Fleet
Pretty Fly for a Bonsai Guy
Over several rounds of water blasting, combing out roots with a hook, and cutting them back, order was restored.


Then, the bottom was reduced; anything growing down was cut back to the base, and more combing out.

Secured to the pot, New soil was worked in, topped with sphagnum moss, and I finished in the pouring rain...


Just over 90 minutes, not bad.


Then, the bottom was reduced; anything growing down was cut back to the base, and more combing out.

Secured to the pot, New soil was worked in, topped with sphagnum moss, and I finished in the pouring rain...


Just over 90 minutes, not bad.
just.wing.it
Deadwood Head
90 minutes, not bad at all!
Beautiful work.
I'm interested in how exactly you wired it into the pot....I like the square, very secure.
Beautiful work.
I'm interested in how exactly you wired it into the pot....I like the square, very secure.
Brian Van Fleet
Pretty Fly for a Bonsai Guy
Easy: https://nebaribonsai.wordpress.com/2016/02/27/preparing-a-pot-draft/90 minutes, not bad at all!
Beautiful work.
I'm interested in how exactly you wired it into the pot....I like the square, very secure.
One wire on each side, back to front (1-2, 3-4). Make a pigtail and hang it over the back left wire. (5). Set the tree.
Bring the back left wire (1) forward to the front left (2), pull up, twist tight, and clip the back left end short, leave front left (2) long.
Front left (2) to front right (3), twist and clip the front left (2) short, leave the front right long.
Front right (3) to back right (4), twist it tight and clip the front right (3) short, and leave the back right long.
Back right (4) to pigtail (5), pull up, twist it tight, clip it short.


I do it this way every time for every tree, so I always know where my wires are. At repotting time, I turn up the pot, clip the underside of each wire where it enters the drain hole, and the tree lifts right out.
Then, find any portion of the wire cage, clip it, and grab it with your pliers, and pull it straight out as you turn the tree. The whole assembly comes out in one piece.
Last edited:
just.wing.it
Deadwood Head
Oooh, ok ok...Easy: https://nebaribonsai.wordpress.com/2016/02/27/preparing-a-pot-draft/
One wire on each side, front to back. Make a pigtail and hang it over the back left wire. (5). Set the tree.
Bring the back left wire forward to the front left, pull up, twist tight, and clip the back left end short, leave front left long.
Front left to front right, twist and clip the front left short, leave the front right long.
Front right to back right, twist it tight and clip the front right short, and leave the back right long.
Back right to pigtail, pull up, twist it tight, clip it short.
View attachment 181074View attachment 181075
I do it this way every time for every tree, so I always know where my wires are. At repotting time, I turn up the pot, clip the underside of each wire where it enters the drain hole, and the tree lifts right out.
Then, find any portion of the wire cage, clip it, and grab it with your pliers, and pull it straight out as you turn the tree. The whole assembly comes out in one piece.
Great!
I appreciate that B!
I'll be sure to give it a go!
Brian Van Fleet
Pretty Fly for a Bonsai Guy
StoneCloud
Omono
Beautiful Root development Brian! always love to see the "background" workings of your trees!
Gary McCarthy
Chumono
One wire on each side, back to front (1-2, 3-4). Make a pigtail and hang it over the back left wire. (5). Set the tree.
Bring the back left wire (1) forward to the front left (2), pull up, twist tight, and clip the back left end short, leave front left (2) long.
Front left (2) to front right (3), twist and clip the front left (2) short, leave the front right long.
Front right (3) to back right (4), twist it tight and clip the front right (3) short, and leave the back right long.
Back right (4) to pigtail (5), pull up, twist it tight, clip it short.
When does the video come out???
@Brian Van Fleet can I ask what brand of Akadama you use and where you source it from. Thanks!
Brian Van Fleet
Pretty Fly for a Bonsai Guy
Should be live now.When does the video come out???
@Brian Van Fleet can I ask what brand of Akadama you use and where you source it from. Thanks!
I use Double Line akadama, from Cass Bonsai near St. Louis. Every few years I split a pallet with our club.
Gary McCarthy
Chumono
COOL...........THANKS!!!Should be live now.
I use Double Line akadama, from Cass Bonsai near St. Louis. Every few years I split a pallet with our club.
KiwiPlantGuy
Omono
Should be live now.
I use Double Line akadama, from Cass Bonsai near St. Louis. Every few years I split a pallet with our club.
Hi Brian,
Thank you for the fantastic thread as it works amazing as a learning tool for us newbies.
I have a question which I can’t / don’t understand.
When u did your latest repot you left most/all of the feeder roots? ( not much cutback compared to how much space available in pot).
Sure you pruned all the root bound/circling roots but I was confused to see a lack of empty space in pot.
Thanks in advance for your explanations,
Charles
Brian Van Fleet
Pretty Fly for a Bonsai Guy
It may be tough to tell from the photos, but more than half of the roots were removed throughout the repotting. There is a significant difference between these two root masses, and lots of room for roots to now grow in the pot.When u did your latest repot you left most/all of the feeder roots? ( not much cutback compared to how much space available in pot).
Sure you pruned all the root bound/circling roots but I was confused to see a lack of empty space in pot.

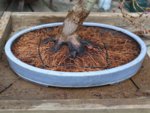

Leaving some width is an exchange for making a very thin root mass; the depth was reduced from 2” to under 1”.
The root mass could have been made smaller, but I’m still trying to encourage the base to swell, and leaving more roots accelerates this, as does planting it deeper. You can see from the final soil level, the best of those roots are still not visible, yet.
Brian, you’ve done really well developing those roots. I see you want the base to swell more. I’m assuming to make a plate nebari? If so, I suggest you thin the root system even more than you have. Using “root pruners” that cut flush, you could easily trim the underside of your rootball directly under the trunk. The image I see shows where you have cut downward growing roots off short. They could be even shorter. All the way up to the underside of the trunk itself. And you could split off the bottom half of the large horizontal roots. WIt may be tough to tell from the photos, but more than half of the roots were removed throughout the repotting. There is a significant difference between these two root masses, and lots of room for roots to now grow in the pot.
View attachment 181313View attachment 181314View attachment 181315
Leaving some width is an exchange for making a very thin root mass; the depth was reduced from 2” to under 1”.
The root mass could have been made smaller, but I’m still trying to encourage the base to swell, and leaving more roots accelerates this, as does planting it deeper. You can see from the final soil level, the best of those roots are still not visible, yet.
When you’re done, you’d have a white chunk of wood 3 or 4 inches wide exposed that’s the bottom of the trunk/nebari.
Then, trim the pad of feeder roots back from underneath, making it about 50% thinner. Then, shorten the pad of feeder roots! Maybe about 50%!
Yeah, I know that adds up to about a 75% total root reduction!
But here’s what all that does:
Thinning the plate concentrates the base of the roots along a disk rather that a ball. Pretend the outermost edge is shaped like a CD. With roots. When the roots swell at the base, the CD gets bigger. Now pretend the rootball is shaped like a barbell weight. It has more of a flat surface on its edge. It take much more root growth to expand that larger surface are than a thin disk would.
So having a thinner root ball concentrates the root based which will then fuse and make the plate form faster.
This will also allow you to bury the base of the tree deeper. Shallow roots will bark up to protect themselves from sun, and the top surface of the soil dries out more than the soil lower down. Barked roots don’t fuse as well. So it’s important to keep that leading edge of the expanding plate buried to encourage fusing.
And, you have that layer of akadama... well, now you’re letting roots grow down, making that leading edge fat. The Ebihara technique has the trunk screwed to a board. No soil underneath. The roots are prevented from growing down, outwards only. When they get to the edge of the board, they shoot straight down, then when they hit the pot, they spread in all directions. Ebihara puts soil down, then places the board on top of the soil.
There does needto be sufficient space for the new roots to run. Tons and tons of feeder roots don’t fatten the plate as much as rapidly growing “running” roots. You know how tridents in the ground tend to form a few really heavy long roots that build that buttress effect? And once we cut them that stops, and unless we do some thing (root graft) the buttress stays, but doesn’t fatten up evenly everywhere. And also, when building fat trunks, it’s the escape branches that build trunk, not lots and lots of ramification. Same is true for plate development. We need to let roots run to fatten the plate.
So, that’s why reducing the current mat of roots by 75% will produce a plate faster than the thick pad. Fewer roots concentrated on a thinner edge, prevented from growing down, but allowed to run will do the job!
Brian Van Fleet
Pretty Fly for a Bonsai Guy
Surely you can see the only real difference is that you rode harder on an older tree.
Similar threads
- Replies
- 12
- Views
- 2K


