You are using an out of date browser. It may not display this or other websites correctly.
You should upgrade or use an alternative browser.
You should upgrade or use an alternative browser.
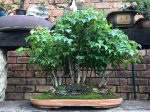
Trident Maple Forest
- Thread starter Dorian Fourie
- Start date
Dorian Fourie
Chumono
dirk hoorelbeke
Omono
I like the effort you put in this tree. I like the rocks and the choices made. The more rocks there are the more i would think this is a landscape for an evergreen (pinus, juniperus,...). It adds tension so that never is a bad thing.
Dorian Fourie
Chumono
Thanks DirkI like the effort you put in this tree. I like the rocks and the choices made. The more rocks there are the more i would think this is a landscape for an evergreen (pinus, juniperus,...). It adds tension so that never is a bad thing.
Appreciate it.
jeanluc83
Omono
I really like this!
The addition of the rocks adds to the overall composition. It is really starting to look like a forest.
I grew up in the Adirondacks and spent a lot of time in the woods. If I didn't know better I could say this is a little chunk of those same woods.
The addition of the rocks adds to the overall composition. It is really starting to look like a forest.
I grew up in the Adirondacks and spent a lot of time in the woods. If I didn't know better I could say this is a little chunk of those same woods.
Dorian Fourie
Chumono
Thanks so much Jeanluc. Really appreciate itI really like this!
The addition of the rocks adds to the overall composition. It is really starting to look like a forest.
I grew up in the Adirondacks and spent a lot of time in the woods. If I didn't know better I could say this is a little chunk of those same woods.
Dorian Fourie
Chumono
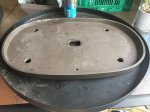
Over the last few weeks, I have been looking around for a pot for this forest for the future. The current one is not right and I was even thinking of having one made. As luck would have it, I went to the local bonsai nursery where we have our monthly bonsai club meetings and took the forest with me. The owner had only seen the forest via photos and was not sure about the rocks that I had put in. She asked me to bring it with so she could see it in person. After seeing it in person, she agreed that the rocks looked much better in person and also agreed that the pot was wrong.
So we got talking about how difficult it is to get the right pot for this tree as for some reason in South Africa, shallow pots are not very common. I told her that I was thinking of having one made for the forest but it was not really my first choice. She went outside and had a look through her personal collection of pots and brought out 2 shallow pots to show me what I should be looking for. After all the positioning etc we decided on the larger of the 2 pots as it would create a better overall view in the future and I started to measure the dimensions for record for when I might find something. The next thing to my surprise she said that I could buy it from her as she did not have anything planned for it in the near future.
So now I have a pot for the forest for when I replant it in Spring 2017 (Sept). There was a large amount of calcium buildup on the pot.

I decided to put the pot into my cooler box with loads of vinegar to assist with eating and breaking down the calcium.

After it had soaked for a few hours, I took it out and used a fine wire brush on my dremel to assist with getting rid of the calcium. I first tested the base of the pot to make 100% sure that the wire did not scratch the pot.

After getting rid of the calcium, I rubbed the pot with a silicone free spray to protect it and bring out the shine of the pot.

This is what the with and without calcium looks like

Now over the next few months, I will make sure the pot stays dry and clean and I will polish it up every month to ensure it stays protected.
So we got talking about how difficult it is to get the right pot for this tree as for some reason in South Africa, shallow pots are not very common. I told her that I was thinking of having one made for the forest but it was not really my first choice. She went outside and had a look through her personal collection of pots and brought out 2 shallow pots to show me what I should be looking for. After all the positioning etc we decided on the larger of the 2 pots as it would create a better overall view in the future and I started to measure the dimensions for record for when I might find something. The next thing to my surprise she said that I could buy it from her as she did not have anything planned for it in the near future.
So now I have a pot for the forest for when I replant it in Spring 2017 (Sept). There was a large amount of calcium buildup on the pot.

I decided to put the pot into my cooler box with loads of vinegar to assist with eating and breaking down the calcium.

After it had soaked for a few hours, I took it out and used a fine wire brush on my dremel to assist with getting rid of the calcium. I first tested the base of the pot to make 100% sure that the wire did not scratch the pot.

After getting rid of the calcium, I rubbed the pot with a silicone free spray to protect it and bring out the shine of the pot.

This is what the with and without calcium looks like

Now over the next few months, I will make sure the pot stays dry and clean and I will polish it up every month to ensure it stays protected.

Attachments
Dorian Fourie
Chumono
Thanks so muchThat will improve your forest quite a lot i believe
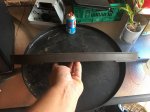
Just a few pics to show the difference between the 2 pots. It is considerably wider then the original pot
The depth is wider too.

It is shallow which I was looking for.

So far the idea will be to put the planting off centre. On the left hand side the idea would be to totally fill it with rocks looking almost like a cliff edge and make sure the rocks are till the edge of the pot. On the right hand side, there will be a steady downwards slope with no rocks and hopefully create a perception of space.

A. Gorilla
Omono
I don't see a ramp on there. Not to be a buzzkill, but you are in violation of South African building standards:
* The National Building Regulations 1986, Part S - Facilities for Disabled Persons. (#08)
* The National Building Regulations 1986, Part S - Facilities for Disabled Persons. (#08)
Bolero
Omono
Are your Tridents wired in ? Will you try to lift all at once ? I'm inspired by your Trident Landscape and the special attention to the Ground Cover...
What are your Pot sizes for both Pots ?
What are your Pot sizes for both Pots ?
Dorian Fourie
Chumono
Hi BoleroAre your Tridents wired in ? Will you try to lift all at once ? I'm inspired by your Trident Landscape and the special attention to the Ground Cover...
What are your Pot sizes for both Pots ?
None of the tridents are wired in and when I move them into the new pot in Spring (Sept 17) the plan will be to try and move them all together. I will need to try and cut the roots at the bottom much shorter so that it lies lower in the shallower pot then what it currently lying.
Thanks so much for following this and liking what I am doing. The ground cover is especially hard as we have had quite a large amount of rain but it has also been especially hot which scorches the ground cover. Luckily I work from home so I can watch it closely and make sure it stays misted or move it to cover when it rains too much.
The current pot dimensions are 44cm w x 33 cm d x 4.5 cm h
The new pot dimensions are 55 cm w x 37 cm d x 3 cm h
Bolero
Omono
Dorian, thanks for the info...The height of your soil base in relation to the overall is excellent and adds to the grouping, I would be judicious in shortening those roots, don't do too much...
Good luck in removing the group as a whole, go slow, I made a similar move last year and ended up busting up the original pot sides with a hammer.
I have 7 Tridents, 3/8" to 3/4" trunks that will go into a Grouping this Spring, presently in Garage for the Winter, I am going to emulate your grouping less the steps, I will post when doing so...
Keep us posted on your Trident Grouping.
Dorian Fourie
Chumono
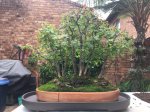
Eventually it was time, this past weekend to get my maple forest into its new pot. Since the last post, I have left it to grow and only been cutting back and working on the canopy.
The tree is very healthy and full of new leaves so it was time to get stuck in.

I removed all the rocks and stairs before I started on the moss. I was careful with removing the moss as there is one type that I wanted to keep and get rid of the rest. The one type is a very fine moss that does not creep up the trunks so I really wanted to preserve that. The rest was going into the bin
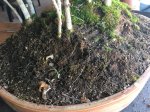
This went into the bin

I used a putty knife to loosed the tree around the inner edge of the pot
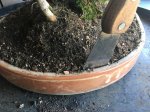
I was really amazed at the root growth that I had achieved over the last year.

Then it was time to rake out the roots and reduce from the bottom to make sure it would fit into my new pot. The new pot is so much shallower then this one so I had to remove quite alot.
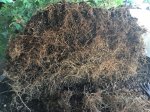
The tree is very healthy and full of new leaves so it was time to get stuck in.

I removed all the rocks and stairs before I started on the moss. I was careful with removing the moss as there is one type that I wanted to keep and get rid of the rest. The one type is a very fine moss that does not creep up the trunks so I really wanted to preserve that. The rest was going into the bin

This went into the bin

I used a putty knife to loosed the tree around the inner edge of the pot

I was really amazed at the root growth that I had achieved over the last year.

Then it was time to rake out the roots and reduce from the bottom to make sure it would fit into my new pot. The new pot is so much shallower then this one so I had to remove quite alot.

Dorian Fourie
Chumono
So it was quite a few times that I had to rake, cut and put the tree into the pot to check on the height before I was happy with where I wanted it to be

Once that was done, I positioned it in the correct area of the pot. The idea is to keep the forest more to the one side and create negative space on the other side. I filled up the rest of the pot with soil.


Once I had done that, it was into the watering area to give it a good hose down to ensure that the soil settles down nicely. As you can see with the position, it is moved to the left with the negative space out on the right.

Now it is back in my garden and over the next week or 2 the soil has to settle before I will work on placing the moss back and then getting the rocks and stairs back into the bonsai forest


Once that was done, I positioned it in the correct area of the pot. The idea is to keep the forest more to the one side and create negative space on the other side. I filled up the rest of the pot with soil.


Once I had done that, it was into the watering area to give it a good hose down to ensure that the soil settles down nicely. As you can see with the position, it is moved to the left with the negative space out on the right.

Now it is back in my garden and over the next week or 2 the soil has to settle before I will work on placing the moss back and then getting the rocks and stairs back into the bonsai forest

Bolero
Omono
I don't want to say it looks better because I think it was hard to improve on as it was.... however it does add another new dimension with all that additional space on the right side.
I think your front to back placement is the same essentially but all the space on the right is interesting and I am looking forward to see what you will do with it...
I think your front to back placement is the same essentially but all the space on the right is interesting and I am looking forward to see what you will do with it...
Dorian Fourie
Chumono
Thanks BoleroI don't want to say it looks better because I think it was hard to improve on as it was.... however it does add another new dimension with all that additional space on the right side.
I think your front to back placement is the same essentially but all the space on the right is interesting and I am looking forward to see what you will do with it...
Appreciate the feedback.
Just to give you an idea of the plan going forward. I will definitely be putting the stairs and the rocks back in. On the left hand side closest to the edge, I will be adding in rocks to make it look like a cliff / rock face with a sharp drop almost over the edge of the pot. The open space to the right will gradually get less rocks as it moves from the forest into the edge of the pot. The effect I am trying to create is one that you will either be walking up a slight hill into a forest and it getting more rocky as you go upwards or the opposite effect of leaving the forest and moving towards the open.
I think once it is done (and if I do it properly) it will stand out.
Now to go and get more rocks and in about 2 weeks, I will start the positioning and planning. So watch this space.
Bolero
Omono
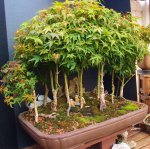
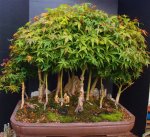
Hi again Dorian...Here are a few pictures of my Japanese Maple Penjing which I call
"3 Monks in Maple Grove Pondering the Trump Presidency"
I also moved from one pot to another and added some Stone and Steps, which were inspired by your Trident Bonsai.
I still consider mine a Work in Progress, seems like there is always a change of some sort...
My Penjing Landscape is approximately 26"W x 24" High x 3" Tray Ht.
![002[1].JPG 002[1].JPG](https://www.bonsainut.com/data/attachments/150/150327-3cdb76e41f671e03f726829ff631f5e0.jpg?hash=PNt25B9nHg)


Bolero
Omono
The open space to the right will gradually get less rocks as it moves from the forest into the edge of the pot. The effect I am trying to create is one that you will either be walking up a slight hill into a forest and it getting more rocky as you go upwards or the opposite effect of leaving the forest and moving towards the open.
Yes and it will add to creating a fuller Landscape with additional context...
Yes and it will add to creating a fuller Landscape with additional context...
Dorian Fourie
Chumono
I like what you have done and I agree that it is always a work in progress. I like what you did with the dead piece of wood lying in between the trees and that creates another dimension to the forest and something I have only done small scale. I will incorporated it later into my scene once all the moss has settled and the rocks are in.Hi again Dorian...Here are a few pictures of my Japanese Maple Penjing which I call
"3 Monks in Maple Grove Pondering the Trump Presidency"
I also moved from one pot to another and added some Stone and Steps, which were inspired by your Trident Bonsai.
I still consider mine a Work in Progress, seems like there is always a change of some sort...
My Penjing Landscape is approximately 26"W x 24" High x 3" Tray Ht.
View attachment 161104 View attachment 161105 View attachment 161106 View attachment 161107
I love what you called it. 10 out of 1o
If I could give one suggestion on the scene. Maybe think of moving some of your thin trees from the front towards the back and bring your biggest trunks forward. Create a bigger depth perception.
Other then that, I love it.
Similar threads
- Replies
- 3
- Views
- 1K


