Removing a sacrifice on JBP in conjunction with root work?

When to remove sacrifice and do root work?


  • Total voters
    20
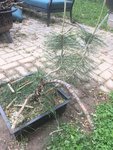
The tree looks healthy and nicely barked up. You are losing opportunity to manage and develop the lower branching. I would suggest decandling the lower branches and letting the one higher branch act as an apical leader for now. ( you might wire that one more vertical and lower the other branches with wire) . Protect any lower shoots that are forming for the time being. From the picture it is unclear how many there may be.
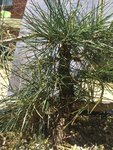
Here is a rough picture of the format I am suggesting to work towards. Leave the tree in the Andersen flat and consider the other 1/2 HBR this fall. That will allow time for root recovery and not interfere with next springs growing season.
View attachment 297272

Thank you for the knowledgeable and thoughtful replies, in general. You are a valuable resource to the forum.

I’ll try to get another picture of the branch structure, I think there are some inside options yet to work with, but not many that are not sharing a node with a sacrifice branch.
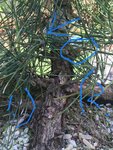
Let me grab another photo and then I’ll ask what sort of timing I should target for candle removal if you still think appropriate, given that I have the multiple sacrifices running for taper.
 
Apologies for my sub par camera skills.. and the sun was blaring which didn’t help. It looks like the lowest branch is on it’s own as a sacrifice. The closest bud is a few inches out on the sacrifice. The first branch would be opposing the second (thickest) sacrifice.
 

Attachments

  • 12EB2F15-B7F2-48B1-B150-A0890B622D61.jpeg
    12EB2F15-B7F2-48B1-B150-A0890B622D61.jpeg
    377.8 KB · Views: 103
Apologies for my sub par camera skills.. and the sun was blaring which didn’t help. It looks like the lowest branch is on it’s own as a sacrifice. The closest bud is a few inches out on the sacrifice. The first branch would be opposing the second (thickest) sacrifice.
The interior is not clear, I can make out several developing candles amongst the longer needles but cannot make out any branch structure. I would clean out any dead needles, as well as those turning brown, this may help to expose structure. Typically this would be part of a regular fall maintenance routine. My teacher Boon has excellent videos on Pine development if you want specifics. The reason they are better than most is the specific information that is relevant to the stage of development as opposed to simply instructions for refinement. So often presentations focus on one rather than differentiating between the timing for certain techniques.
Because I cannot see the structure specific suggestions cannot be made. My guess would be that the primary branches have not reached the desired thickness so any pruning should be limited to the extended top apical sacrifice. Primarily older lower needles and lateral growth just on the top sacrifice branch.. Keeping one or two lateral branches not opposite each other. ( these are just fall back in case of breakage or health issues at the top. At the beginning of June or when the candles have opened their needles, I would reduce the top whorl to the central candle and two medium side candles. This will focus the growth on extension and thickening the trunk. The two side candles are just back up once again. The top reduction will also benefit balancing the lower portion to retain good lower development. You can cut back the lower sacrifice branches when the desired branch thickness is reached and or the area of trunk reaches the desired thickness. You may be using the sacrifice branches for either purpose.
Maintaining sunlight and air movement in the lower design portion is very important at all stages of development! This is the type of openness and overall
balance I like to see! You can clearly see where needles have been removed to ensure no shading occurs below or in the interior. Just trying to illustrate a point. This tree is five years old. IMG_9504.jpeg
 
The interior is not clear, I can make out several developing candles amongst the longer needles but cannot make out any branch structure. I would clean out any dead needles, as well as those turning brown, this may help to expose structure. Typically this would be part of a regular fall maintenance routine. My teacher Boon has excellent videos on Pine development if you want specifics. The reason they are better than most is the specific information that is relevant to the stage of development as opposed to simply instructions for refinement. So often presentations focus on one rather than differentiating between the timing for certain techniques.
Because I cannot see the structure specific suggestions cannot be made. My guess would be that the primary branches have not reached the desired thickness so any pruning should be limited to the extended top apical sacrifice. Primarily older lower needles and lateral growth just on the top sacrifice branch.. Keeping one or two lateral branches not opposite each other. ( these are just fall back in case of breakage or health issues at the top. At the beginning of June or when the candles have opened their needles, I would reduce the top whorl to the central candle and two medium side candles. This will focus the growth on extension and thickening the trunk. The two side candles are just back up once again. The top reduction will also benefit balancing the lower portion to retain good lower development. You can cut back the lower sacrifice branches when the desired branch thickness is reached and or the area of trunk reaches the desired thickness. You may be using the sacrifice branches for either purpose.
Maintaining sunlight and air movement in the lower design portion is very important at all stages of development! This is the type of openness and overall
balance I like to see! You can clearly see where needles have been removed to ensure no shading occurs below or in the interior. Just trying to illustrate a point. This tree is five years old. View attachment 297310

I was focusing on roots and taper, but I think you are right that I should start working toward a tenable design as well.

I tried to get a better picture. 1 and 2 are my sacrifices. There are two potential branches on the same whirl as #2, across and behind.
The circle is a cicada shell I have left on for good measure, and the arrow is pointing to what I think could be a decent new leader. My material obviously doesn’t have the same quality movement and planning built into it yet as this is more or less my first and only JBP. Do you think having the first bend a couple branches up would work? It would eliminate a straight section with no branching above.
Also, on sacrifice #1 any buds on this branch would not be workable into the design, correct? There are a few buds behind the number 1 that I can’t imagine could be worked in, but wanted to check.
If you think the new leader might be a good idea, I’ll clear out the growth above but keep alive. I might be able to use as some leverage to get a little more bend into the length of the trunk.
 

Attachments

  • BD887E68-1C66-4DC8-B1B3-348F96D1D53D.jpeg
    BD887E68-1C66-4DC8-B1B3-348F96D1D53D.jpeg
    311.6 KB · Views: 98
  • 3304581C-CDEB-429F-8DF3-3ABA26EA9B83.jpeg
    3304581C-CDEB-429F-8DF3-3ABA26EA9B83.jpeg
    329.4 KB · Views: 81
I was focusing on roots and taper, but I think you are right that I should start working toward a tenable design as well.

I tried to get a better picture. 1 and 2 are my sacrifices. There are two potential branches on the same whirl as #2, across and behind.
The circle is a cicada shell I have left on for good measure, and the arrow is pointing to what I think could be a decent new leader. My material obviously doesn’t have the same quality movement and planning built into it yet as this is more or less my first and only JBP. Do you think having the first bend a couple branches up would work? It would eliminate a straight section with no branching above.
Also, on sacrifice #1 any buds on this branch would not be workable into the design, correct? There are a few buds behind the number 1 that I can’t imagine could be worked in, but wanted to check.
If you think the new leader might be a good idea, I’ll clear out the growth above but keep alive. I might be able to use as some leverage to get a little more bend into the length of the trunk.
Can you give me some dimensions to work with? What is the current trunk diameter just above the soil line? How high up is branch one? How high up is branch two? distance up to the possible apical leader?
There appears to be some movement and taper in the lower section that was not apparent in previous pictures.
How far below soil line is the Nebari you wish to work with and is it fairly evenly distributed around the trunk.
This was an airlayer of a friend Pete from NVBS. His tree was from seed, I believe collected in Japan. And he airlayered this one because he liked the bark on it.. not quite a cork, but nice bark. Because it was an air layer the roots are almost too radial and the surface roots are close to 90 degree angle(reminds me of a broom nebari). They can be seen better from a photo posted over the weekend to this thread. I just covered them with a little extra soil for protection, but they are not deep down at all.

Diameter is almost 2” exactly including flakey bark at the base. First, presumably sacrifice branch is 2” up. First branch across from sacrifice is 4” from soil. The bud with the arrow in previous post is 6” from the soil, so that branch starts around 5” from soil. Next branch I didn’t measure but I think 8 or 9” from soil.
Thank you, that helps a lot! The distances are much smaller than I imagined! the only step I would take at this time is to shorten the thicker branch you indicate is approximately 4 inches up on the right side. the one you call a sacrifice that is coming off rather straight and is a bit thicker than the opposite branch a bit lower called number 1 in your diagram.
Here is my thinking, it would be great to continue thickening the trunk while stalling the growth on that branch. It is nicely position on the outside of a bend and the right height for a first branch. If its growth is slowed, the trunk continues to thicken from other sacrifice branches and a new apical sacrifice leader up top then the outcome could be very beneficial. Using the picture in post #22 I would wire up the the top left branch to a vertical position and let it take over as apical sacrifice branch. Let it grow out for a couple of years while controlling the growth of that thicker lower branch on the right!
Basic guideline only remove sacrifice branch or leader when the base has reached the desired size. You can slow down parts of the design by reducing foliage or cutting back, you can accelerate by increasing balancing foliage and allowing extension.
If your base increases the taper will improve and the movement from a new apex two years from now roughly seven or eight inches up will be amazing. Try to select two smaller branches in the same general plane but not exactly opposite each other. one ill be wired down to become second primary branch. The other will be wired up to become the new top after reducing the apical sacrifice leader again. For this step it would be helpful to retain a lower sacrifice branch somewhere below the new apex to keep additional foliage and continue a vigorous tree while developing the lower branches!
I know that is a lot. Hope it makes sense. The tree has very good potential, hope you take your time with this one.
If the distances are smaller than you imagined, than I imagine I am doing something right, as the goal is to throw off the sense of scale and imagine a larger tree. A leap with this material I know.
I am picking up what you are putting down, however, there is also another branch on the back side of the node with the #2 sacrifice, which is thin enough, maybe it could be repositioned to the outside of the curve?
I’m not saying no to your idea, but #2 is also the most vigorous of the the sacrifice branches. I’ll certainly go take another look. Even in person it is difficult to see through the needles.
Clearing out the top section while leaving it fundamentally intact could provide some clarity without reducing vigor or even options.
Also using the top to leverage a bit of extra movement might open up a less developed branch.
Thank you for the direction. I’ll consider your advice even if I choose a different path.
Fully agree with your position. As my pines develop often another path opens up! Especially when one of the following is considered!
A. front and planting angle.
B. New leader position.
C. Accelerating or Decellerating the growth of certain key components. Allowing other areas to catch up.
I am blessed to have over 300 pines ( JBP, JRP and JWP ) in various stages from 3 years to 30 years to work with. This helps me to be patient and have time to reconsider;)
Seeing how quickly the vision can change if a branch or leader is changed has led to my # 1 rule for developing pines. Only remove foliage or a branch/leader if it is creating a problem for development. In other words keep as many options as possible!
One last suggestion is to graft a scion on to the lower branch just where it exits the trunk towards the desired front before removing that branch. This gives you control over direction and thickness of the lower branch. Simple fix I use even if it does take time.
If I were to graft to what is now the sacrifice branch, do you think I would still want to slow the sacrifice development, or is that less important and I could keep using to generate taper for another year or more?
Of course my grafting skill level is another matter as “I couldn’t approach graft a ficus,” but I may be able to find someone to help me with the operation in the next year or two.

That sounds like a good bonsai insult(that I would only direct at myself) : “you couldn’t approach graft a ficus”
Yes I would still slow it, because that keeps another option open and you have other sacrifice branches lower down to aid the thickening! Plus the apical sacrifice will aid the thickening of the trunk faster than lateral sacrifice branches. Just keep the branch healthy so it can foster a scion graft if desired! You may also find that as you shorten the sacrifice backbudding occurs and give you interior options on the branch close to the trunk. Similar to the outbreak near the top of your tree currently.
The other reason being is you may be surprised how the lower branch looks when the trunk thickens even another 1/2 inch and if the angle was even slightly downward. Small distances and angles really make difference in Bonsai.
Have fun the tree has considerable potential I think, far from the usual straight sections people try to work with.
 
I did some cutting.. I think it was important to open it up to keep those inner buds from getting shaded out. I did reduce the sacrifice #2 significantly, but that branch behind is even more on the outside of the bend caused by the new leader. I cut the old apex back or pretty hard, but kept some options there. 48438727-4197-488B-89A8-EA7B10FBCDDA.jpeg
 
I did some cutting.. I think it was important to open it up to keep those inner buds from getting shaded out. I did reduce the sacrifice #2 significantly, but that branch behind is even more on the outside of the bend caused by the new leader. I cut the old apex back or pretty hard, but kept some options there. View attachment 297891
Good thinking, I see that other branch now even another a bit higher! Great call to strengthen the interior buds for a year or two.
 
Thanks again for all the guidance. This will be my last post on the tree to let it grow a while and respond. If the inside candles extend more than a few inches should I consider decandling mid summer?
Pictures:
1) backside with future branches
2) zoomed out to show 2 remaining sacrifice branches and reduction of largest sacrifice.
3)Current front with old apex still intact.
 

Attachments

  • 41B520F4-B9C0-43A2-89C2-077516F03013.jpeg
    41B520F4-B9C0-43A2-89C2-077516F03013.jpeg
    275 KB · Views: 66
  • 9F02BA3B-07FE-4E55-BB20-0FC98FBAE66E.jpeg
    9F02BA3B-07FE-4E55-BB20-0FC98FBAE66E.jpeg
    337.3 KB · Views: 56
  • 335E5E00-DB1A-4FF7-888D-1B3AE9A89281.jpeg
    335E5E00-DB1A-4FF7-888D-1B3AE9A89281.jpeg
    333.6 KB · Views: 63
Thanks again for all the guidance. This will be my last post on the tree to let it grow a while and respond. If the inside candles extend more than a few inches should I consider decandling mid summer?
Pictures:
1) backside with future branches
2) zoomed out to show 2 remaining sacrifice branches and reduction of largest sacrifice.
3)Current front with old apex still intact.

First off, thanks for the additional pictures. Nothing more to do at this stage. Lots of Sun, Water, and fertilizer!
1. The interior buds are usually left to grow for at least two seasons.
2. Decandling is used for refining foliage and creating pads!
It is not used if you are still developing primary, secondary and tertiary branching on pines.
Your tree is not close to that stage!
3. For the coming years the process will be grow out and cut back. The grow out is to retain vigor. The cut back is to promote back budding!
This action is primarily in the design portion of the tree.
4. The apical leader will be allowed to grow out until the base reaches the desired thickness or you wish to change leaders and or direction for movement.

You will be working towards this general shape over the next five years before decandling activity. The apical leader and overall size depends on your final style and expected height. This is just to help you grasp the concept. Decandling has begun with branches developed and style wired. Tree belongs to one of my teachers.
Decandling one step.jpeg
 
First off, thanks for the additional pictures. Nothing more to do at this stage. Lots of Sun, Water, and fertilizer!
1. The interior buds are usually left to grow for at least two seasons.
2. Decandling is used for refining foliage and creating pads!
It is not used if you are still developing primary, secondary and tertiary branching on pines.
Your tree is not close to that stage!
3. For the coming years the process will be grow out and cut back. The grow out is to retain vigor. The cut back is to promote back budding!
This action is primarily in the design portion of the tree.
4. The apical leader will be allowed to grow out until the base reaches the desired thickness or you wish to change leaders and or direction for movement.

You will be working towards this general shape over the next five years before decandling activity. The apical leader and overall size depends on your final style and expected height. This is just to help you grasp the concept. Decandling has begun with branches developed and style wired. Tree belongs to one of my teachers.
View attachment 298011

Not quite on par with your example (or even close to it, but I think good progress. I did de-candle just the top section a bit early, since the sacrifices are still allowed full steam. The internodes on the top section were real long, and I’m not sure if I’ve counted it out of the final design yet.
I was rewarded with a nice (weak) little bud on the bare branch in the middle right.
Should I go ahead and remove the remnants of the lower right sacrifice at this point or during the winter? It didn’t bud back any closer, and I have one strong bud at the end if I wished to extend it again. Should I remove with concave when it is time? I think Jin there would be pretty ridiculous.
 

Attachments

  • 3F35EA3D-8179-455D-9E8F-FDBF46004093.png
    3F35EA3D-8179-455D-9E8F-FDBF46004093.png
    621.3 KB · Views: 59
Not quite on par with your example (or even close to it, but I think good progress. I did de-candle just the top section a bit early, since the sacrifices are still allowed full steam. The internodes on the top section were real long, and I’m not sure if I’ve counted it out of the final design yet.
I was rewarded with a nice (weak) little bud on the bare branch in the middle right.
Should I go ahead and remove the remnants of the lower right sacrifice at this point or during the winter? It didn’t bud back any closer, and I have one strong bud at the end if I wished to extend it again. Should I remove with concave when it is time? I think Jin there would be pretty ridiculous.
I would remove late winter early spring rather than now, use the foliage remaining to add to the thickness of the tree rather than healing cuts going into the fall! If you want back budding you need to cut back into the remaining needles, not just decandle. Decandling may produce some backed but is not as reliable as stronger cut back beyond the base of spring candles. The best response is a vigorous tree that has been allowed to grow out for a period of time! One or two years is the usual.
Proceeding too quickly can really slow things down!
It is common to think of internode length and needle length too soon on in the process! patience is the key! Retain interior needles and cut back for back budding, but only when tree is very strong. Do not worry about needle length until branches are formed and density of foliage is achieved. At this point it can be reduced quickly.
Hope the comments help!
 
I hear you on not taking it too fast, but I still have two strong sacrifice branches going. The top section I am keeping on as an option but I may remove, so I figured I’d push some of the energy down by decandling. Maybe I should have waited until next spring and cut it back harder up top.
 
I hear you on not taking it too fast, but I still have two strong sacrifice branches going. The top section I am keeping on as an option but I may remove, so I figured I’d push some of the energy down by decandling. Maybe I should have waited until next spring and cut it back harder up top.
It is difficult to see from the picture how much foliage has been retained, or what strength the remaining sacrifice branches have. Simply the more strength retained the better the reaction when removed. Wishing you the best.
 
Here is the photo from April and those two sacrifices are still running strong, one at the bottom and one near the top.
Maybe I’ll take the top one in winter 2021 and the bottom one in the winter of ‘22 or ‘23 depending on how things are going. I can regrow one from the top to keep the wounds small, but the lowest one is terminal, so to speak.
From my first post from tonight, do you think the top section has a place, or should I be thinking smaller?
 

Attachments

  • 767F74A0-2FBC-434A-90EE-3A78E30F59A4.jpeg
    767F74A0-2FBC-434A-90EE-3A78E30F59A4.jpeg
    350.6 KB · Views: 57
Back
Top Bottom