Montpeiler Maple

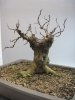
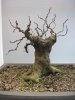
No front chosen as of yet, the stick is a water checker. Never had this variety, so making sure I know how it's water uptake is... The front will be from this side at some angle. Lots of decisions to make, just getting started.:D
 
Without reading all the posts, I would eliminate the two largest branches on either side. I would carve out the middle so instead of have a mass in the middle(adding a lot of weight to a taper problem) it would appear to be a fork in tree. I would carve it out down to the spot where a limb was taken off awhile ago. Make it look like an old hollowed out tree.


I love cutting out holes in other people's trees!!

Yes this carving has been an option both on my mind, and others have posted the same. There is even a really good example of a hackberry that I dearly love that this tree could emulate. It's a Ben Oki tree, perhaps you know of it. There is a link to it back in the thread somewhere.

I will eliminate one of the two larger branches or cut them both so they aren't mirroring as much. Wanted to leave them as options for now.

I am hesitating about the carving, as I see many old maples around here that have the same shaping (without the obvious missing center) and they are not hollowed out. Not that I have anything against carving, I just don't know that it is always the only option.

Perhaps in this case it may be, but I do love the untouched bark and shape of this trunk. I would love to hear any other viable ideas anyone has other than carving this piece. Can it heal enough? Or am I the lone ranger on this one?:rolleyes:
 
Here's an update for this years reduction and start on styling branching. If you look at the trunk closely, you can see the lines drawn where the carving will happen. Anyone care to weigh in on winter carving pros and cons?
I wanted to go in the direction of Mach5's drawing, but the top is too wide to attain that idea of just two main branchings. However I'm hoping to get something in between the current image, and that drawing.

I'm still very happy to have this tree, it is so chubby. and who doesn't like a chubby? :p
(I figured that everyone around here could stand to lighten up Francis....)

Front is prob. pic 2, and last is a year ago.
 

Attachments

  • IMG_3003.jpg
    IMG_3003.jpg
    54.1 KB · Views: 131
  • IMG_3004.jpg
    IMG_3004.jpg
    56.2 KB · Views: 128
  • IMG_3005.jpg
    IMG_3005.jpg
    57.6 KB · Views: 119
  • IMG_2249.jpg
    IMG_2249.jpg
    54.8 KB · Views: 114
Looking good Judy, and much improved from a year ago. Once your selected branches thicken up, the image will really start to come together nicely. As far as winter carving goes, I have always been under the impression that you risk die back if the tree isn't actively growing and unable to repair itself nearly as quickly. I suspect the best time to carve a maple trunk would be after spring flush and right into and through the summer...just guessing though. Good luck and looking forward to future updates, particularly after you break out the die grinder (or dremel:o).

Edit: I should add that I've carved lots of trees but they've all been conifers like juniper and yew... No maples...and I've always done it during the active growing season.
 
Last edited:
Nice progression, Judy. I like the progression. Have you thought about something radical like splitting the trunk? I have a tree with a similar configuration and I've been thinking of splitting the trunk at the top.
 
That's the idea behind the carving, to give that sort of feel. I don't think this would actually split very well, the wood is super hard.
You should share your tree, I'd love to see it.
 
Thanks Dave, I'm looking forward to seeing these branches get fat. Will change the image entirely I imagine. I think I'll probably keep this one fairly compact. I'll wait till summer to carve...
 
Looking great. Really like the squat sinister look--hope you continue the theme.
 
Soo glad you like it, bwahahhaaa (you have to imagine the creepy voice saying it, for it to make sense)
I shall name it boris.
 
Soo glad you like it, bwahahhaaa (you have to imagine the creepy voice saying it, for it to make sense)
I shall name it boris.


It's alive... IT'S ALIVE!! Bwahahahaha (read curled up evil hands waving in the air). Very nice Judy. Like the direction a lot and like the almost casual, wild feel of this tree. Like an ancient oak. Also apologies since I went back to the beginning of this thread and realized that the sketch was deleted from the thread due to my own doing when I was editing stuff out of my photobucket :mad: I am putting it back again on post #16.
 
Last edited:
Judy, have you decided whether or not you will carve it? I took from some of your posts you may be on the fence. My 2 cents, I love the trunk and the pics of it flushed out with growth looked great.

ed
 
M5, fortunately I did print that sketch out, (thanks for reinstating it!) and had it with me when I reduced and styled. I feel the same way about this tree, it has a certain charm in it's strangeness.

@ed, yes carving next summer, there are lines on the trunk in the current photos where that will be done.
 
That's the idea behind the carving, to give that sort of feel. I don't think this would actually split very well, the wood is super hard.
You should share your tree, I'd love to see it.

It's brand new, and in an "awkward" stage. I'll post it next year when I have a little more confidence in it lol. I want to see what kind of growth it pushes next spring after I chopped it up a bit this fall.
 
Here is the tree pushing buds, and after a session with my carving tool. Took off the large back branch, and went to town. Really happy with the outcome, did more branch editing, and a wiring. Will take off the crossing root now that the carving is complete, and may or may not repot it at the same time.
P1000485.jpg P1000487.jpg
 
Good work Judy! Looks like you were not afraid to really use that carving tool! ;) I have an amur maple that looks very similar to this tree and... I was also thinking about doing some kind of carving to it possibly doing the same as you did here all the way down to the base.
 
Very nice outcome Judy! I really like this one :)

Grimmy
 
Thanks guys, it's got a long way to go, these aren't very fast growers.

Funny, I just went back and reread the thread, and it's interesting the phases you go thru with a tree like this. Sergio, you were right about just having the two main "trunk" areas, I couldn't see it till I started carving.
And fwiw, I did all this carving with my dremel, it may take more time, but it's easy to use, and I wouldn't want to do it any faster anyway, it's hard to put wood back! ;)
 
Last edited:
Back
Top Bottom