David P
Yamadori
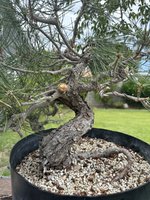
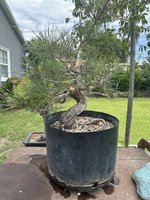
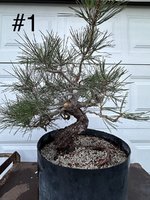
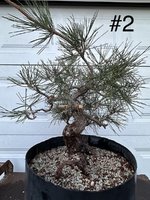
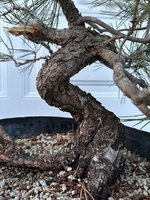
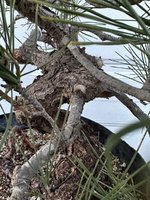
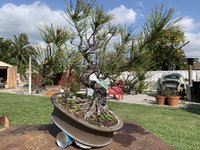
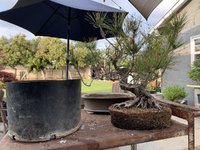
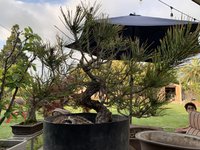
I need help deciding on the front for my tree before I cut any more branches. Here some pictures the first 2 are one option and the other 2 are my second option.
 .
.Hi thanks for your input. I’ve had this tree for over 10 years and have never done anything to it basically just watered it. It was given to me by someone who had it for maybe 20-30 years. I am now just starting to work on it. I’ve never understood JBP and how to work on them so I just left it alone. Now I’ve been researching and I think I have an idea but I hope I don’t kill it. That’s why I’m asking for help.Trunk moving away then back is better so option 2.
Seeing good strong roots is better so option 2.
Apex coming toward the front up higher is best so option 2.
Suitable first branch coming side and forward - option 2
The only spoiler is the 2nd branch growing from inside a bend but you have that from either side.
Check possibility of removing either that 2nd branch - Large open space??? OR remove entire apex and wire up branch 2 as a new apex??
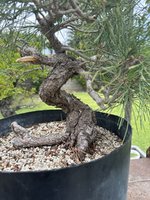
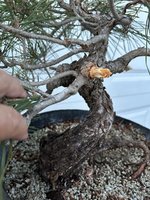
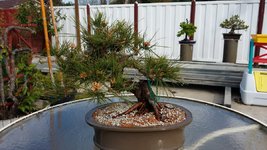
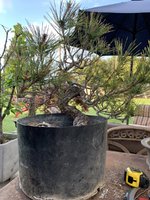
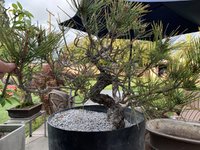
Hi here are some additional pictures. Also including pictures of that root I want to remove.I would consider first how you wish to deal with various planting angles and the view of the larger roots. If those aspects were improved first the options for front would increase and perhaps improve. Another key consider action is the position and direction of the lowest branch. What options exist to change direction, and or shorten. Bringing it down to flow better with trunk line will open options as well.
With the age and shape you are starting with the planting angle and root ball development, including those two major roots is the key starting point in my opinion.
Short answer, I would reconsider before limiting your choices to the two mentioned.
It would be beneficial to see pictures of all four sides. I am intrigued by the prospect of removing the the second branch that appears to originate on an inside curve and is too thick for its position on the trunk. Hard to tell with the limited views however.
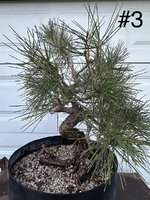
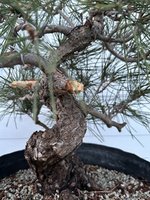
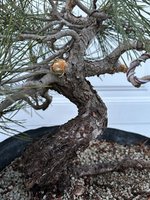
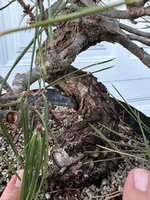
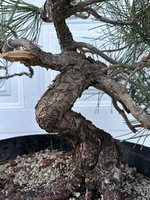
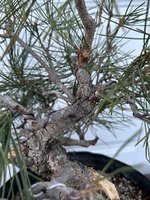
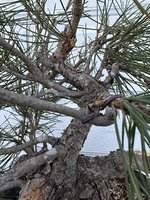
The extra photos seem to confirm that branch is a definite problem with all sorts of aspects - flow, taper, etc. There appears to be enough nearby smaller branches to provide replacement. It would definitely be on my list to remove but only you can see it in full 3D so your call.What do you think if I remove it?
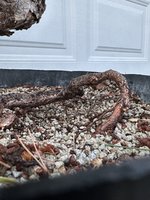
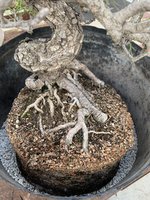
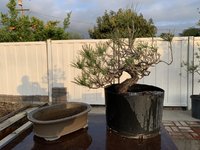
Even pines are capable of growing new roots. Like most other species, 90% of new roots will grow from the cut end of a pine root, very few emerge back along the length of the root. Even thick, old roots and those that have been exposed above ground are still capable of generating new roots when cut. Provided it has plenty of other roots to sustain the tree it is safe to shorten that root. Make sure you bury the cut ends deep enough so they have a good chance of generating new roots from the cut end afterward. If the worst happens and it does not make new roots you have not lost anything by removing another problem.The Roots on the left, the one that’s on the surface is probably the thickness of a quarter and about 7” long with no roots of any kind coming from underneath and into the soil. Then it has that loop on the far left and that’s the part that goes down into the soil. Do you think it’s safe to cut the whole thing off. Maybe at an angle and just leave about 1.5” to 2” of it coming out of the main trunk?
Thanks for the extra photos, they confirm the observations I previously posted.Hi here are some additional pictures. Also including pictures of that root I want to remove.
@River's Edge, thank you so much for your input you have been so helpful. For timing purposes of the work that's needed You probably should know that I live in Southern California in the city of Whittier, and we usually have a hot long summer. Prior to decandling this summer the tree was vigorous and very healthy and a very beautiful green color, now it looks a little thin and not so vigorous because it’s been decandled and I removed some needles to balance what's left.Thanks for the extra photos, they confirm the observations I previously posted.
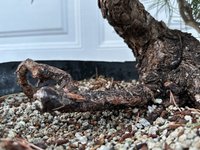
1.I would deal with the large root this coming spring. Because it comes off the trunk in a very prominent manner and forms a major part of the aesthetic powerful base I would use a combination of wire and bend downward. Think heavy bending below ground. At the same time I would shorten the feeder roots at the end of this very thick root to promote more side roots closer to the trunk. Other steps to consider with this root is to partially notch the thicker portion to ease bending and wiring. I would not wish to remove the root as a first choice because it would detract from the powerful base leaving a very large scar. Shortening it would just leave a thick straight section in my view. So that leaves bending it or burying it with a change of planting angle.
2. Not a fan of jin on pines, would rather heal scars over time. In this case the photos show almost a bar branch view of opposing jin.
3. There appear to be lots of smaller younger branches to provide design options if the thicker problem branches are removed.
Most importantly this tree has very good potential, well work working on it one step at a time, rather than trying to accomplish too much at once. The benefit of this approach is that each change tends to create a new clearer view with better possibilities that may not be obvious before the first and subsequent changes are made.
So my plan of attack would be the major root, and the thicker branches. When happy with that part of the process I would completely reassess before moving forward. I would use that time to further strengthen and improve the health of the tree. Bring it up to an optimum health level before further work to design and refine the tree.
I would be very happy with progress if this were accomplished in the next two years and the tree was ready for the next steps of design and wiring.
Full disclosure, I am fussy about wanting a tree to be vigorous before a major styling process and always try to get major aspects dealt with first.
The responses you have received should give you a wide range of options to consider. Yet the basis of a consistent approach. Proceed when you are comfortable with the process and reassess as you go. This will be a great project


Your plan to let them be till spring is fine.feel it’s fine to just remove them now
I would do a repot at the same time, that allows for the best alternative and choice. You will be fully aware of the overall root situation for planning purposes.I like your idea of bending it down into the soil with wire, Is the something I should do at a the time of repotting? or when do you suggest I do that?
That makes sense, my preferred process would be to grow out and cut back for extra density and health, leaving the decandlingnow it looks a little thin and not so vigorous because it’s been decandled and I removed some needles to balance what's left.
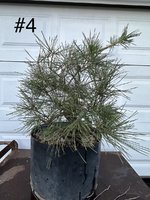
Overall the change is a good one in my view and dealing with the root is the next step to begin taking it to a different level. The change you made took advantage of a a better view of the trunk line and flow with the base.Originally the tree was at a different angle as you can see in the pictures. But I thought it would look better with more of an informal upright design so I’m the one who changed the angle knowing I would have to deal with that root eventually. in these pictures you will see what it looked like when I received the tree and what I’ve done.
OK, so in the spring time, anytime in March I assume in order to bend that root down, do you suggest I make a few perpendicular cuts about half way up the root from underneath about 1/2" to an 1" apart starting near the base of the tree? do you have any examples of that or a good resource I can look at to get a better understanding the necessary procedure?Your plan to let them be till spring is fine.
I would do a repot at the same time, that allows for the best alternative and choice. You will be fully aware of the overall root situation for planning purposes.
That makes sense, my preferred process would be to grow out and cut back for extra density and health, leaving the decandling
until the refinement process after the restyle is completes and recovery has taken place. Decandling creates more buds on tips but slows down the progress on bud back and density within the branches closer to the trunk in my experience.
Overall the change is a good one in my view and dealing with the root is the next step to begin taking it to a different level. The change you made took advantage of a a better view of the trunk line and flow with the base.
Your location with a longer growing season is a benefit for pine development. It has been many years since I visited that area, certainly I remember the hot and dry part. Lots of watering to keep your trees active and healthy!
I would only use a cut if necessary, other options include heavy wire, anchor wire and or a root splitter! The options you choose should be from less invasive first and then more aggressive if required and if within your skill set. Otherwise I suggest you seek assistance. California is a hotbed of accomplished Bonsai enthusiasts so that should not be difficult through any of the well established clubs and professionals within the state.OK, so in the spring time, anytime in March I assume in order to bend that root down, do you suggest I make a few perpendicular cuts about half way up the root from underneath about 1/2" to an 1" apart starting near the base of the tree? do you have any examples of that or a good resource I can look at to get a better understanding the necessary procedure?
IIf I understand correctly the diameter of the root is about the same as a quarter . Working with a seven inch length, I would use a fulcrum about mid point on the first section to assist with bending downward and #6 copper wire. Likely two wraps spaced equal distant . The goal would be to create a bit of downward movement in that root 3 inches or so from the trunk so it disappears when planted. The second bend is to bring the root closer and under the root ball. Thus compacting the root ball and enabling it to be cut back and eventually have smaller roots in closer on that root over time.thickness of a quarter and about 7” long
How do you make it fit traditional Bonsai aesthetic?Somehow I don't find the thick root above soil line to be ugly. I think it is actually quite interesting and can be part of the design to show stability if you change the planting angle in the future. If it was my tree, I would not cut the root off just to make it fit traditional bonsai aesthetic.