Help style this challenging Yew

RODERLO

Mame
Messages
228
Reaction score
468
Location
The Netherlands
USDA Zone
7
Hi everyone,

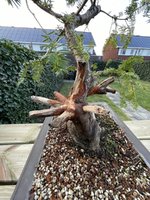
I've recently acquired this unique and rather unconventional Yew (taxus cuspidata).
It's approx. 70 cm tall measured from the soil up.
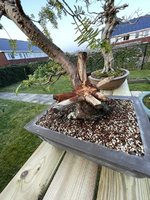
It's got several stubs in circular formation around base of the trunk, which I think present some interesting possibilities for carving.
Not sure yet what I want with it. I could lean into the "king's crown" look that it has now, and create something artistic and unique. Thus veering away from a more naturalistic look.
Or I could try to make it look like a second trunk was lost to the tree, possibly carving it into a partially hollow trunk.

Regarding the branch structure, I think that's where the real challenge is with this tree. Obviously, the main trunk is long, with little taper. It has been chopped abruptly at the end.
Secondly, the position of the branches aren't optimal. However I would really like to try and work with it. I think we often decide doing drastic chops/reduction too easily without considering the tree's unique properties and leaning into them.
I would love to take this tree somewhere interesting, perhaps even controversial, rather than conventional.
So please let your minds run wild with ideas for this one!

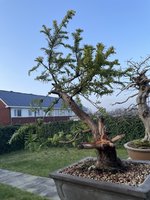
The tree is oriented in the pot like this right now:

IMG_2809.JPG
As you can see, most branches are positioned on the top of the trunk and flowing back down the trunk.

I am however considering using this as a front: basically turning it 90 degrees in the pot.
There is a lot more interesting movement to the trunk. Plus, the future deadwood would be more visible.
IMG_2828.JPG

I'd be really curious to hear your ideas regarding the styling elements of this tree (carving the trunk, branch positioning, possible front and planting angle)!
Thanks!
 
I might consider building the entire tree off the lowest branch - once you wire it up as a new trunk. Continue to prune back the original trunk over the course of a few years to transfer the strength of the tree from the old trunk to the new trunk.
 
I might consider building the entire tree off the lowest branch - once you wire it up as a new trunk. Continue to prune back the original trunk over the course of a few years to transfer the strength of the tree from the old trunk to the new trunk.
Thanks for your suggestion! It is an option that has crossed my mind as well. You may imagine it is something of a last-resort option for me, when there turn out to be no other viable styling options for this tree using the structure it already has.

plant it more forward then maybe this? Just a little more dynamic then my photoshop skillz lol
View attachment 532298

Thanks for quickly whipping up this example, Dabbler! I really like the idea of extending the deadwood up along the trunk.
The branch structure seems viable too. Gives the tree a literati feel.
I am also considering to bend a branch downwards to the right and create multiple pads from it (like in a cascade tree) & thereby giving it a more compact conical crown.
You often see this principle applied to picea (see example below).
In this case I would not be sure what to do with my lowest branch, as it's horizontal orientation would be conflicting with the cascading branches higher up.
1709819214285.png
 
I’m in agreement with @Bonsai Nut that you should build from the first branch. I’d cut the tree just below the second branch and do carving of that area.

My rationale is that the trunk is largely taper free from the 2nd branch and there’s a large gap between the first and second. With the branches removed already it’s possible to envision an old massive tree that has had its main trunk die back and is now fighting its last years out on a few branches. I think that story can be sold with carving - maybe an insinuation of a trunk snapping or holes for insect infestation. I don’t think carving to look wind worn will be convincing as it’s rather chunky and stable feeling - I’d go with a trunk break.
I understand the lack of taper is something that really drives the argument to cut back and develop from the lowest branch. It hasn’t got reverse taper though, so I wonder if some clever placement of foliage pads and some carving high up on the trunk can create the illusion of taper.

I want to try to first make something out of the current structure before any big reductions. I can always cut back, but never restore what I take away. I am not usually opposed to drastic cuts, but I’ve found some of the most interesting and beautiful trees come out of unusual styling possibilities. So before I go the more conventional route, I want to try discover more interesting options and work with the tree, rather than against it.
 
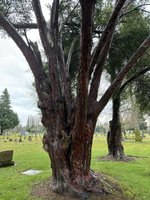
Most old yews take on a spreading habit.
A short stout trunk with long primaries arcing up and outwards from it.

A local tree.
1709843204735.jpeg
1709843362473.jpeg
1709843588764.jpeg


A more ancient tree ripped from google..
1709843720393.jpeg


In your situation I’d layer the top thinner trunk off and build off the thicker base to create something akin to the photos.
 
In this case I would not be sure what to do with my lowest branch, as it's horizontal orientation would be conflicting with the cascading branches higher up.
View attachment 532303
I like the idea of moving toward a tree with this structure.

A possibility for your lowest branch would be to wire it up and grow it as a second smaller trunk, then create a similar (bur smaller) cascading feel on that trunk too. You'd then have flexibility to go with @Bonsai Nut 's idea if you change your mind later, or chop off that lower branch/trunk if it doesn't fit with the design of the main trunk.
 
Most old yews take on a spreading habit.
A short stout trunk with long primaries arcing up and outwards from it.

A local tree.
View attachment 532373
View attachment 532378
View attachment 532379


A more ancient tree ripped from google..
View attachment 532380


In your situation I’d layer the top thinner trunk off and build off the thicker base to create something akin to the photos.
Awesome examples! Yews are such characterful and sinister trees. Gotta love ‘em. Not sure my tree will be suited to pursue the broom habit of these mature yews though. Not without at least spending half my life waiting for it to form a completely new branch structure. 👴
 
I like the idea of moving toward a tree with this structure.

A possibility for your lowest branch would be to wire it up and grow it as a second smaller trunk, then create a similar (bur smaller) cascading feel on that trunk too. You'd then have flexibility to go with @Bonsai Nut 's idea if you change your mind later, or chop off that lower branch/trunk if it doesn't fit with the design of the main trunk.

Now that is a very interesting proposition, to try and position the lowest branch as a second trunk! Perhaps I could then instead make the cascading branches along the left of the trunk and start developing a similar cascade on the second trunk towards the right. I’ll make a sketch of the idea later.
 
At some point I think you need to remove the wheel-spokes. Without those lengthy stub distractions the tree will begin to evolve into a more attractive base and you’ll see new possibilities unfold. I'd carve to utilize much, much shorter stubs that become one visually….one carved area and eliminate the sense of the individual stubs.
 
UPDATE 14-03-2024
ID: Taxus Cuspidata, acquired from the nursery of Danny Use

I spent some more time with this tree and drew up a design in the meantime. Tweaking and altering as I went along, until I found the design I envisioned.
I have stuck with my initial inclination to work WITH the tree as it is, and not do a drastic trunk chop.

Last weekend I went and did the first initial styling towards the sketched design.
Below is the comparison between the sketch and the first styling:

Yew vs Sketch.jpg

BEFORE AND AFTER STYLING:

taxus vs schets.jpg

CARVING:
I will attempt to follow the design as best I can when I create the deadwood on this Yew. The main challenge will be to create the hollow and extensive deadwood areas, as those are currently still live tissue.
Also, my experience with creating deadwood is limited. I would really appreciate some insight as how to approach this without compromising the tree's health!

FOLIAGE:
The sketch is an impression of what I aim the tree to look like in 5 years. This will require the pads that already exist to fill out and new pads to develop using new shoots.
I deliberately left all the tiny sprouts on many of the branches alone in this initial styling as I want to create as many options as possible for the next step.
The side view and the back view below really shows there is much left to fill in with not-yet existing foliage.
I aim to create a lot more cascading branches coming from higher up in the tree in a 360 degree arrangement around the trunk.

IMG_7320.jpg IMG_7321.jpg

COMPOSITION:
With the next repotting, the tree will be rotated 90 degrees towards it's new front. It will also be angled more towards the viewer, as it is slanted backwards a bit too much right now.

I would love to hear your ideas for making this design come to life and how to maximize chances of success!
 
Last edited:
I like where you want to take this.

Make sure you allow the yew to backbud, and wire young. The moment branches are a year old, they already do not like to be adjusted and take a lokng time to set. If you wire them in the growing season, they set much quicker.

Develop pads by removing inner needles so backbudding can be induced. Fertilize.
Thanks for chiming in Jelle! I will make sure to wire any new shoots whilst still pliable, instead of waiting for them to harden off. As for the current “mature” branches, I’ve obviously no choice but to be patient with them until they keep their shape.

I’d like to ask you about the dead wood as well. Do you have some knowledge as to how to proceed safely in creating my design? The hollow I’m envisioning is entirely artificial and into living tissue, instead of an already rotting section of dead wood.
 
UPDATE 14-03-2024
ID: Taxus Cuspidata, acquired from the nursery of Danny Use

I spent some more time with this tree and drew up a design in the meantime. Tweaking and altering as I went along, until I found the design I envisioned.
I have stuck with my initial inclination to work WITH the tree as it is, and not do a drastic trunk chop.

Last weekend I went and did the first initial styling towards the sketched design.
Below is the comparison between the sketch and the first styling:

View attachment 533736

BEFORE AND AFTER STYLING:

View attachment 533744

CARVING:
I will attempt to follow the design as best I can when I create the deadwood on this Yew. The main challenge will be to create the hollow and extensive deadwood areas, as those are currently still live tissue.
Also, my experience with creating deadwood is limited. I would really appreciate some insight as how to approach this without compromising the tree's health!

FOLIAGE:
The sketch is an impression of what I aim the tree to look like in 5 years. This will require the pads that already exist to fill out and new pads to develop using new shoots.
I deliberately left all the tiny sprouts on many of the branches alone in this initial styling as I want to create as many options as possible for the next step.
The side view and the back view below really shows there is much left to fill in with not-yet existing foliage.
I aim to create a lot more cascading branches coming from higher up in the tree in a 360 degree arrangement around the trunk.

View attachment 533746 View attachment 533747

COMPOSITION:
With the next repotting, the tree will be rotated 90 degrees towards it's new front. It will also be angled more towards the viewer, as it is slanted backwards a bit too much right now.

I would love to hear your ideas for making this design come to life and how to maximize chances of success!
Though I’m only 1 year into Bonsai, I am a believer in working with what the tree brings to the table (whenever possible). There is often such beauty and creativity waiting to be unlocked if we are willing to wait and search and find it. It is there. You found it.
 
I like where you want to take this.

Make sure you allow the yew to backbud, and wire young. The moment branches are a year old, they already do not like to be adjusted and take a lokng time to set. If you wire them in the growing season, they set much quicker.

Develop pads by removing inner needles so backbudding can be induced. Fertilize.
“removing inner needles” for backbudding is a $1Million statement
 
Though I’m only 1 year into Bonsai, I am a believer in working with what the tree brings to the table (whenever possible). There is often such beauty and creativity waiting to be unlocked if we are willing to wait and search and find it. It is there. You found it.
I couldn’t agree more! And I take that as a great compliment, thank you.
 
“removing inner needles” for backbudding is a $1Million statement
Yes, I’m familiar with the technique. One thing I can’t find information on is whether there is right time and a wrong time for doing this procedure. Or does it not matter when you perform needle plucking?
 
Back
Top Bottom