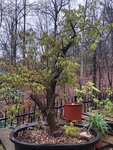
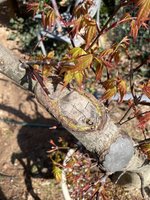
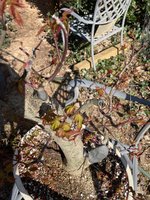
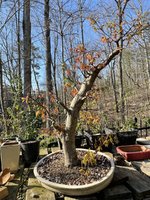
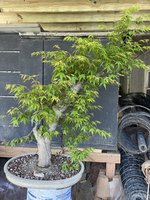
Go big or go home!

I have no idea, but I think it will take at least 10 years just to build the rest of the trunk. My plan is to ground layer this one next year, then probably put it back in the ground for a few years.
yeah thats what i had in mind too but kinda doubt if there will be nice transition + to get some matching branches and some ramification i think you may need an extra 10 to 20 years if not more.
so i wonder, if this is really worth it. i would think it may be easier to build a convincing maple starting from younger thinner material then this. i may be wrong but thats just what i think though,
You could be right, but who knows. This tree was sitting in a 1 gallon nursery pot less then 8 years ago and grew that trunk in my yard. I'm pretty sure a few years in the ground will really beef up that next section. Will it look good? We'll see...
 
@Dav4
Im making some of my own grow pots(Hypertufa like material) and wondering the dimensions of the pots shown, approx.
And great development, like others, we are looking forward to seeing these are they progress.
I reference this thread to some friends that have no idea when I say air/ground-layer there landscape trees they don't want anymore. So Thanks
Those are some of the largest Mika parts available… I’m guessing they’re probably 22 inches wide .
 
@Dav4 thanks and approx. depth/wall height?
Im playing with a more angled wall, rather than vertical, I have about 45deg. angle.

But as I said, playing with different shapes and forms, just think that a grow pot doesn't have to be so ordinary, we can add some "flash! a little Booyah!
 
@Dav4 thanks and approx. depth/wall height?
Im playing with a more angled wall, rather than vertical, I have about 45deg. angle.

But as I said, playing with different shapes and forms, just think that a grow pot doesn't have to be so ordinary, we can add some "flash! a little Booyah!
Those mica pots are 23" x 17" x 6.5". I've built and still use many wooden grow boxes of similar dimensions... very utilitarian in their design, though... no "Booyah!":confused:.
 
LOL, Dav4 thanks for the dim's.
and the Booyah, was just a stupid phrase, for adding some esthetic detail to my cement grow pots. I try to make them look more like rock formations, with layers, slight carving, and paint layering.
I use wood ones too, and lately got my hands on some large Styrofoam boxes/coolers...again these are all for development.
 
These got repotted today… I needed to work some of the roots on both of them but so far so good. Proposed potting angle in the last pics. I applied cut paste on the callus of the multi trunk to hopefully prevent roots from forming to high off the rootbase... that tree needs the most root work.
AFBDCB56-D5A9-4F9F-A1F5-9834FD4189C1.jpegFA3115A5-7453-4184-B545-8354014F5245.jpegC8FBC7A6-6A72-444D-9CB2-57F7CF61B023.jpeg68D04BB9-2076-4110-A7AD-D758D8D10554.jpeg19881868-49D2-403D-ADA3-BA182512E3D0.jpegFADB1D88-BFF2-4D93-AB1F-DF43D9F7BAFB.jpeg231CD0D3-0EB8-4C3E-B39B-3FD42F9119B6.jpeg448DD5E1-338D-4B3F-BA8B-9CCFEFAB3AAA.jpeg
 
Last edited:
Three weeks later and several of the grafts are ready to begin to be separated. They’ll get weaned off of the don branch and get fully separated in a few weeks. The approach graft has been on its own for a week and hasn’t looked back😊

90F1F0AD-9F82-402D-BA42-EADCE74241BD.jpeg6194CDA8-64C2-4EA0-9B97-1D042D6D623A.jpegB75C3C98-E800-4C40-B83A-1B3BC935CAE4.jpegDE92CE2D-917D-4F4D-B521-D5D318B39015.jpeg5BD3A7E9-A2E2-4BBD-98E6-2CB954481BCA.jpeg
 
There was a time when I couldn't walk into Home Depot without going through the garden center first and every landscape nursery had a monthly visit from me during the growing season. The pickings were slim and the results were generally disappointing. Now, along with working the refined bonsai and older prebonsai trees I have, I've come to enjoy creating and developing new stock from seedlings and layering potential material from maples in my yard. It allows far better control at the development process and this results in higher quality material and all it really costs me is time. My hope is to have lots of well developed material in a decade that might be a very nice bonsai when I retire in 2 decades or so... at least, that's the plan:D.
Same! Except I’m well behind you, and will never retire! Lmao
 
Question, i know when layering smaller material you pretty much just shave down past the cambium and can have successful layer..i notice how deep you are carving that band, is this because its larger material?

This makes me want to set some up in the big maple at my dads yard..just want to make sure i go deep enough after seeing this

Excellent and inspiring
 
I’m just thinking out loud... it would be nice if you could find some kind of metal ring (washer, or flange) you could slip over the bottom of the trunk, and snug up to the new roots

And if not a metal flange which is of course an excellent idea what if you were to use a hole saw and cut a nice hole into a board the diameter of the trunk ..you could snuggle it right up around the trunk into the root spread.. and would be easy enough to secure in place..ie if the trunk still protrudes pass the board they sell little right angle pieces kind of like shelving support-screw to board and of course trunk stub

I currently work as an ironworker and we do a very similar process but instead of a wood board and a trunk it is with metal pipe and corrugated deck

Oh and if no hole saw there are ways to cut it by hand of course,drill and coping saw or keyhole saw etc
 
Back
Top Bottom