Ezo Wars - Ezo Spruce Forest construction and development

Not at all

Presently the goal is to grow out as is to thicken the trunks and size up bit more. Little wiring will be done.

Can’t see your trees, so can’t comment but in general, wiring young spruces it’s very tricky as the needles grow all the way to the trunk. So one needs to try to wire in between (or remove) the needles. This wiring usually causes needles to be damaged / fall off.

…and Young Ezos have very small soft easy to damage needle!.

Once these needles fall and bare bark is shown, wiring is easier. See images of spruce below.
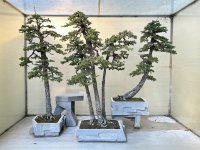
IMG_3024.jpeg

Note almost all the styling was done by trimming and clip and grow…. with pinching this keeps growth inside the profile.

We were successful in propagating Ezo, with 1/3 of the cuttings taking off. Sheer neglect - getting too dry on the heat mat caused this this discourage you, sure you’ll do much better. If we ever get time will try again.

Anyways propagating with cuttings was slow. On the other hand, more successful growth was achieved with ground layering lower branches.. although these haven’t been unearthed to date to observe roots, the branches are still growing strongly as little trees..

Hope that helps!

Cheers
DSD sends
 
Not at all

Presently the goal is to grow out as is to thicken the trunks and size up bit more. Little wiring will be done.

Can’t see your trees, so can’t comment but in general, wiring young spruces it’s very tricky as the needles grow all the way to the trunk. So one needs to try to wire in between (or remove) the needles. This wiring usually causes needles to be damaged / fall off.

…and Young Ezos have very small soft easy to damage needle!.

Once these needles fall and bare bark is shown, wiring is easier. See images of spruce below.

View attachment 585171

Note almost all the styling was done by trimming and clip and grow…. with pinching this keeps growth inside the profile.

We were successful in propagating Ezo, with 1/3 of the cuttings taking off. Sheer neglect - getting too dry on the heat mat caused this this discourage you, sure you’ll do much better. If we ever get time will try again.

Anyways propagating with cuttings was slow. On the other hand, more successful growth was achieved with ground layering lower branches.. although these haven’t been unearthed to date to observe roots, the branches are still growing strongly as little trees..

Hope that helps!

Cheers
DSD sends
I love that center one .. that is one of my my favorite pieces
 
Not at all

Presently the goal is to grow out as is to thicken the trunks and size up bit more. Little wiring will be done.

Can’t see your trees, so can’t comment but in general, wiring young spruces it’s very tricky as the needles grow all the way to the trunk. So one needs to try to wire in between (or remove) the needles. This wiring usually causes needles to be damaged / fall off.

…and Young Ezos have very small soft easy to damage needle!.

Once these needles fall and bare bark is shown, wiring is easier. See images of spruce below.

View attachment 585171

Note almost all the styling was done by trimming and clip and grow…. with pinching this keeps growth inside the profile.

We were successful in propagating Ezo, with 1/3 of the cuttings taking off. Sheer neglect - getting too dry on the heat mat caused this this discourage you, sure you’ll do much better. If we ever get time will try again.

Anyways propagating with cuttings was slow. On the other hand, more successful growth was achieved with ground layering lower branches.. although these haven’t been unearthed to date to observe roots, the branches are still growing strongly as little trees..

Hope that helps!

Cheers
DSD sends
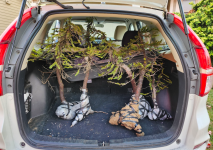
Seeing these spruce at the museum inspired me to collect a bunch of Engelmann spruce to make a forest, a project I started 3 years ago and I have a dozen or so trees at this point. I will post whenever it finally comes together.

I've been playing around with making ceramic slabs this last year for forest plantings, the "Kurama" type you see in the Saburo Kato book

1740932022271.png
 
Seeing these spruce at the museum inspired me to collect a bunch of Engelmann spruce to make a forest, a project I started 3 years ago and I have a dozen or so trees at this point. I will post whenever it finally comes together.

These guys are decidedly in the “adult” class. Looking forward to seeing this thread!

I've been playing around with making ceramic slabs this last year for forest plantings, the "Kurama" type you see in the Saburo Kato book

Awesome. Definitely be interested in one of these! At some point these Ezos will need a new home. What’s your prospective timeline on these slabs?

Best
DSD sends
 
Awesome. Definitely be interested in one of these! At some point these Ezos will need a new home. What’s your prospective timeline on these slabs?

Best
DSD sends
Yes sure thing. I plan to have some large slabs at Nationals but would sell a lot more locally if they work well. Some advance copies going out this summer.
 
Yes sure thing. I plan to have some large slabs at Nationals but would sell a lot more locally if they work well. Some advance copies going out this summer.
Please do share some examples! I plan on taking a crack at doing one myself but I’m not confident I’ll like the results 😂
 
These guys are decidedly in the “adult” class. Looking forward to seeing this thread!


Awesome. Definitely be interested in one of these! At some point these Ezos will need a new home. What’s your prospective timeline on these slabs?

Best
DSD sends
Nuh uh I’m interested more
 
I’ve been curious about these Ezos from Valavanis. They don’t look the same as the Ezo from Hagedorn, but maybe it’s just the juvenile vs aged. I have Ezo straight from cuttings from his trees and their foliage is way more dense than those..
Maybe it’s just some variation in the trees, but either way it’s coming along!!
 
Pretty sure Michael got hits stock from BillV, at least this starter stock, like Chojubai

Cheers
DSD sends
 
Oh, well that is probably true then. Maybe it’s just the growing style?
Here is a close up of mine to compare.
 

Attachments

  • IMG_3431.jpeg
    IMG_3431.jpeg
    345.4 KB · Views: 19
  • IMG_3430.jpeg
    IMG_3430.jpeg
    319.2 KB · Views: 16
Michael's ezos are all large, at least one came from Telperion, the chojubai from Brent Walston

Could be …thought he did tell me the starters came from BillV.

As always could have misheard.

Cheers
DSD serves
 
Oh, well that is probably true then. Maybe it’s just the growing style?
Here is a close up of mine to compare.

Again, could be. Don’t know where BillV sourced his Ezo’s heard through the grapevine most came from Jose Naga.

The fiorest Ezo came in two different year groups. As noted earlier.. One was greener and appeared more dense. After two years these all looked the same.

When I have time, likely later will post close ups of foliage.

Best
DSD served
 
Quick question DSD, did you do 1:1:1 Akadama, pumice, lava rock for your media? Do you know if ezo prefers a higher ration of akadama or anything?
 
Just gonna add on to your post with the construction of my ezo spruce forest today!
IMG_0450.jpeg
Started with this mica pot, about 28”x18”x2.75” or so. I read Saburo Kato’s book on bonsai forests and put together a plan… but the trees were a bit bigger than I planned so I had to make a few adjustments.
IMG_0451.jpeg
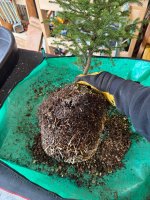
Subject number 1, the primary tree. I chose to keep trimming to a minimum to facilitate faster recovery. Roots were in great shape but the tree was more expansive than I originally estimated which resulted in me scaling back the planting by 2 trees.


IMG_0452.jpegIMG_0453.jpeg
This was my secondary focal tree. Roots were gently released from the planting media, a mix of compost, pumice, and lava rock, with a chopstick. Lots of fibrous roots and white growing tips.

IMG_0456.jpeg
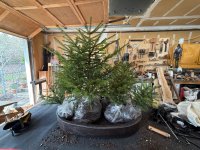
Once the roots were teased out, each tree’s roots were misted and placed in a plastic bag temporarily while I worked on the next tree, this actually made it really easy to test placements as the roots in the bag acted as a cushion allowing for easier management. Tested out a slightly adjusted layout and got to prepping the pot.
IMG_0457.jpeg
Went with 2:1:1 APL sifted to remove the fines. Layed down a base layer of the largest bits to ensure good drainage.
Apparently I didn’t take any pictures of the wiring down and assembly, hands were full but here is the final composition.

IMG_0459.jpeg
I added a small fern because I wanted to. It’s still a little too big though which certainly messed with the scale so it may not stay, we’ll see.
IMG_0462.jpeg
Here it is in its display bench for now. Sun in the morning and afternoon shade… if we ever get sun in the PNW.

I kept pruning to a minimum for now and almost no wiring. I think I may come back and do a very light pruning just to ensure light can get into the center and take some cuttings for propagation. Unlikely to do much wiring for now until the trees show me they’ve recovered.
 
Back
Top Bottom