Cement/Concrete/Grout Containers

ghues

Omono
Messages
1,554
Reaction score
3,148
Location
Campbell River BC Canada
USDA Zone
7b
There are posts on these types of containers so I thought I’d try and set up a thread where we can exchange ideas and examples.
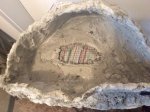
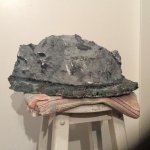
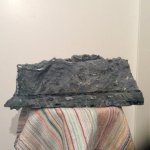
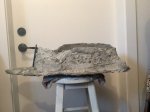
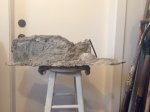
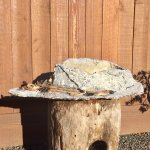
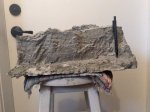
I tried making a number of containers recently using an Portland expandable grout, with. 1/2” wire armature and 1/4” drainage areas. Due to the design it took a number of applications/sessions to complete. Let it dry for a few days, then I painted this one as a trial.
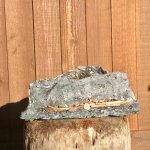
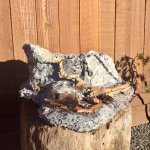
The concept on this one (and another much larger one) is an Island concept......Wild West coast of Vancouver Island....Broken Islands to be exact.....I’ll attempt to plant a forest in it come spring.
Photos are poor quality (IPad) but the colours should look more appealing in daylight.
First two photos are after production before painting, last two after painting. The tide line may have to be reduced or maybe expanded to reflect to continuing changes in tide lines.
Cheers
G.
 

Attachments

  • 5F4417A6-E78B-4C1A-A266-EBC12DD3BCA0.jpeg
    5F4417A6-E78B-4C1A-A266-EBC12DD3BCA0.jpeg
    266.1 KB · Views: 212
  • 2210070C-CA63-4348-BE7B-49ACB60DEA45.jpeg
    2210070C-CA63-4348-BE7B-49ACB60DEA45.jpeg
    303 KB · Views: 213
  • FE19F324-71BB-42F9-A7C0-B7BEED4F89D6.jpeg
    FE19F324-71BB-42F9-A7C0-B7BEED4F89D6.jpeg
    279.5 KB · Views: 218
  • 77872B47-62DB-4D48-98B7-5FE076962D2C.jpeg
    77872B47-62DB-4D48-98B7-5FE076962D2C.jpeg
    283.3 KB · Views: 223
I really like the third picture. How tall do you plan for the trees to be in this scene?
 
There are posts on these types of containers so I thought I’d try and set up a thread where we can exchange ideas and examples.
I tried making a number of containers recently using an Portland expandable grout, with. 1/2” wire armature and 1/4” drainage areas. Due to the design it took a number of applications/sessions to complete. Let it dry for a few days, then I painted this one as a trial.
The concept on this one (and another much larger one) is an Island concept......Wild West coast of Vancouver Island....Broken Islands to be exact.....I’ll attempt to plant a forest in it come spring.
Photos are poor quality (IPad) but the colours should look more appealing in daylight.
First two photos are after production before painting, last two after painting. The tide line may have to be reduced or maybe expanded to reflect to continuing changes in tide lines.
Cheers
G.
Have you tried Shapecrete?
 
Have you tried Shapecrete?
No I haven’t. A bonsai friend of mine has and explained that although it works it’s too expensive. The 50lb bag I use is C$13 (taxes included).
Here is my largest to date, will paint it soon. (For scale .....the mechanical pencil is 5 1/2”).
 

Attachments

  • D0BB5077-B9EA-48B4-910C-E81409ACCE3C.jpeg
    D0BB5077-B9EA-48B4-910C-E81409ACCE3C.jpeg
    227.5 KB · Views: 186
  • CD157176-6B45-444C-B56C-466B193EAFB6.jpeg
    CD157176-6B45-444C-B56C-466B193EAFB6.jpeg
    224.1 KB · Views: 186
  • Like
Reactions: SU2
a freeform combo of ceramic and concrete by an unknown potter in WA.IMGP0175.jpg
 
Update, added some paint and west coast beach features that are found on just about any beach exposed to strong storm winds, around these parts. First and third photo are of the same Island pot, second photo is of a smaller one, might add a third and use as a grouping....will take up a lot of the bench lol.
Cheers Graham
 

Attachments

  • 9520268B-CD61-4D7F-901F-5BBA7D64F848.jpeg
    9520268B-CD61-4D7F-901F-5BBA7D64F848.jpeg
    486 KB · Views: 158
  • 97005FD0-BA1A-4930-B492-925E79997AF2.jpeg
    97005FD0-BA1A-4930-B492-925E79997AF2.jpeg
    400.7 KB · Views: 152
  • 6962DD31-D6F5-461D-B458-E7DE4AD9ED5E.jpeg
    6962DD31-D6F5-461D-B458-E7DE4AD9ED5E.jpeg
    531.2 KB · Views: 168
That can look very nice, the first 2 weeks i keep mine wet as much as possible. Cement or concreet gets harder and the minerals are going away.
 
Heres some i made last winter. I'm itching to make some slabs and faux rocks for ror projects this winter,
 

Attachments

  • IMG_20170511_193147464.jpg
    IMG_20170511_193147464.jpg
    376.3 KB · Views: 161
  • IMG_20170512_151625492_HDR.jpg
    IMG_20170512_151625492_HDR.jpg
    206.4 KB · Views: 158
  • IMG_20170511_193008598.jpg
    IMG_20170511_193008598.jpg
    261.1 KB · Views: 153
  • IMG_20170511_204244.jpg
    IMG_20170511_204244.jpg
    289.3 KB · Views: 147
UnlikeUpdate, added some paint and west coast beach features that are found on just about any beach exposed to strong storm winds, around these parts.
Cheers
Heres some i made last winter. I'm itching to make some slabs and faux rocks for ror projects this winter,
Very nice, have you put trees in all of them?
Slabs....., got a couple going.....they are much easier......for mine, I find a flat service, armature, two pieces of heavy plastic, some boards and a weight. Once the armature (beneath 1 piece of plastic on level surface) is covered with the mixture, then on top of that the second piece of plastic, then boards and weight for compression.......with the stuff I use I have to have many pieces going (armatures) at the same time......as it’s needed for the many stages, as it’s not a mould per se, and because the mixture is fairly fluid and will build up on you if there is any significant angle.
Keep them coming....
 
That can look very nice, the first 2 weeks i keep mine wet as much as possible. Cement or concreet gets harder and the minerals are going away.
Thanks,
We get at least 60” of annual rainfall so there no issues about keeping them wet....as you can see they are outside
Graham
 
A little imagination required.......
The landscape container colour will be darkened.....and filled with the Larch in the background...(photo south the forests side view) trees will be separated, rearranged and other trees added where necessary from another batch of Larch that are growing and being groomed in an old, unused sandy soiled, old barefoot nursery Field. Just hoping for a long winter so when I get back from my snowbird hibernation, it will be the first project of a busy Spring repotting.
Cheers Graham
E3E8478F-A78D-453F-B7C9-DC61DD5C95D3.jpeg
 
Designing a container for your trees is as addicting as your initial thirst for more Bonsai knowledge.......as you easily got hooked into this living expression of Art.
Besides, what’s a guy gonna do during these long days and nights. Hopefully my measurements were correct for the J. Maple/Limestone combo. At least two more pours.

F02B87F5-F659-4462-90E8-8553C9CFAD2A.jpeg A09ED9CD-1C22-45B5-A820-77AE0D6EADD8.jpeg
 
  • Like
Reactions: SU2
With this type of production,(multiple pours) you have to have a few projects, next up a cliffhanger motive, a Mountain Hemlock, in a cliff crevice/pocket of soil....nothing fancy, still on a steep learning curve. First photo is the base that will hold the cliff (photo #3 below) and #2 is a pocket/cliff front piece.B1661AEC-D5A1-400E-9AA8-30D25BD1C8ED.jpeg3962CA3F-1B17-4757-A2F7-B1090FA63642.jpegCEE848EF-4323-4D32-9EE5-DF4CB4B0D6BD.jpeg
Not sure why it loaded up this way?
G.
 
Just for the fun of it... I tried using some left over floor leveler. IMG_20171226_143330232.jpg
I cut down some pieces of burlap, ran them through a thin mix then put them over some foam balls.IMG_20171226_143416158_HDR.jpg
I let them dry over night then used some needle-nose pliers to pull out the foam ball.IMG_20171227_184613034.jpg
I put a second coat on tonight then I plan on dry brushing and maybe putting some ceiling over it then I'll throw them in the snow for the rest of the winter and see what happens.
 
Back
Top Bottom