Zuisho JWP - with Guy Wires!

Excellent work! Such a transformation. Congratulations on another amazing tree on your benches.

Just makes me giggle thinking that there are people who do not wire
with pines, it’s pretty much impossible to effectively style without wire.

A tree like this one could be intimidating. I used a whole spool of Jim Gremel 16 gauge! And probably just as much 18 gauge. Lots of 14, too.

The heaviest wire was a bit of 8 gauge on the lowest two branches.

The main thing was to plan out the work so I didn’t have to double back and run more wire than absolutely necessary. That and making sure I set good anchors, and locked down the splices when I transitioned from a thicker wire to a thinner wire as I moved from the trunk end towards the tip.

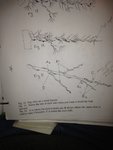
I did a LOT of Figure 15’s:
C2E04E2B-4FBD-4EA8-8469-943AD4A307D4.jpeg

I’ve done them so much now it’s no longer a challenge.

What’s harder is to sort out the myriad of branches to find the best “main line”.

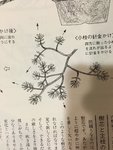
These diagrams show the process, but they’re greatly simplified:
D4B53F8F-5833-4653-BB54-9510F49E1A63.jpeg

This first one shows the untrained branch, with twigs going every which way.
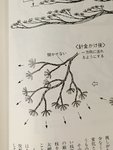
C79A9F9D-0506-4343-B33D-F9A9F6E4EB07.jpeg

And thus shows the branch sorted out with alternating left/right, left/right structure. It’s ysually not so easy. Especially if the lefts and rights are over grown. I had to do some trimming on the lefts and rights so that the main line would be the longest line. I see many poorly designed trees where the lefts and rights have never been cut back. What happens is instead of the being a central leader branch, it just becomes a fan, and the outer outline of the branch becomes a semi circle. Instead, I try to make my branches have triangular outlines. They’re sustainable. You can cut back (cut off) the central leader and wire one of the lefts or rights (or even better, a top branch) to take its place. The fans, on the other hand, just get wider and wider and wider. Eventually, they outgrow the trunk.
 
Reviewing, you remove all needles but for this year's, to start.
If needles are brown or yellowing = remove them.

This is "cleaning"?
 
Reviewing, you remove all needles but for this year's, to start.
If needles are brown or yellowing = remove them.

This is "cleaning"?
Yep. Also, there are sometimes places where at the terminal, there’s three new shoots. Two weaker side shoots and a center, stronger leader. I will usually remove the center leader, keeping the two weaker shoots.
 
Yep. Also, there are sometimes places where at the terminal, there’s three new shoots. Two weaker side shoots and a center, stronger leader. I will usually remove the center leader, keeping the two weaker shoots.

How do you remove the stronger shoot?

I cannot remove the whole shoot, and leave part behind whither or not I pinch or use scissors.
 
How do you remove the stronger shoot?

I cannot remove the whole shoot, and leave part behind whither or not I pinch or use scissors.
I’m talking about where there are three (sometimes more) little twigs growing from one node. I keep two twigs, and remove one. Usually the center one, with scissors.

EA39A26A-514D-4F18-BD08-1EB31DBB69F6.jpeg

Look at the “branch before cutting back”. See where they say “Branch too strong”? Now look at the second drawing. They cut the middle twig out.
 
The branch pads look quite flat right now, especially the lowest left (even though this may be just do to photographic perspective).

What we want (or what I like and what you've done with some other JWPs) is a rounded pad with a solid array of foliage puffs with branchlets visible only from below.

How do we get there from here?
It is the camera angle, largely. It’s a tall tree, so my pictures have been taken mid-trunk height. So, we’re looking down on that first branch a bit. I agree that the pictures look flat. Now that the tree is done, I might could lift the layers some, but I like the structure I’ve put in, and I think that once next years’ growth comes in, it will fill in. I did a “structural” wiring rather than a “show” wiring.
 
I’m talking about where there are three (sometimes more) little twigs growing from one node. I keep two twigs, and remove one. Usually the center one, with scissors.

View attachment 262642

Look at the “branch before cutting back”. See where they say “Branch too strong”? Now look at the second drawing. They cut the middle twig out.

Thank you for the illustration I was doing this all wrong and trying to take out the middle bud.
 
Here’s an update, nearly a year later, June 1, 2020:

76669936-C699-4A7A-966B-FD6F2A7DAE87.jpeg
As I mentioned, the pads have filled in, and gained a bit of height as the new growth came in. This year’s needles are still growing, and the candles are still elongating, so the pads will get “fluffier” over the next month or so.
Some of the terminals have grown out a bit too much, and I’ll probably go back and give them a light cutback. But overall, I’m pleased with how this one is progressing.

Zuisho likes to be kept “full” rather than “sparse”. I think it’s in its way. One thing I will have towork on is keeping the branches in check. As this has a relatively thin trunk, it should have relatively short branches. The current branch length is about a long as they can go. Fortunately, by wiring them out, it’s developing lots of interior branches that I can cut back to, and keep the branches in scale.

The pot is still oversized. Alas... I want the trunk to thicken, so keeping lots of room for roots is the best way to stimulate the growth that will fatten the trunk. Someday...
 
those are some nasty wire scare on that bad boy
For some reason, my attention was drawn to this post. Back on 2016, @Giga, complained about the wire scars on the branches. Hmm... I wonder how they look today?

Here’s the picture he complained about:

8DD4B7B9-5132-46C6-8C12-B045AF6A43B4.jpeg

Here’s how they look today, nearly 4 years later:


C95492E7-C6A0-430F-9A15-970277683794.jpeg

They’re all pretty much healed over, a slight discoloration difference is all that’s left.

So, yes, try to avoid wire scars if you can. But don’t freak out if they happen. Over time, things will even out.
 
An update: August 2020...

2A93BB47-4012-4BB3-8E0C-444636A04BA5.jpeg

With a year’s growth, the pads no longer have that “flat” look. New pine candles grow up, and give depth to the pads. As long as you have interior growth, you can achieve “layered” pads with height.

And, as branches get lovely long, the longer bottom sections can be cut back or removed, and the upper layers wired down to take their place. do, always strive to develop interior branches for the long term.
 
Very educational thread and what a great tree!!! I hope to have one of Julian’s cuttings one day. A Zuisho is one of my holy grail trees.

…any updates on this tree?
 
Back
Top Bottom