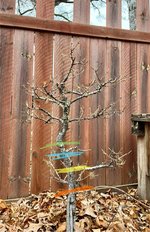
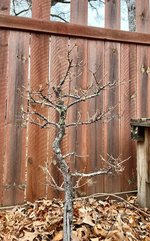
Where would you layer this Tamarack?
- Thread starter Eckhoffw
- Start date
pandacular
Masterpiece
I think yellow would be my choice. Right around there looks like the widest point on the trunk, and you get more of the fullness of the bend above.
MeDupree
Mame
Eckhoffw
Masterpiece
are you suggesting I layer it twice? Or lair at bottom yellow then chop at top yellow line?
Eckhoffw
Masterpiece
Delayed reply…… guess I never finished this
If I’m understanding this correctly, you think I should layer at the lower yellow line- chop at the upper yellow line- pull up the new leader.?
Definitely something to think about.
Thanks!
Time Wizard
Sapling
Yellow line would be my vote.
River's Edge
Imperial Masterpiece
I am curious to see the rest of the story! Perhaps a full picture and dimensions. Trunk has some real character and aged appearance!I know it would be better to have photos from more angles, but given this photo, where would you air layer this Tamarack?
View attachment 522132View attachment 522133Thank you for your input.
Eckhoffw
Masterpiece
Thank you. Here is the thread on collecting this one. I guess I don’t have dimensions measured, but you can get a better idea from the other pics.I am curious to see the rest of the story! Perhaps a full picture and dimensions. Trunk has some real character and aged appearance!
I like the tree as is BUT, even though the bottom section has some cool features to it, it’s just so long and straight. So I’ve been contemplating where to layer.
Maybe the bottom section can be re-worked after.
Bog Tamarack #2. Long Trunk.
This was also collected spring of 2022 from the bog in Luck,WI. It was the 1st of three I collected that day. It put up a good fight. Potted up in 50/50 pumice, sphagnum moss. Today. Trimmed back. I’m going to attempt an air layer here as the top portion is killer, but the lower portion, Well…...
B-funk allstars
Sapling
- Messages
- 43
- Reaction score
- 29
- USDA Zone
- 4a
_#1_
Omono
If it were mine, I'd keep the entire tree...
Nice find!
Nice find!
River's Edge
Imperial Masterpiece
I would estimate the tree itself around 36 inches tall once the root ball is compacted and developed for Bonsai. ( I counted bricks in the backgroundThank you. Here is the thread on collecting this one. I guess I don’t have dimensions measured, but you can get a better idea from the other pics.
I like the tree as is BUT, even though the bottom section has some cool features to it, it’s just so long and straight. So I’ve been contemplating where to layer.
Maybe the bottom section can be re-worked after.
Bog Tamarack #2. Long Trunk.
This was also collected spring of 2022 from the bog in Luck,WI. It was the 1st of three I collected that day. It put up a good fight. Potted up in 50/50 pumice, sphagnum moss. Today. Trimmed back. I’m going to attempt an air layer here as the top portion is killer, but the lower portion, Well…...www.bonsainut.com
Bottom line, collected material with some age and character, I would treat it like Yamadori as opposed to nursery developed expectations. Just another opinion. In other words neglect the aspect that has branching beginning over 1/3 up the tree. Instead drop down the main branch at a bigger angle and reduce the distance with slight bends and planting angle.
Now, selection of bend points will need to consider the section with natural shari, likely starting above that point. So consider the planting angle and basal flare to introduce a beginning change of direction rather than a straight up planting angle. Just some additional thoughts! It looks like some flare at the base, over time it could develop a better base than expected at this point. Usually when a flat is present some thicker roots are also present to work with for nebari.
MeDupree
Mame
Delayed reply…… guess I never finished this
If I’m understanding this correctly, you think I should layer at the lower yellow line- chop at the upper yellow line- pull up the new leader.?
Definitely something to think about.
Personally I find that section really interesting for an air layer but after seeing more pictures of the entire tree I really like the base of it too with the scar so may be worth working with the whole tree for a while longer to see what happens
River's Edge
Imperial Masterpiece
This picture has a 5 degree slant to the left- change of planting angle!
Red arrow indicates a possible spot for slight bend introduction to the right, no more than the base angle change!
For future consideration would be trunk reduction from the top if desired to shorten the overall design, however I think I better sense of unity and flow is retained with the original , given the lengthier base section.
I would plan the change of angle and base view to include the natural shari and plan all the additional work from that perspective. So the arrow is just a general concept. I am not considering that the best front based on one picture and no actual base or nebari in sight.
Just having fun deciding how I would approach it.
Tamarack with the light foliage could be incredible literati and the slender trunk is a natural beginning. nebari not so important in that case.

Eckhoffw
Masterpiece
Thanks so much for the thoughtful replies!This picture has a 5 degree slant to the left- change of planting angle!
Red arrow indicates a possible spot for slight bend introduction to the right, no more than the base angle change!
For future consideration would be trunk reduction from the top if desired to shorten the overall design, however I think I better sense of unity and flow is retained with the original , given the lengthier base section.
I would plan the change of angle and base view to include the natural shari and plan all the additional work from that perspective. So the arrow is just a general concept. I am not considering that the best front based on one picture and no actual base or nebari in sight.
Just having fun deciding how I would approach it.
Tamarack with the light foliage could be incredible literati and the slender trunk is a natural beginning. nebari not so important in that case.View attachment 522698
I’ve really gone back-and-forth with this one,
The top section has movement And foliage
- the bottom section has none, but it has character.
This was my main reasoning for splitting it up.
I love your ideas on how to progress this as a full tree. I’m going to Take you and @MeDupree ‘s advice and see what I can do with it in one piece. ….for now…
Eckhoffw
Masterpiece
Nice vibrant color this fall 

The lowest right branch grew like crazy this season. It was about a 16” longer before I cut it back a bit. It has thickened up a lot.
I’m getting more convinced that I may not want to layer the upper portion of this tree.
If I did layer, I would try to ground layer it.
Risky, but If I remember correctly, there is another good 3 to 4 inches of straight trunk
under the soil.
Been in this can of sphagnum and pumice for 3 years now. I plan on taking a look at the roots next spring and repotting.
Similar threads
- Replies
- 2
- Views
- 942
- Replies
- 7
- Views
- 4K


