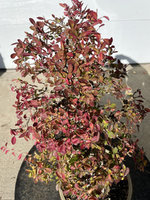
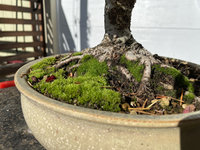
Ulmus parvifolia (A) progression

With all the diligence into this tree I think it looks pretty fantastic.....tells a story really.Roots are the bomb.I would not air layer and also post #57 looks best front if still feasable...although I like this angle too.
 
Looking very nice in a relatively short period of time. Nice work!

I would consider chopping at the red line and make the branch indicated with the arrow the new leader. It would improve taper and make the tree have a more rounded apex indicative of an older tree. I also think the tree would greatly benefit from wiring out every branch and twig.

Nonetheless, nice tree and nice work!
IMG_0064~2.jpeg

Cory
 
Last edited:
I'll leave the top of the tree alone in this comment and just say that what you have done with the base/nebari over such a short time to develop it to where it is ... awesome effort!
I have seen a lot of really poor bases and root spread on chinese elm, but this isn't one of them.
I'm excited for the development of the tree as you move it forward. Seriously good job to date!
👍 👍🍺
 
Enjoyed reading through this immensely. I've been selling off a lot of deciduous trees lately, using the money to get a pair of elms.
 
Somewhere in September I gave this tree a trim to edit out undesired branches. I was able to get some separation between branch pads and the crown continues to broaden, giving the impression of age.
IMG_1421.jpeg
 

Attachments

  • IMG_1422.jpeg
    IMG_1422.jpeg
    314.4 KB · Views: 85
  • IMG_1423.jpeg
    IMG_1423.jpeg
    215.4 KB · Views: 104
Thanks for the great thread! I don't think there is anything wrong with the first branch. The tree looks great! I do like Misfit's proposal on reducing the height and improving the taper.
 
Great progression, showing what can be done with sound technique and time!
 
Consider this:

refine.jpg
I think you are letting your apex get away from you. The upper 1/3 of the trunk is too straight and uninteresting. I would reduce the height of the tree, and while doing so shift your apex slightly to the left to give some movement to the upper trunk and some balance to the design. Continue to develop your primary branch, but also extend the branch directly above so that it fills out a triangular mass of foliage.
 
Mixed fall color on November 14
IMG_0135 2.jpeg

On the trunk you can see some new, dark scars. Unfortunately it was chewed up a little bit by squirrels. I was angry! Their population has been reduced a little bit 😎

In the summer heat they were desperate for water and chewed on some of my trees. They stopped that once I started leaving out some dishes of water.

This year I picked up a great set of pots from Vicki Chamberlain. This one is the right size to continue growing out the canopy so its form is more rounded and balanced in the proportion I’m planning. It’ll be allowed to grow a bit wider of an outline. Hopefully I’ll easily be able to get some pillowy, cloudlike pads soon.

January repot
IMG_2264.jpeg

Late April, showing the slow growth of a cold and wet spring
IMG_2765.jpeg

June, before some minor pruning to balance out the growth a bit
IMG_3119.jpeg
 
In the summer heat they were desperate for water and chewed on some of my trees.
They did a lot of damage here this summer also. The usually just dig in the pots but this year they chewed off branches and pretty much killed all my p.afras.
 
Love the thread, really appreciate a great progression!

I think you have two great trees here… air layer off that sweet formal looking broom up top and make the base more powerful and show off that awesome nebari?

Lame sketches, but you know. Phones

A61A31DC-91C5-4A46-9183-F0A92B39C3AC.jpeg


B54B4867-0D94-457E-BD6F-D85E7BAF6364.jpeg
 
I’m continuing to trim back its growth 2-4 times a year. The silhouette is filling in better and approaching the size and shape of my desired image. Pad separation will continue here and there as the pads fill in.

The first full flush of the spring, hardened off:
IMG_2928.jpeg

Pruned back for continued twig development:
IMG_2985.jpeg

The shape of the top ended up a little arbitrarily flat this go around. Ignore that. It’ll all come out in the wash.
 
Back
Top Bottom