Now, I regret that I got completely caught up in the project and neglected to photograph some key elements to make it easier to explain what I found, so I will try my best to explain. What I should have done was cut a ring around the bottom of the trunk (just like and air layer) and then added the tourniquet for an added safety measure. The tree just absorbed the wire tourniquet, which made a real nice flare by the way, and just threw out some roots around the part of the trunk that was buried.
Here are some pictures of the process. I started by shortening the tree (I think that picture is actually on of the ones above), not the final chop, just cut it some to make it more manageable. Then sawed off the lower portion of the roots with the saws-all.The final cut was made with a hand saw, you can see the wire tourniquet swallowed inside the trunk, a good ¼ inch all the way around.
View attachment 185594
View attachment 185595
View attachment 185596
View attachment 185597
View attachment 185599
The remaining roots, such as the were, were cleaned up and the trunk was dusted with rooting hormone and then screwed to a plastic cutting board. This is where I was really caught up in the moment and forgot about the camera. The entire assembly was potted up in a training pot, we’ll see what happens, hopefully it will be good.
View attachment 185598
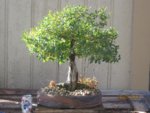
All of that work was done on February 17th of this year, fast forward to just yesterday, March 29th, and we have this. Not too shabby up top, a little thin on one side, but I think I can work with it.
View attachment 185600
View attachment 185601