Tricks?

Smoke

Ignore-Amus
Messages
11,668
Reaction score
20,727
Location
Fresno, CA
USDA Zone
9
I have always been curious about the effects of some bonsai tricks to do certain aspects of the art that take a lot of time. I showed the way I was able to fatten tridents to double size by using a trick of spur pruning in the spring and then allowing it to grow all year long, trimming nothing to increase girth from the increased food available at all the old spur prunings.
'
I am well on my way in sharing the process for making movement early in some maple trunks by growing them under window screen.

Now I would be interested in seeing some pictures if available of those that have had any success in growing maples in tiles. Does anyone have any pictures of growth spreading on top of the tile, time frame etc., etc?
 

pmalelis

Mame
Messages
128
Reaction score
39
Location
Brewerton, NY
USDA Zone
5a
smoke, I have read about your technique of growing the seedlings under screen, but the spur pruning sparked some interest, could you point me in the direction of an old thread? Thanks
pete
 

bwaynef

Masterpiece
Messages
2,022
Reaction score
2,413
Location
Clemson SC
USDA Zone
8a
Does anyone have any pictures of growth spreading on top of the tile, time frame etc., etc?

I'm going to need another year or so. Hopefully (and I'm sure) you'll get responses/results before then.
 

Brian Underwood

Chumono
Messages
930
Reaction score
214
Location
Santa Rosa, CA
I've got a trident and two olives growing ON tiles right now, which will be re-potted next spring. Jim has a few fused tridents that were grown THROUGH tiles that look pretty incredible. I'll have to find some pictures...
 

Beng

Omono
Messages
1,279
Reaction score
51
Location
Los Angeles, CA
USDA Zone
10b
I have a cork oak growing on a tile but it won't be repotted till next year... So I'm not much help
 

Smoke

Ignore-Amus
Messages
11,668
Reaction score
20,727
Location
Fresno, CA
USDA Zone
9
Well this is what I have so far. I started with five cuttings I took the previous year. Punched a hole in the bottom of a terra cotta saucer. The hole is just a little larger than 1/4 inch. Not quite 3/8.

Planted the whole thing in a pond basket.

I started this the last week of January.
 

Attachments

  • DSC_00020002.jpg
    DSC_00020002.jpg
    76.4 KB · Views: 109
  • DSC_00360002.JPG
    DSC_00360002.JPG
    85.2 KB · Views: 119
  • DSC_00380004.JPG
    DSC_00380004.JPG
    108.7 KB · Views: 121
  • DSC_00460001.JPG
    DSC_00460001.JPG
    114.2 KB · Views: 128

Smoke

Ignore-Amus
Messages
11,668
Reaction score
20,727
Location
Fresno, CA
USDA Zone
9
The update now is that the trunks have all fused together and are creeping out on the saucer. The base is about as large as a nickle. The trees were matchstick size when I threaded 5 of them thru the whole, and now they are as large as a pencil.

I have some pretty good size roots on top of the saucer so far and it looks like it will continue growing well. The trees are just shy of four feet tall right now.
 

Attachments

  • DSC_00120004.JPG
    DSC_00120004.JPG
    94.1 KB · Views: 163
  • DSC_00080001.JPG
    DSC_00080001.JPG
    109.2 KB · Views: 170
  • DSC_00100002.JPG
    DSC_00100002.JPG
    78.7 KB · Views: 170

clic8991

Sapling
Messages
40
Reaction score
10
Location
Durham, NC, USA
USDA Zone
7B
I dont have many long term results (I only started this technique last year), but I have begun to experiment with growing on and through tile with Japanese Maple, Trident Maple, Crepe Myrtle, Native Sugarberry (I think), and some pine. Some of the growing is in the ground, some in pots and, some in pond baskets/colanders. There is actually a very good pictorial article on growing through tile in Bonsai Today 104 pg 30-41. It is far superior to anything I will post here.

Materials:
-4X4, 6X6 Ceramic Tile (Other sizes will work)
-Masonary Drill Bit (Bosch 1/4 in. Blue Granite Turbo Carbide Hammer Drill Bit; Im not sure if this is best, but it did the job)
- Drill
- Dust Protection (Im not sure what is most suitable for this application)
- Ear Protection
- Eye Protection
- Seedlings (or cuttings if you are the type that gets a high percentage of striking success

General Idea:
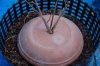
1. Drill a hole (or many) through a tile
2. Put a cutting or seedling through each hole so that all the roots are on one side only. I believe It is important to ensure all roots are below the hole in the tile so that existing roots do not become dominant above the tile.
3. Plant it in the ground or in a pot covering the tile surface with sufficient subsrate/soil to support new root growth.
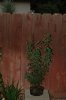
4. Let it grow, the Bonsai today article says up to 4 years before root pruning. I would shape the trunk as desired.
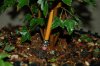
5. As Smoke showed, as the tree swells/grows, the hole in the tile induces new roots forming at the constriction. These roots are forced to grow on the tile surface creating a flat nebari and fuse with nearby root growth if there are multiple trees.

Results:
After one year I do generally get nice radial root formation at the site of constriction and lateral root growth forming the beginnings of a nice nebari. In some case a couple roots appear to dominate. These may even out over time or corrective pruning may have to be used to ensure the desired effect is achieved. Certainly at some point the nebari will have to be touched up.

Concerns/Questions I have asked myself:
Do I have sufficient material (organic or otherwise) above the tile to maintain tender shoots through the summer and protect them in the winter?
When to prune the new roots?
Will this technique yield very similar safe bonsai every time?
Should I try varying spacing and angle of trees?
Does the sizes of the hole or seedling matter?
What types of trees are suitable for this technique?

I will be digging up some this spring and will post some of those pictures when I do. Oh, I also have a trick that may not be great, but is better than a busy background in pictures. I spray painted a large sheet of insulation black on one side and put gray mortar on the other side. It is a light weight two color photo backdrop that stores relatively easily. Its a little rustic, especially when I leave it in the dirt, but that is how I like things.
IMG_4230.jpgIMG_4226.jpgIMG_4236.jpgIMG_4244.jpgIMG_4202.jpg Results Pics on next page.
 
Last edited:

clic8991

Sapling
Messages
40
Reaction score
10
Location
Durham, NC, USA
USDA Zone
7B
After two years I got curious and repotted some of my through-tile maples. Here is a ~3 year trident grown in turface and sited pine bark. It was grown on a 4"X4" tile through a ~1/4" hole and fertilized heavily with miracle grow. Top growth and root growth was strong and both were left to grow freely. Root growth is somewhat coarse, but a nice radial root pad was formed.The root(s) that grew through the tile were very stunted. I cut these root(s) off during this repotting, but i'm not sure this was necessary as I am only repotting into the same sized container. The damaged caused by additional swelling if this root was left may have driven further roots to spring from the base and grow across the tile. A root took off high on the trunk, which I removed and this wound can bee seen.

Anecdotally, I also had a similar project with a hackberry through a tile in a pond basket and got many more feeder roots, but this is a different species. In the future/ideal conditions, I would probably preferentially put these in pondbaskets/collanders to force/ensure feeder root growth and use more pumice/akadama in the soil to encourage less coarse root growth. You can see that feeder roots appear to start at the edge of the tile, presumably because of more hospitable conditions there. Potentially planting the tile deeper in the pot would generate a better root mass, but this is just a guess. I am happy with this method as I like growing at this stage and it produces traits that are generally desirable for bonsai.

IMG_5884.JPG IMG_5891.JPG IMG_5893.JPG IMG_5898.JPG
 
Last edited:
Top Bottom