The Education of a Bonsai Potter II

Gaea's listener

Yamadori
Messages
92
Reaction score
161
Location
Ontario, Canada
USDA Zone
5b
One other comment after visiting your site - make sure your bonsai pots are functional. That typically includes:

(1) Heavy; stable; not easily overturned
(2) Proper drainage
(3) Wire tie-down holes
(4) No thin edges
(5) Frost-proof

Because these pots have to sit out in all sorts of weather and be subject to all kinds of situations, they need to be built to take some abuse. The last thing you want is to pay $$$ for a nice pot, be working a tree, accidentally drop your wire cutters, and break off part of the rim. Pots are moved around on benches and will occasionally bump into each other. They will be picked up, put down, and spun around while full of dirt and a heavy tree, etc. They will be in blazing Arizona sun on a 110 degree day, or huddled under a Minnesota bench when it is -20. I have even had pots with trees in them get blown off a bench during a thunderstorm, and be none the worse for wear. So make sure that the function is at least as good as the form.

May I please hop into this thread. I am also a potter and currently exploring the making of the bonsai pots. Would you please elaborate on the subject of proper drainage and wire tie- down holes? Specifically, how many drainage and wire tie- down holes per pot are needed? Is there a recommendation as of the location of drainage holes in relationship to the feet?

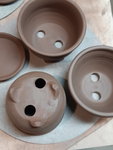
I don't have much experience with wiring the bonsai into the pot so any information is valuable. Here is an example of the smaller pots that are just in the experimental stages, could you please advice about the spacing and placement of wire tie-down holes?

Thank you
 

Attachments

  • 20201001_151326.jpg
    20201001_151326.jpg
    92.4 KB · Views: 41
Last edited by a moderator:
I'm going to create a separate thread for you, just so we don't have two separate discussions going on in one thread :)

I don't know there is a science to placing drain holes and wire tie-down holes, so I'll just share my thoughts and let others chime in.

(1) It is really important that you are neat and symmetrical. Make sure drain holes are evenly spaced, and on the centerline of the pot, or in the case of a circular pot, are in the center, or equidistant from the center and spaced equidistantly from each other. In your one image, you can see how you placed two drain holes somewhat haphazardly on the bottom of a circular pot. With the three pot feet and two holes off center it ends up looking sloppy and off-balance.

(2) Make sure the the bottom of the pot is slightly concave (or perfectly flat) on the inside, and that the low points are the drain holes. You don't want any low spots away from the drain holes where water can pool.

(3) I don't know how many drain holes you need for the size pots you are making, except to say that I don't think you need more than two for any pot 12" or smaller. If you feel you need more drainage, however (after prototyping or whatever) it is much better to add additional drain holes than to increase the size of the drain holes you have. I have seen some pots with massive drain holes that become difficult to place screens over or to prevent soil from falling out.

(4) I have seen some pots with an insane number of wire tie-down holes. I can't imagine any pot (or tree) that needs more than four. With four you can create an "x" as well as place wire loops on all four sides of the rectangle created by the four holes. Don't make the error in assuming that if four is good that six (or heaven forbid eight) is better. The purpose of tie-downs is to simply anchor the tree in the pot - they serve no other functional role. You should never need more than four holes to anchor your tree - I have been doing it for years using just two drain holes on many pots - with a tie-down wire on either side of the trunk to secure the root ball in the pot.

(5) Looking at your circular pots above, imagine how clean it would look with one central drain hole, and three wire tie-down holes - one in front of each foot.

Bonsai pots are all about the detail. If I look at a pot and the feet aren't level, or the rim isn't flat, or the sides are warped... I will buy something else. Granted there is always a little leeway in a handmade, individual piece of ceramic... but you can't be messy at all. If you leave a fingerprint on your pot because you can't be bothered to finish it properly... no bueno. Focus on getting the details of construction PERFECT before you worry about fancy glazes or creative exterior embellishments. Some very expensive exhibition pots are quite simple in their lines... but renowned because of the perfection of their simplicity. It is harder to do simple well than to do crazy creative pots with acorns and mice and crazy crackle glazes, all of which tend to hide imperfections (or at least the potter thinks so :) )
 
This is an illustration of the benefits behind these newer half inch seperated double tie holes.

The top is how we are taught to wire in, the bottom what double holes allows.

Yellow is the inserted wire, the dotted line is where we actually drag it out to though.
Red is where the wire ends up.
Green is the distance of travel which damages roots.

20200927_104402~3.jpg

The closer the 2 ends of wire, the less damage, movement of roots and soil, etc.

Truth Truth though....

Both of those methods should be out of style shortly.😉

The most useful place for a tie down hole is between the center and rim, favoring more towards the center as the width increases, since the best wood to tie is usually there. Not so close to the trunk it's unhideable, not so far that it crushes delicate feeder roots.

For rounds. One drain hole center till around 12" or so, then one hole for each foot when larger, with one in the middle depending on how your bottoms bow.

I dry upright and fire upright so my bottoms sag. Convex. So a middle hole is required.

If dried upside down the bottoms are usually concave, so a middle hole is less useful, and feet holes are required.

Sorce
 
Thank you for in depth information in this topic. Upon cutting the two holes in the round pot and adding the feet I could see how sloppy/ off balance it looks like. These pots will be used for the regular plants instead, and for the future I will take your advice on symmetry. For the idea to make one drainage hole in the middle with 3 wire tie- down holes: I had no idea the odd number of holes is acceptable. Also, this method would make the most sense since the bottom of the pot is the lowest and the water will accumulate there, I haven't thought of that either. Great points and observations!
 
This is an illustration of the benefits behind these newer half inch seperated double tie holes.

The top is how we are taught to wire in, the bottom what double holes allows.

Yellow is the inserted wire, the dotted line is where we actually drag it out to though.
Red is where the wire ends up.
Green is the distance of travel which damages roots.

View attachment 332510

The closer the 2 ends of wire, the less damage, movement of roots and soil, etc.

Truth Truth though....

Both of those methods should be out of style shortly.😉

The most useful place for a tie down hole is between the center and rim, favoring more towards the center as the width increases, since the best wood to tie is usually there. Not so close to the trunk it's unhideable, not so far that it crushes delicate feeder roots.

For rounds. One drain hole center till around 12" or so, then one hole for each foot when larger, with one in the middle depending on how your bottoms bow.

I dry upright and fire upright so my bottoms sag. Convex. So a middle hole is required.

If dried upside down the bottoms are usually concave, so a middle hole is less useful, and feet holes are required.

Sorce

On my pot of yours, I like how the pot that just has a flat bottom has recesses into the bottom for wire, which makes a huge difference.

I have unlimited access to 10” bulb pans that I use for training and after holes are drilled for wire, Its immediately noticeable.

Ill take a pic next time im out with my trees.
 
For the idea to make one drainage hole in the middle with 3 wire tie- down holes: I had no idea the odd number of holes is acceptable.

Speaking on odd numbers-

even though symmetry is important in pots, Asymmetry and odd numbers are a strong theme in bonsai.

ie., the “traditional rules” of ratio, having an odd number of trees in a forest planting, offsetting a tree in a pot, etc.

Tons of great trees are exceptions to every rule, but a lot of inspiration can still be found in traditional design.
 
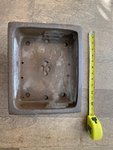
Pot is only 10inx12in
 
I have always been thinking: since Anderson flats is so superior due to it's ability to let air in and water out, why don't bonsai pots have a ton of small holes at the bottom to increase air flow? It's not even visible anyway.
 
I have always been thinking: since Anderson flats is so superior due to it's ability to let air in and water out, why don't bonsai pots have a ton of small holes at the bottom to increase air flow? It's not even visible anyway.

The more holes you put in the bottom of a pot, the more you weaken it. To make an Anderson flat out of ceramic would be a recipe in disaster.

I knew someone was going to toss out a forest pot as an exception to the rule :) Ok so I will admit, a big 36" forest pot can use additional tie-down holes because they are dealing with numerous trees. For the other 99.9% of bonsai pots, four holes is enough :)
Is it possible to built pots like we pore concrete? Adding metal in the clay to strength the structure? Not sure how the metal is going to handle the heat though...
 
Is it possible to built pots like we pore concrete? Adding metal in the clay to strength the structure? Not sure how the metal is going to handle the heat though...
Speaking as a novice potter - you'd have to do some research to get that answer. In theory the idea of some kind of "rebar" might sound good. But for example, I know that on average most clay bodies shrink @ 8-10% when you bisque fire. That could lead to cracking with a solid structure like wire inside that isn't going to shrink the same way. Pending what kind of metal is in there - I'm not even going to pretend to know about metals.

Also thinking about this idea it could be really hard to work with wires inside of thinner clay pot walls. How would you keep your wires "centered" in the middle of your clay slab as you're rolling it out?

Wire is used as armature inside sculptures that need support, but those are usually thicker pieces.
 
This is an illustration of the benefits behind these newer half inch seperated double tie holes.

The top is how we are taught to wire in, the bottom what double holes allows.

Yellow is the inserted wire, the dotted line is where we actually drag it out to though.
Red is where the wire ends up.
Green is the distance of travel which damages roots.

View attachment 332510

The closer the 2 ends of wire, the less damage, movement of roots and soil, etc.

Truth Truth though....

Both of those methods should be out of style shortly.😉

The most useful place for a tie down hole is between the center and rim, favoring more towards the center as the width increases, since the best wood to tie is usually there. Not so close to the trunk it's unhideable, not so far that it crushes delicate feeder roots.

For rounds. One drain hole center till around 12" or so, then one hole for each foot when larger, with one in the middle depending on how your bottoms bow.

I dry upright and fire upright so my bottoms sag. Convex. So a middle hole is required.

If dried upside down the bottoms are usually concave, so a middle hole is less useful, and feet holes are required.

Sorce
I have to disagree with your wiring down theory. With a 4 hole pot, I construct a “cage” that secures the tree very firmly to the pot, and it doesn’t “crush the feeder roots”. Nor does it send wire over the top of the rootball. Your pots have far too many wire holes.
 
Here is an example of one of Japan’s most respected potters: Gyosan:

AA7EBD94-6871-4E5D-8212-46B775AFB2B4.jpeg

779BB4D8-0827-478A-AD87-35A35AAFDF09.jpeg

This one has his signature fancy center hole, 4 drain hole in the corners, and a couple extra wire holes on the sides. I usually don’t need to use the side wire holes, I just use the 4 corner holes.

He also put in extra drain holes in the ends.

If you use the side wire holes, the wire might be visible from underneath.
 
Back
Top Bottom