Skin Graft

bonhe

Masterpiece
Messages
4,147
Reaction score
8,775
Location
Riverside, CA
USDA Zone
11
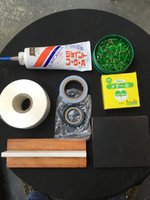
I like to introduce this special skin graft to you. As you know, after we prune the branch, it will leave a wound in the area. This wound will eventually heal over, but unfortunately some will never be healed! Based on human skin graft technique, I modified the technique and applied it to my plants. It works very well for me. It is very easy to perform. It takes me about 3 minutes to finish one job!

This afternoon, I worked on this 13 y.o. KBP.
Before
200269469_928984137668898_6547060876294907126_n.jpg

After pruning the Spring shoot, removing some old needles and wires
200266185_928992224334756_981853527276665794_n.jpg

This branch had 2 secondary branches emerging from the same level.
200679901_928985951002050_8855752528552888887_n.jpg

I removed one.
198408294_928986384335340_1356000451592500338_n.jpg

The removed branch
199263257_928986504335328_3634836938011576052_n.jpg

I cut a piece of that branch
199287392_928987121001933_23161414686441890_n.jpg

Then used this dental tool which is really sharp liked the thin blade knife.
199210521_928988291001816_7857873052380883522_n.jpg 199245128_928988507668461_5941213112751764295_n.jpg

To cut this piece along its axis down to the hard wood beneath. Then used the same blade to peel off the bark out of that piece.
199280578_928989021001743_7666913795923795076_n.jpg

Then put the skin (bark) on the wooden surface and flat it out
198595220_928989127668399_2814703062313347854_n-2.jpg

(be continued)
Thụ Thoại
 
Then used the scissors to cut the skin to fit with the wound surface. It was perfectly fitted!
198880650_928989377668374_8896557004519084555_n.jpg

Then I used the grafting tape to keep the skin in place. The very important point is that the skin and the wound surface must be approached tightly. If there is a gap between them, the tree sap will be collected there, and it will lead to a failure! To make sure the skin and the wound surface stay together neatly, one hand to press on the skin continuously while other hand to guide the grafting tape over the area. I used only one piece of grafting tape about 2" length.
200627955_928991881001457_4989013967184855965_n.jpg

Finished tree
198713880_928992117668100_2642619299269735779_n.jpg 198502787_928984467668865_3579559168737264551_n.jpg

I will continue working on this tree in this winter

Below is the pictures from other pines I did skin graft on 5/2/2021.
On 6/12/21,
201348995_929023440998301_6862133223931438956_n.jpg

The grafting tape was being removed
198735470_929023547664957_5541886889446231271_n.jpg

Tape was removed completely. The skin graft looked pretty good!
200776692_929023727664939_780788194222825656_n.jpg 200147055_929023777664934_7476539687429861601_n.jpg

It is healing very well. I will continue observing this graft in one year.
I will name this technique as Bonhe skin graft technique. I hope it will help whoever wants to avoid the ugly scar for the trees.

p/s: I actually cut the grafting tape into half along the axis, so that I can easily apply it to the graft area.

Thụ Thoại
 
That is
Then used the scissors to cut the skin to fit with the wound surface. It was perfectly fitted!
View attachment 380858

Then I used the grafting tape to keep the skin in place. The very important point is that the skin and the wound surface must be approached tightly. If there is a gap between them, the tree sap will be collected there, and it will lead to a failure! To make sure the skin and the wound surface stay together neatly, one hand to press on the skin continuously while other hand to guide the grafting tape over the area. I used only one piece of grafting tape about 2" length.
View attachment 380861

Finished tree
View attachment 380862 View attachment 380863

I will continue working on this tree in this winter

Below is the pictures from other pines I did skin graft on 5/2/2021.
On 6/12/21,
View attachment 380864

The grafting tape was being removed
View attachment 380865

Tape was removed completely. The skin graft looked pretty good!
View attachment 380866 View attachment 380867

It is healing very well. I will continue observing this graft in one year.
I will name this technique as Bonhe skin graft technique. I hope it will help whoever wants to avoid the ugly scar for the trees.

p/s: I actually cut the grafting tape into half along the axis, so that I can easily apply it to the graft area.

Thụ Thoại
That is pretty awesome.
 
Then used the scissors to cut the skin to fit with the wound surface. It was perfectly fitted!
View attachment 380858

Then I used the grafting tape to keep the skin in place. The very important point is that the skin and the wound surface must be approached tightly. If there is a gap between them, the tree sap will be collected there, and it will lead to a failure! To make sure the skin and the wound surface stay together neatly, one hand to press on the skin continuously while other hand to guide the grafting tape over the area. I used only one piece of grafting tape about 2" length.
View attachment 380861

Finished tree
View attachment 380862 View attachment 380863

I will continue working on this tree in this winter

Below is the pictures from other pines I did skin graft on 5/2/2021.
On 6/12/21,
View attachment 380864

The grafting tape was being removed
View attachment 380865

Tape was removed completely. The skin graft looked pretty good!
View attachment 380866 View attachment 380867

It is healing very well. I will continue observing this graft in one year.
I will name this technique as Bonhe skin graft technique. I hope it will help whoever wants to avoid the ugly scar for the trees.

p/s: I actually cut the grafting tape into half along the axis, so that I can easily apply it to the graft area.

Thụ Thoại
Nice work, is it important to align the graft similar to its original position or do the cells heal and function in any direction? Could you comment on the specific type of grafting tape that you used? When you mentioned that you cut the tape radially for wrapping purposes I envisioned a wider type of grafting tape. Perhaps along the lines of what we refer to as " Buddy Tape" The buddy tape is perforated in shorter sections and wider. It also stretches a long ways and adheres to itself similar to kitchen wrap.
Would this be a good application for the medical tape called "opsite" ? Trickier to place but may have some advantages.
Thanks for all of you who are interested in this.
Thanks for asking those questions!
We have to pay attention to the future bark of the grafted area. It is why the piece of skin should be placed in the same direction of the wound surface ảea. B to B and T to T
8AD6C3B5-BD78-4015-AC98-FEB95258434E.jpeg

By doing this, the cambium, phloem, xylem would be aligned well.

This is a roll of grafting tape bought from EBay 10 years ago. It is ready perforated in the 2.75” length and 1” width. It is self adhesive and elastic. It is really good for graft
2A2C528D-3FCB-4AF0-854E-25FBDE980D8F.jpeg D55BF7DC-0CB9-454D-8470-25DF808951A2.jpegB092373A-35BB-4457-8BAF-FE51590DA9B6.jpeg

it was cut in a half
54A08663-51BF-45B9-A5A8-500CB5B4FEA6.jpeg

Opsite? It is too expensive for this kind of job!!! 😊
Thụ Thoại
 
Thanks for all of you who are interested in this.
Thanks for asking those questions!
We have to pay attention to the future bark of the grafted area. It is why the piece of skin should be placed in the same direction of the wound surface ảea. B to B and T to T
View attachment 380881

By doing this, the cambium, phloem, xylem would be aligned well.

This is a roll of grafting tape bought from EBay 10 years ago. It is ready perforated in the 2.75” length and 1” width. It is self adhesive and elastic. It is really good for graft
View attachment 380882 View attachment 380883View attachment 380885

it was cut in a half
View attachment 380884

Opsite? It is too expensive for this kind of job!!! 😊
Thụ Thoại
Thank you for the detailed response. The attention to detail is what makes these techniques successful! The grafting tape appears to be the type we refer to as "buddy tape" and is pictured below in the yellow and green cardboard packaging as purchased from the Kaneshin website. It has the same dimensions and characteristics that you have mentioned.
 

Attachments

  • IMG_0572.JPG
    IMG_0572.JPG
    151.2 KB · Views: 54
Thank you for the detailed response. The attention to detail is what makes these techniques successful! The grafting tape appears to be the type we refer to as "buddy tape" and is pictured below in the yellow and green cardboard packaging as purchased from the Kaneshin website. It has the same dimensions and characteristics that you have mentioned.
You are very welcome.
For me, “buddy tape” means using the tape to keep 2 toes or fingers together! 😊 .

Wow, what a great idea! Now that I see it, I will keep it in mind for large pruning cuts in the future!
Thanks Greg. Hope it will help you.
Thụ Thoại
 
This morning, I worked on this Kakuju pine. I will show you another way to approach this technique.
Before
48DE2750-7F48-4761-A799-5B0C3EB356F8.jpeg

After pruning, removing the wires and some old needles, I removed 2 unnecessary big branches .

The 1st wound
EE53FA0B-E434-4A76-B4FB-8361D6FF497F.jpeg
Because this wound is right in the big trunk, it is not good to use the grafting tape to keep the skin in place! I decided to use Crazy Glue instead of tape!
B8AB84AD-59E7-415D-A08F-0A071BB77FA8.jpeg

The problem which may appear with glue is that the skin may not attached well to the wound bottom. Because of that, it may create the gap between the skin and the wound bottom. This gap will hold the sap excreted from the wound, which may turn out into the “sapoma “ . This sapoma may prevent the healing process of the skin graft, lead to a failure!

To avoid of sapoma, I made multiple tiny holes on the skin . I have this dental tool which works well for this purpose.
87CA3194-8B6A-43DD-92AD-D564BCCC1139.jpeg 9B05C481-8BBE-4E67-B04C-0C0E919F58A8.jpeg

The skin with multiple puncture wounds through and through!
541AA779-5FE7-45CD-8E90-F57C74947D55.jpeg

After cut the skin to fit into the wound area, I placed it into the wound. One hand used the flat blade to press the skin down, while another hand squeezed a little Crazy glue into the border of the skin and the wound. The glue was just sucked in easily.
445156B2-B5B5-4C76-8820-78DDA113177A.jpeg

After one minute, the blade was removed. The skin still stayed well in place !😊
4009ADAF-9F42-4626-9AF8-FB56A8027CA4.jpeg

In 5 minutes, as I expected, there were some oozing coming out from some tiny holes ! 🤣
B7FE4D19-819C-4FFB-9D06-9C1F40CDE3C1.jpeg 5F01BD9B-4640-45A1-A4D9-B8E9505A4EF9.jpeg

Thụ Thoại
 
The 2nd wound
66D0B857-EB55-4FF7-B09A-5BB534F6563C.jpeg

I just used the grafting tape to hold the skin in place .
FFA9D086-A397-4447-989B-78720CECD59C.jpeg


This time I also made multiple punctured wounds through the tape down to the wound bottom.
71611568-F682-4646-A613-47B2AC76E519.jpeg

After few hours, the one with crazy glue was still in place. No more active oozing
DDCAA871-1CB0-41DE-B5B8-39F1433CC23E.jpeg

Thụ Thoại
 
Awesome bohne! Really amazing.
I'm wondering how they heal, can you keep us posted?
I'm going to use this idea in the future for sure!
 
This morning, I worked on this Kakuju pine. I will show you another way to approach this technique.
Before
View attachment 381214

After pruning, removing the wires and some old needles, I removed 2 unnecessary big branches .

The 1st wound
View attachment 381227
Because this wound is right in the big trunk, it is not good to use the grafting tape to keep the skin in place! I decided to use Crazy Glue instead of tape!
View attachment 381233

The problem which may appear with glue is that the skin may not attached well to the wound bottom. Because of that, it may create the gap between the skin and the wound bottom. This gap will hold the sap excreted from the wound, which may turn out into the “sapoma “ . This sapoma may prevent the healing process of the skin graft, lead to a failure!

To avoid of sapoma, I made multiple tiny holes on the skin . I have this dental tool which works well for this purpose.
View attachment 381228 View attachment 381229

The skin with multiple puncture wounds through and through!
View attachment 381230

After cut the skin to fit into the wound area, I placed it into the wound. One hand used the flat blade to press the skin down, while another hand squeezed a little Crazy glue into the border of the skin and the wound. The glue was just sucked in easily.
View attachment 381231

After one minute, the blade was removed. The skin still stayed well in place !😊
View attachment 381232

In 5 minutes, as I expected, there were some oozing coming out from some tiny holes ! 🤣
View attachment 381234 View attachment 381235

Thụ Thoại

Definitely curious about this one. Did you glue around the whole border? Would that prevent the cambium layers from connecting?

Maybe "tack welding" it with the glue in 4 or 5 places could be a compromise?

Keep us updated!!
 
Awesome bohne! Really amazing.
I'm wondering how they heal, can you keep us posted?
I'm going to use this idea in the future for sure!
Thanks. I definitely will update this asap.
Definitely curious about this one. Did you glue around the whole border? Would that prevent the cambium layers from connecting?

Maybe "tack welding" it with the glue in 4 or 5 places could be a compromise?

Keep us updated!!
I just glued the half upper part and at 6 o'clock.
I hope it will not prevent the cambium activity. I used this one basing on the experience in using Dermabond to treat the skin superficial laceration.
I will keep you updated.
Thụ Thoại
 
Brilliant work. Thank you for sharing and explaining so well.
 
This feels similar to the thoughts of Hans van Meer who tried grafting the flaps of bark of removed branches over wounds, when still attached.
I am very curious to learn how this turns out, as the method by Van Meer did not work for me (I am too clumsy for such fine matching needed to make this work, I am sure!
 
Brilliant work. Thank you for sharing and explaining so well.
Thanks. Hope it helps
This feels similar to the thoughts of Hans van Meer who tried grafting the flaps of bark of removed branches over wounds, when still attached.
I am very curious to learn how this turns out, as the method by Van Meer did not work for me (I am too clumsy for such fine matching needed to make this work, I am sure!
I saw the technique to which you are talking about and tried it myself about 7 years ago. I don’t blame you , because I really had a hard time doing that, even with my skillful hands 😊. For me it is too much time consuming and messy! I had to abandon that work in the middle.
I absolutely will update my technique here in the near future .
Thụ Thoại
 
Back
Top Bottom