Show Us Your Bonsai Benches

So @jmmzpsu14 I really don't understand the support question vs the drawing.
The drawing looks like you want to mount it in a shelf fashion, sorry.
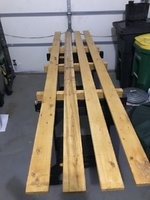
Then, as long as the slab is supported or secured I mean, it shouldn't warp, but thicker would take longer to crack.
If you can, place the growth rings in a rainbow arc not cupping up, but narrow at the top, and wider apart on the bottom
side. That will HELP, prevent cupping which will hold water, but, you can place a board in the Sun
and it will draw the ends and or edges up. Secured down, will prevent most of that.
Maybe @Vinnie Charity can dial in your illustration better than I.
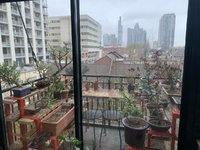
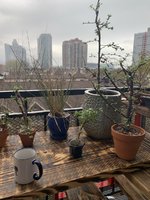
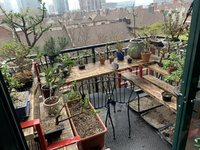
View attachment 366423View attachment 366424
But here are 2 examples of how I've supported live edge slabs in a shel like manner.

You can scroll through a listing to find dimensions
Live edge may or may not include bark, still legit without. With, may separate outdoors IDK.
Cracks and crevices should be filled too being in PA (freeze/expand) if outdoors for the Winter.
I've never used a resin filler, and an epoxy pour plastic type finish, like a bar top, will scratch terribly.
Hahah no no not a shelf those would be supports for each leg on a bench. Besides support beams under the bench so it doesn’t bend in the middle... are triangular structure support barns necessary
 
are triangular structure support barns necessary
ah I gotchya. I did not orient the drawing (is rotated on side) and didn't see the word "or".
Size matters there. If you're making a small display for minimal pieces knee high, no.
Then again, size matters. Height and weight are big players.
Your 1st drawing puts the corner at the pivot point or weakest link.
If you tie it together with a support you'll rest more easily and your work won't be in vane.
Main thing is stability when you lean on it when it's loaded down. Triangular, lateral or diagonal to tie it together makes sense.
A lateral tressel (spelling) can work quite well and be decorative. Search tressel table images.
That's the kind of table we ordered with a beam truss.
 
Used my stimulus check to buy a second set of shelving along with 12” risers. It was super cramped until I had the idea to replace the table with two 2x10” boards spanned across the two shelves. I must admit - I’m quite pleased with my self for this one 😁
 

Attachments

  • image.jpg
    image.jpg
    242 KB · Views: 263
  • 54F84D43-3853-49E5-93A2-49AF71523E11.jpeg
    54F84D43-3853-49E5-93A2-49AF71523E11.jpeg
    243.8 KB · Views: 157
  • 41CFCC29-5224-4D6D-8C1E-42E2843FB9CB.jpeg
    41CFCC29-5224-4D6D-8C1E-42E2843FB9CB.jpeg
    335.3 KB · Views: 192
I would think the winds might be a problem periodically. ?
 
Type of wood .. do wood slabs cut work well for this? How thin should the boards be to not allow for water to pool .. what type of stains and what type of wood junctions for best support?

I want legs not put in ground for portability.
Forgive my crude drawings I’m at work on lunch haha
I would use 2x (two by) pressure treated lumber for your benches with 4x4’s or 6x4’s for legs if you have a bunch of SUPER heavy trees. They will be heavy, but this is a good thing. The angled supports are only needed if the bench(es) want to move back and forth, which shouldn’t happen if they are built well.

What I do is attach the feet with 2 diagonal, epoxy-coated screws on each side. Regular wood screws will rust REALLY fast in pressure treated lumber, so get epoxy-coated screws. When facing the foot from the side, one goes in the top right and the other in the bottom left, then do the same on the other side of the foot.

Like this on each side...

94636C35-0D02-4863-9230-47D7FABC23DC.jpeg

The idea is that the two screws will go through foot number 1, then the leg, then partially penetrate foot number two about 3/4 of the way through. These 4 screws will be plenty strong enough. Use clamps to hold everything in place and make sure the legs are plumb so the load is transferred to the ground.

I also used the “feet” as the supports for the tops and they were attached using epoxy-coated screws as well from the top. You can use pocket hole screws if you want the top to be smooth and have no visible screws.

These benches are bulletproof and will last a very long time, especially if you use concrete pavers under the feet of each bench to keep them drier, longer.

Hope this helps, let me know if you have anymore questions.
 
Just got to add two more support beams at the end. This will rest on some free stone blocks for the time being, then one day have legs. Kinda a quick design I need to practice w my wood carving tools for the next one in the future. I dropped from the bottom for that no nails appearance.
 

Attachments

  • image.jpg
    image.jpg
    124.2 KB · Views: 137
bench before patio


jpbA9qd.jpg
 
The bench was great for the space, but I've since moved to a new townhouse with a lot less space.

Figured I'd toss these pictures up before they get buried in the phone archives forever.
View attachment 355484View attachment 355485View attachment 355486

Come spring, I'll be building a new bench, reusing as much of the material as possible, in this tiny patio I now call my backyard. Stay tuned.
*trees are all sleeping soundly under their mesh enclosure, and snow*
View attachment 355487

As promised... Excuse the mess, repotting season was rough in tight quarters. The whole space measures 14ft by 5ft if you can believe it.

IMG_20210519_1814257.jpg

IMG_20210519_1814373.jpg

I need to core drill some 2" drainage holes into the concrete foundation one day; to much water is pooling underneath the exterior benches when I water...I'm sure condo management won't mind 🤫
 
As promised... Excuse the mess, repotting season was rough in tight quarters. The whole space measures 14ft by 5ft if you can believe it.

View attachment 375985

View attachment 375986

I need to core drill some 2" drainage holes into the concrete foundation one day; to much water is pooling underneath the exterior benches when I water...I'm sure condo management won't mind 🤫
Is it possible that the Alberta Spruce is in a pot?
 
Is it possible that the Alberta Spruce is in a pot?
Not yet. It's in a thick black garbage bag, with holes, full of loose sphagnum moss for the time being. I was hoping no one would notice that...

It was a curbsidedori from Monday night that I'm trying transfer into a grow box as soon as I have time to build one. FB_IMG_16213003910536603~01.jpg

The tree, specifically the root structure, is quite interesting and worth sharing. But not yet, I want to make sure it survives the summer first.
 
With Labor Day coming up, some of you might be interested in building a bonsai bench. Here’s a recent one I built, including step by step instructions. Good luck!


5E0F4599-2C73-4840-BBE1-A8B3CA737A39.jpegB94BB321-EC44-4B08-B8D5-CF0B50C0FEA1.jpeg4E24DBCF-95A6-4FEF-8F7C-AB600BFDB5AB.jpeg
 
For those of you building your own benches. I would try to avoid making any holes on the top sides of the boards where the pots sit on as well as any boards with knots.....if you can. When you water the water will collect at those locations allowing the board to absorb it back into the boards. Wet boards will rot a lot faster.
 
For those of you building your own benches. I would try to avoid making any holes on the top sides of the boards where the pots sit on as well as any boards with knots.....if you can. When you water the water will collect at those locations allowing the board to absorb it back into the boards. Wet boards will rot a lot faster.
This is only partially true if you’re using pressure treated boards. Try to drill and countersink any up screw holes so the screws sit flush and always use epoxy coated screws so the chemicals in the wood don’t cause them to rust.
 
Back
Top Bottom