Shimpaku design help

bwaynef

Masterpiece
Messages
2,214
Reaction score
2,820
Location
Clemson SC
USDA Zone
8a
https://www.bonsainut.com/threads/b...arrage-of-burgeoning-bonsai.47170/post-957702 <-- Some of my earliest photos of this tree. I'd had it for several months at that point.

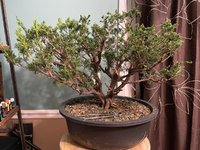
I bought it from a friend that needed to sell. He knew I liked it, if for no other reason than its propensity to throw runners. (I'd had significant issues growing junipers a few years back and watching this one throw runners so effortlessly drew me to it. Turns out that more light is one of the secret ingredients to growing vigorous Shimpaku.) Part of this tree's problems is that it was allowed to grow so vigorously and had little to backbudding to reduce its silhouette. In the above link, I pruned as much as I was comfortable to open it up and hopefully drive backbudding. I let it grow again this past year.

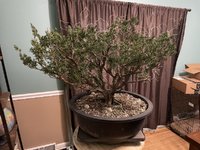
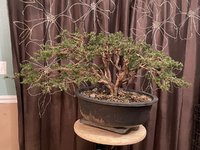
After opening the tree up last year I couldn't really get a handle on how to style this tree. I managed to clean it up again last night, and there's more backbudding on the inside which is what I was hoping for. While I formulate a plan to move forward with, I'm probably going to focus just on building structure. I'd like to wire most everything down/out, reducing the tips as little as possible. I'd like the tip growth to drive more growth, but wired down and out of the way so that the backbuds can strengthen ...and ideally drive even more backbuds. Maybe once I get to that point a design will be apparent.

If I wanted to grow a "true oak" (that's a translation of shimpaku/shinpaku/sinpaku), this tree's spreading form would be fantastic. I've been taught that the best shimpaku have twists. Maybe this one isn't destined to be "the best shimpaku" and I just deal with what's there? Any of you feel like stretching your brain around this material?
 

Attachments

  • lrg-shimp-2023-before.jpeg
    lrg-shimp-2023-before.jpeg
    313 KB · Views: 143
  • lrg-shimp-2023-after.jpeg
    lrg-shimp-2023-after.jpeg
    305.3 KB · Views: 127
https://www.bonsainut.com/threads/b...arrage-of-burgeoning-bonsai.47170/post-957702 <-- Some of my earliest photos of this tree. I'd had it for several months at that point.

I bought it from a friend that needed to sell. He knew I liked it, if for no other reason than its propensity to throw runners. (I'd had significant issues growing junipers a few years back and watching this one throw runners so effortlessly drew me to it. Turns out that more light is one of the secret ingredients to growing vigorous Shimpaku.) Part of this tree's problems is that it was allowed to grow so vigorously and had little to backbudding to reduce its silhouette. In the above link, I pruned as much as I was comfortable to open it up and hopefully drive backbudding. I let it grow again this past year.

After opening the tree up last year I couldn't really get a handle on how to style this tree. I managed to clean it up again last night, and there's more backbudding on the inside which is what I was hoping for. While I formulate a plan to move forward with, I'm probably going to focus just on building structure. I'd like to wire most everything down/out, reducing the tips as little as possible. I'd like the tip growth to drive more growth, but wired down and out of the way so that the backbuds can strengthen ...and ideally drive even more backbuds. Maybe once I get to that point a design will be apparent.

If I wanted to grow a "true oak" (that's a translation of shimpaku/shinpaku/sinpaku), this tree's spreading form would be fantastic. I've been taught that the best shimpaku have twists. Maybe this one isn't destined to be "the best shimpaku" and I just deal with what's there? Any of you feel like stretching your brain around this material?
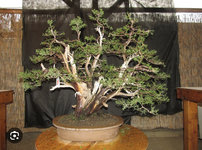
I’d try and work out each trunk as a sub trunk in a kabudachi style. You may end up removing g quite a few, but if it were mine I’d start by wiring down branches down all the way around. Once everything is wired and laid out you’ll probably end up cutting quite a bit off. Using aluminum over copper for the initial styling so it’s not a huge loss if you have to cut off something you’ve wired. But I personally see a multi trunk tree in there. Here’s a Random pic I saw online that may inspire you.
IMG_7341.jpeg
 
when in doubt...put some wire on it and see where it goes! A clear vision is not always necessary or possible. Just start wiring and focusing on individual branches...make every branch look as good as possible...at some point a vision will happen or it won't. Don't let your brain be the limiting factor!
 
https://www.bonsainut.com/threads/b...arrage-of-burgeoning-bonsai.47170/post-957702 <-- Some of my earliest photos of this tree. I'd had it for several months at that point.

I bought it from a friend that needed to sell. He knew I liked it, if for no other reason than its propensity to throw runners. (I'd had significant issues growing junipers a few years back and watching this one throw runners so effortlessly drew me to it. Turns out that more light is one of the secret ingredients to growing vigorous Shimpaku.) Part of this tree's problems is that it was allowed to grow so vigorously and had little to backbudding to reduce its silhouette. In the above link, I pruned as much as I was comfortable to open it up and hopefully drive backbudding. I let it grow again this past year.

After opening the tree up last year I couldn't really get a handle on how to style this tree. I managed to clean it up again last night, and there's more backbudding on the inside which is what I was hoping for. While I formulate a plan to move forward with, I'm probably going to focus just on building structure. I'd like to wire most everything down/out, reducing the tips as little as possible. I'd like the tip growth to drive more growth, but wired down and out of the way so that the backbuds can strengthen ...and ideally drive even more backbuds. Maybe once I get to that point a design will be apparent.

If I wanted to grow a "true oak" (that's a translation of shimpaku/shinpaku/sinpaku), this tree's spreading form would be fantastic. I've been taught that the best shimpaku have twists. Maybe this one isn't destined to be "the best shimpaku" and I just deal with what's there? Any of you feel like stretching your brain around this material?
Nice and has potential! I like the suggestion for multi-trunk style. I do not yet have shimpaku, but yours looks like it easily elongates.

My question regarding shimpaku back budding: Can you reduce junctions of 3 down to 2 to push energy/auxin back towards the trunk to promote back budding? Such as the ends of primaries or secondaries?
 
Nice and has potential! I like the suggestion for multi-trunk style.
That's the obvious direction, but most good shimpaku have twists. This one lacks it and too big to structurally add any, though I may could add the appearance of twists w/ patient shari work. Its one of the things I've been pondering.
My question regarding shimpaku back budding: Can you reduce junctions of 3 down to 2 to push energy/auxin back towards the trunk to promote back budding? Such as the ends of primaries or secondaries?
I've reduced it down about as far as I can right now. A good bit of that was just what you described. There's an EXCELLENT article in a past issue of International Bonsai that details getting backbudding to build a new tree in juniper material. (The article was about needle juniper but the intro mentioned it applied to shimpaku as well.) I've got a digital copy, but can't really share it for obvious reasons. I'll try to find what month/year it was in for anyone that wants to try to grab a copy.

My takeaways as they apply to this tree:
  1. Thin the tree out. (Keep tip growth!)
  2. Let it grow!
  3. Thin out again. (Foster backbudding that has occurred)
  4. Iterate as needed
  5. When backbuds are in place, ween tips off to strengthen backbudding
  6. Grow backbuds into place.
I'm at about step 3.
 
Nice opportunity to get this tree into shape! I have a couple junipers that have gone through somewhat of the basic process you outlined. Now starting to style one.

A couple observation based upon this experience..

1. There’s still a lot there. It does need to be laid out

2. The sub trunks beg for differentiation in height and for a space of their own. Somewhat like @Hartinez shows… but more sub levels…

3. The long light green extensions should be pushed all the way back to the origin, or near to on each sub branch to the left.

4. Keep any lower branches for now wired out.

5. Reduce to bifurcations whenever possible… this will help give more space and a cleaner look.

6. Finally Each sub trunk should have a space of its own. Look at the tree from the front. Mark sub branches that are hidden by sub branches in front. wire/raffia/rebar and bend as needed to make this happen.

Here’s a raft that’s been in the works for the past four years. As one can see it’s still not quite finished, but it’s coming along now. Hope this helps.

IMG_1828.jpeg IMG_1829.jpeg

Cheers
DSD sends
 
when in doubt...put some wire on it and see where it goes! A clear vision is not always necessary or possible. Just start wiring and focusing on individual branches...make every branch look as good as possible...at some point a vision will happen or it won't. Don't let your brain be the limiting factor!
This. 👆🏻
 
My takeaways as they apply to this tree:
  1. Thin the tree out. (Keep tip growth!)
  2. Let it grow!
  3. Thin out again. (Foster backbudding that has occurred.

  1. I'm at about step 3.
But what is your goal in fostering that backbudding? Are you wanting a more twisty shimpaku? If so, it’d be just as prudent to buy one younger and develop from there. With that said though. Most shimpaku have twists and are compacted and IMO end up looking the same or similar to each other.

As it is now and as I see it, it’s got PLENTY of foliage to make a great composition right now. Ultimately your call though!
 
As it is now and as I see it, it’s got PLENTY of foliage to make a great composition right now. Ultimately your call though!

Indeed, I concur. The tree is strong, robust and ready to go.

Time to lay on the wire and or rebar.

Once the tree is brought into a preliminary shape, it can be left to grow in while it’s studied for future improvements.

Here’s our next challenge! Juniper inside a pumice rock!

IMG_9971.jpeg

Best
DSD sends
 
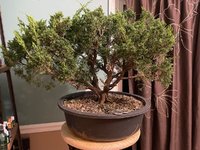
I styled this one by rote. Brought branches down. Angled the branches roughly where they came off the trunk/other branches. Until I got to the apex I didn’t have to get creative. I don’t love those branches but can’t really reduce them so there’s two branches that I had to spaghetti slightly. In all, it turned out ok …for an oak-tree-styled shimpaku.

Some aggressive growing this year should put buds where I want them. Seems a waste of effort to graft this one right now.

Looks better in person (which is usually an excuse, so make of that what you will).
 

Attachments

  • FD5B7B39-2415-49A6-8529-B50C391F0C75.jpeg
    FD5B7B39-2415-49A6-8529-B50C391F0C75.jpeg
    274.4 KB · Views: 30
  • 0DADB451-65BF-40B1-B8B5-E52F018CDAD5.jpeg
    0DADB451-65BF-40B1-B8B5-E52F018CDAD5.jpeg
    274.9 KB · Views: 42
Back
Top Bottom