Reverse Bottle Propagation – Trial with 250 Bottles

Messages
6
Reaction score
11
Location
Uxbridge, Ontario, Canada
Hey everyone,

Over the next month, I’m aiming to collect and root around 250 cuttings from fallen trees, mostly stuff with good movement and decent trunk thickness.
I was inspired by two awesome posts:
I wanted something fast, scalable, and with minimal daily attention – so I created this variation using water bottles I saved up all winter.

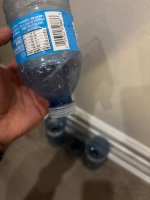
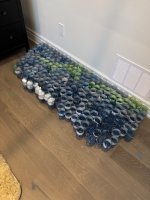
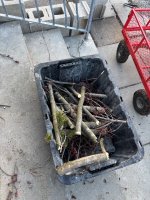
Most methods suggest cutting a bottle in half, adding a slit for drainage, filling the base with water, and placing the cutting above in a mix (See image 1 and 2). But with 250 bottles, cutting and slitting each one didn’t feel efficient.

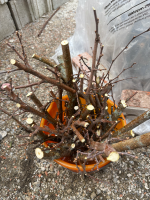
So I flipped the design

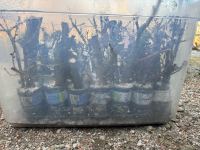
Instead of slits, I simply removed the bottle caps, and placed a rock inside to weigh it down and keep the mix from falling out. This allows water to drain slowly and keeps the substrate intact (See image 3)

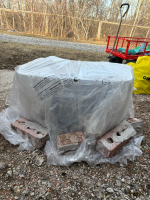
To ensure that the humidity from the water goes upwards we need a tight fit, so I stacked the bottles tight together by pushing them down against each other, but left a little space for the bottom reservoir.

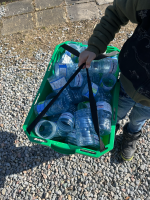
The last image is all of them, took me about an hour and a half to do them all - next time I could definitely do it within an hour. My grandpa and I are really hopeful!

Tomorrow, I’ll fill them with a 80/20 mix of perlite and potting soil and begin inserting cuttings

Let me know what you think of this setup or if anyone’s tried something similar at this scale. I’ll update with results as the roots (hopefully) take off.
 

Attachments

  • IMG_6347.jpeg
    IMG_6347.jpeg
    187.6 KB · Views: 75
  • IMG_6348.jpeg
    IMG_6348.jpeg
    322.8 KB · Views: 60
  • IMG_6349.jpeg
    IMG_6349.jpeg
    148.7 KB · Views: 63
  • IMG_6369.jpeg
    IMG_6369.jpeg
    487.7 KB · Views: 68
  • IMG_6370.jpeg
    IMG_6370.jpeg
    342.3 KB · Views: 71
Today I planted the first batch of cuttings. Most of them are red maples (I believe), since they were the most accessible, but there’s also a mix of elm, mulberry, and a couple of unknown species with decent taper or branch structure.

Image 1 – Cuttings were soaked overnight in water after collection. You can kinda see their thickness

Image 2 – Brought the bottles outside for setup.

Image 3 – Mixed 1.5 bags of perlite with half a bag of potting soil. This is what I used as the rooting medium.

Originally, I was planning to use plastic bags to cover each bottle for humidity, but with over 200 bottles, that became impractical. I needed a faster solution that would make misting easier as well, so we used a plastic box.

Images 4 – My grandfather and I packed the bottles into large plastic boxes, fitting about 28 bottles per box. Simply filled the bottom reservoir with water and then we put the rock to prevent the mixture from falling under. For some of the thinner cuttings, I placed multiple cuttings in one bottle to save space. You can see the variation in trunk thickness in Image 5.

Image 6 – Covered the box with a clear plastic sheet and used bricks to weigh down the corners of the sheet. The boxes are placed in a semi-sunny location outdoors—bright but not full sun. I only had one box so the project right now is halted at just 28, though this week I will buy another 6.

I also collected more mulberry cuttings for the next round. They’re currently soaking in water and will be planted soon using the same method. Image 7

No rooting hormone for the thinner ones, unless their taper was really good, but the thicker ones did get enough rooting hormone

Now just a thought, once I see roots, I can simply just take the top half of the bottle and put it in a larger soil pot.

Gonna leave these alone for two weeks, let's see what happens!
 

Attachments

  • tempImageCUNFAg.png
    tempImageCUNFAg.png
    2.4 MB · Views: 62
  • tempImageqWygnI.png
    tempImageqWygnI.png
    3.6 MB · Views: 56
  • tempImageANdvmz.png
    tempImageANdvmz.png
    2.3 MB · Views: 50
  • tempImage0znLoV.png
    tempImage0znLoV.png
    2.4 MB · Views: 43
  • IMG_6368.jpeg
    IMG_6368.jpeg
    603 KB · Views: 43
  • tempImagel9lHTF.png
    tempImagel9lHTF.png
    2.3 MB · Views: 40
  • tempImagevcHkpZ.png
    tempImagevcHkpZ.png
    2.3 MB · Views: 53
Planted Some Dogwood, Staghorn Sumac, Poplar, and others today

Screenshot 2025-04-20 at 4.53.26 PM.png

Next Week I'll open the first box (on the left) let some oxygen in and give an update:

Screenshot 2025-04-20 at 4.54.42 PM.png

Any suggestions for trees you want me to try?
 
Awesome! I came across this recently and am trying it myself with cuttings from a California mountain maple
 

Attachments

  • IMG_4699.jpeg
    IMG_4699.jpeg
    765.5 KB · Views: 35
yesterday I opened the first tote from about 2 weeks ago

Here are the results:
3...
2...
1...
Screenshot 2025-04-27 at 2.43.18 PM.png
Success!!!

Screenshot 2025-04-27 at 2.43.30 PM.png
Screenshot 2025-04-27 at 2.43.48 PM.pngScreenshot 2025-04-27 at 2.53.26 PM.png
Screenshot 2025-04-27 at 2.55.44 PM.png

Summary:
  • It seems that the thinner Red Maples are opening
    • Nothing from the thicker maples; perhaps because I didn't leave a shoot
      • however based on scratch test they are alive! I'm still hopeful
  • The Elms, regardless of size are sprouting
  • Larch seems to be sprouting as well

Seeing these results made my grandpa and I really happy; I am officially addicted haha(Thank you @eplov90)
The tote has been recovered; next update for this one in 2 weeks
Still have another tote that is full (update next week) and three buckets (update next week)

Today I tackled this elm that fell on my property; That Poplar took it down:

Screenshot 2025-04-27 at 3.01.57 PM.png
Screenshot 2025-04-27 at 3.02.23 PM.png
also found a random Birch that I pulled out; its still alive

Screenshot 2025-04-27 at 3.02.12 PM.png
Here's an example of the type of cutting my grandfather and I cut; stuff that would be respectable if it survives and shoots out
I also planted some cedar shoots and Pine shoots let's see what happens

I think I'll make this post larger; here are some really thick cuttings we collected in the process too:
Screenshot 2025-04-27 at 3.07.31 PM.png
I laid a plastic sheet under them and made a sort of dome out of it

Screenshot 2025-04-27 at 3.07.47 PM.png
Elm

Screenshot 2025-04-27 at 3.08.04 PM.png
Poplar

Screenshot 2025-04-27 at 3.08.14 PM.png
We then covered it with another plastic sheet; I planted these in potting soil because Perlite is expensive, rooting hormone was applied

The current problem with this method is that the plastic bottles set up takes too long, and wouldn't be worth it for the basic material;
Therefore I have another idea that takes the humidity principles of this and expands it so that I can plant more and faster.
 

Attachments

  • Screenshot 2025-04-27 at 3.08.04 PM.png
    Screenshot 2025-04-27 at 3.08.04 PM.png
    1.2 MB · Views: 7
Back
Top Bottom