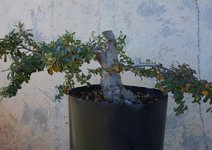
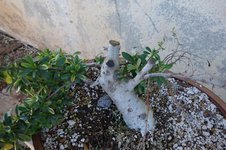
Pyracantha var. Cadvar -- two trees.

Esolin

Shohin
Messages
441
Reaction score
694
Location
So Cal
USDA Zone
10b
Pyracantha, variety Cadvar, aka 'Silver Lining'.

Cadvar.jpg

I found two nicely-fattened specimens at a local nursery about a year ago, but of course the catch was that they’re a variegated type that nobody else wanted for years! I couldn’t find much info on them except that they rarely have berries, and bronze a burgundy color in the winter. They’re also less cold hardy, which shouldn’t be a problem in 10b, but I'll still cold shield them better in future years because they did suffer some wind/frost burn this year. I’m not super thrilled by variegated species, but they have small leaves--which get even smaller after pruning, and this also seems to minimize the variegation trait, so win-win. The game plan for both is informal upright. I know they’re still too tall yet--I plan to cut the trunks down another inch or two once they start growing vigorously again.

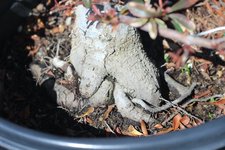
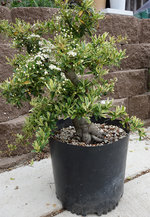
Specimen #1 The roots aren’t radial, but the flare is interesting in its own way. The main flaw I don't like is the 'first branch'. To avoid creating a big scar that probably wouldn’t heal, I chopped the existing branch short and hoped it would sprout new growth off the front that would hide the cut. But of course it produced an eye-poker off the bottom that had to be wired over hard. In hindsight I shouldn't have cut the branch so short. I’m still debating whether I should try shaving the transition down, or just chop it all off and live with a scar.
cadvar1-1.jpgcadvar1-2.jpgcadvar1-3.jpg

First branch debacle:
cadvar1-4.jpg

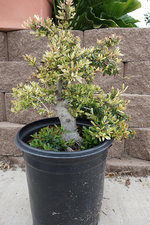
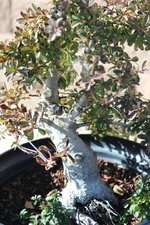
Specimen #2 It has some considerable flaws. The whole backside is a massive scar where I removed a hideous bar branch, and it has some inverse taper. Eventually when it’s stronger, I plan to air layer right at the ground to remove that taper and develop better nebari. It's also got some serious sucker activity--which I haven't removed because after I air-layer it, I might try to develop a forest raft from the stump. I dunno--it's a thought.

cadvar2-1.jpg

cadvar2-2.jpg
The bad side:
cadvar2-3.jpg

This year the plan is just to feed heavy and manage the resulting growth. But I wonder if I should repot them now too? I know it’s unlikely that anyone here has worked with this variety, but in general do pyracantha handle root work well? They’re going to have some massive roots to reduce--at one time they’d rooted out through the drain holes before being hacked off by the nursery staff. But if pyracantha hate root work, perhaps I should build up their strength for a another year first. I'm open to thoughts on the design. These are my first attempt at styling informal uprights.
 
Mine came in a nursery pot. Not as deep as yours. It went into a small pot which was 3" deep yet. Which will be repotted in spring into one that will carry the canopy better and a bit wider. They say they handle root work well. I would imagine all pyracantha would have the same root manurisms.

I wire new growth before it hardens off.
FB_IMG_1594936605838.jpgScreenshot_20210129-110735_Firefox.jpg
 
That's a sweet little pyracantha! I love your presentation too with the wood shelf and dragon. 😍

Thanks for the info. I'll report one of them now since they're starting to leaf out, and see how it affects its growth this year.
 
That's a sweet little pyracantha! I love your presentation too with the wood shelf and dragon. 😍

Thanks for the info. I'll report one of them now since they're starting to leaf out, and see how it affects its growth this year.
Thanks, that's actually my bench. Notice it's strapped down.

Brian Van Fleet actually offered up valuable advice when I got mine in and started a thread...on how to develop them. Let me attach a link. Post #14.

 
Excellent advice on shaping. After seeing Bjornholm's video of wiring flowering apircot growth, I had started wiring the branches for movement while green, but I hadn't thought quite as far as placing the 'buds' on exterior bends for future pruning. Very smart.
 
Excellent advice on shaping. After seeing Bjornholm's video of wiring flowering apircot growth, I had started wiring the branches for movement while green, but I hadn't thought quite as far as placing the 'buds' on exterior bends for future pruning. Very smart.
These grow differently than most trees. So it pays to be observant of where they are when we wire. Helps give a better overall appearance.
 
Repotted tree #1 this morning. It had some big roots. Reduced as far as I dared (a little more than 2/3rds) and moved it into semi-shade while it recovers. I'll look at wiring lower branches later this Spring. Most of the top branches will be removed when I chop the top lower. Now to find something else to torture in the meantime....

cadvar1-5.jpg
 
These guys have bushed out nice with Spring growth and even some flowers, though the new leaves are very much showing the variegated nature of the cultivar. I wonder if a high nitrogen fertilizer would help fill the leaves with more chlorophyll faster. Worth an experiment I suppose. I'm resisting the urge to chop tree #1 shorter right now since it was just repotted. I'm also very tempted to just go ahead and attempt to ground layer tree #2. I know if I wait another year, it'll have a bigger foliage mass to help drive successful root production at the layer sight, but it's so hard to be patient when you're excited about a tree. 😖 Must resist!

Tree #1
cadvar1-6.jpg

Tree #2
cadvar2-4.jpg
 
Whoa, somebody needs a haircut.

Tree #1
cadvar1-7.jpg

That's a little better. I'm liking the lowest branch on the left less and less. I may remove it or try to wire it higher.

cadvar1-8.jpg

Also, tree #2 went SO NUTS with foliage, that I decided to just go for it this year with the ground layer. Fingers crossed that I get good nebari instead of a dead tree! It's been a couple weeks since the operation. Initially the growing tips drooped and I hastily moved it into partial-shade. It recovered and has looked good ever since. It probably wants a little more sun, but daily temps are steadily rising so I'm hesitant to move it. I absolutely do not want the new roots drying out.

cadvar2-5.jpg
 
I went back to the nursery I'd gotten these two Cadvars from and wandered around for a while. Since I have too many sticks in pots right now, I've got a personal policy not to buy any more plants unless A: I get rid of something to make room or B: It's too rare/amazing to pass up, as in 3" minimum trunk with a good shape. They had a lot of good 1" material which tempted me, but nothing that blew my mind with its potential. I was about to leave when I thought I'd check out the staked plants. Maybe there was some old forgotten material over there with girth on it.

And that's where I found this:
cadvar3-1.jpg

I hadn't seen any more Cadvars there for a while and wondered if they'd gotten rid of them because they weren't selling. But they had five Cadvars languishing in the staked plant area. Two looked diseased and dying. Three looked healthy. Since I've been very happy with the growth and resilience of the two I already have, I decided that another one for $18 was a steal I couldn't pass up. This one had the best trunk. It'll be a twin trunk style. It also has great movement in some of the upper branches, which could be air-layered off into more trees.

cadvar3-2.jpg

cadvar3-3.jpg

So, I now have three Cadvars to play with. The first two are fat and happy right now in summer dormancy. I think the groundlayer on tree #2 took (I briefly poked around in the spagnum moss and found a new root), but I won't investigate the extent of its root development until October, which will be 5-6 months since the operation.
 
With September's arrival, and unseasonably cool weather here, I decided it was time to separate the ground layer on tree #2.

cadvar2-7.jpg

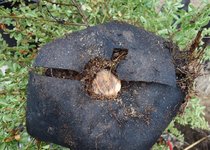
This was my first ground layer attempt, so I hadn't been sure what to use to keep the layer of new roots from mingling with the old roots. The material needed to be flexible to fit into the pot, but also water permeable. I ended up cutting up a heavy felt growbag and shaping the pieces to make a root collar. It worked quite well. Some roots were starting to escape around the edges, but were easily managed.

cadvar2-6.jpg

Separation. Some finer roots had grown into the felt, but damage was minimal when I pulled it off.
cadvar2-8.jpg

cadvar2-9.jpg
Now that it's potted more cleanly, I'm really noticing the inverse taper above the first branch. Perhaps some creative carving can fix this flaw in the future. But enough trauma for now. Into shade to recover.
 
Progress report. It's been warm and everything's starting to push Spring growth, so I topped these two trees to push the growth lower. Wow they look ugly now.

Tree #1:

Hmmm, should I take another inch off?
cadvar1-9.jpg

I also can't decide whether to cut this large nub shorter so it's more in proportion and lose the back facing branch, or keep the nub high and hide it with foliage from the front branch. Since pyracantha don't heal well, it'll have big scar either way. Thoughts?
cadvar1-10.jpg

Tree #2

cadvar2-10.jpg

It kinda looks like a cyclops, waving at me.
cadvar2-11.jpg
 
I'm sad to report that Tree #2 is dead. It declined rapidly from a fungal issue this month in the summer heat. I thought it must be due to me not somehow sealing the large air layering cut on the bottom, however tree #1 is now showing some fungal symptoms as well, which I now believe to be vermiculum wilt. Don't know whether they both came infected from the nursery, or if I got a bad batch of potting soil somewhere along the line. Regardless, I drenched it in Mancozeb today and will apply high potassium fert tomorrow to try and slow the infection. I'll be sad to lose tree #1 as well.

Tree #3 is showing no signs of infection yet, but that doesn't mean much. It came from the same nursery, and has been 'living' in the same environment as the other two for a while now. I'm in the process of airlayering the top off it. I might chop it sooner than later now, and see what happens to the this new layering attempt.
 
Back
Top Bottom