You are using an out of date browser. It may not display this or other websites correctly.
You should upgrade or use an alternative browser.
You should upgrade or use an alternative browser.
Plaster Mold: Bonsai Pot Casting
- Thread starter lieuz
- Start date
lieuz
Chumono
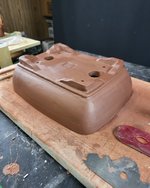
Here are some slight modifications I can apply to the pot. I chose this shape because I felt it was easy enough to make these slight changes. Should they be good, I would make another replication of it.


Here are the pot comparisons after it had a chance to dry.
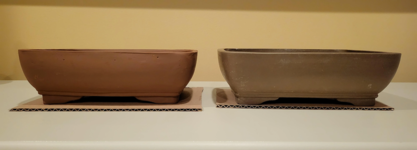
The original pot is 1/4" bigger but after 8 hours, the replica pot shrank by that much.

Here's a direct difference showing the shrinkage. I expect this to be 10-12% smaller. So in the grand scheme of things, it'll just be a tad smaller which is what I actually want since I have smaller-sized trees.

Here's another pot pulled from the mold. The bottom is the first pot, the second is on top. It's currently in the queue to be fired. Super excited.


Here are the pot comparisons after it had a chance to dry.

The original pot is 1/4" bigger but after 8 hours, the replica pot shrank by that much.

Here's a direct difference showing the shrinkage. I expect this to be 10-12% smaller. So in the grand scheme of things, it'll just be a tad smaller which is what I actually want since I have smaller-sized trees.

Here's another pot pulled from the mold. The bottom is the first pot, the second is on top. It's currently in the queue to be fired. Super excited.
lieuz
Chumono
I got these back from the club president when I recently saw him. It just goes to show how much smaller these pots can get after firing.
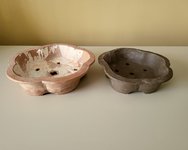
Side by side of the original pot vs the pot pulled from 1.0.

Better size comparison. This makes me think that this is probably how the professionals shrink their pots so that there are size variations.
For the moment, I want to redo the mold for the original sakura blossom pot, given that now that I know the nuances. The next shapes I want to replicate next are moko pots.

Side by side of the original pot vs the pot pulled from 1.0.

Better size comparison. This makes me think that this is probably how the professionals shrink their pots so that there are size variations.
For the moment, I want to redo the mold for the original sakura blossom pot, given that now that I know the nuances. The next shapes I want to replicate next are moko pots.
Pitoon
Imperial Masterpiece
All clays have a shrinkage rate when fired. If you want a 10-12% smaller pot make a mold of the pot that you pulled from the first mold and continue the process. Sooner or later you can get it down to mame size 
The only bad thing with molds is the storage space one needs to store them and the fact that they only last for so many pulls.
The only bad thing with molds is the storage space one needs to store them and the fact that they only last for so many pulls.
lieuz
Chumono
For sure, the storage space is going to be an issue if I made anymore molds. Do you have any pictures of your molds you can share?All clays have a shrinkage rate when fired. If you want a 10-12% smaller pot make a mold of the pot that you pulled from the first mold and continue the process. Sooner or later you can get it down to mame size
The only bad thing with molds is the storage space one needs to store them and the fact that they only last for so many pulls.
Eckhoffw
Masterpiece
That
That shit is tech. Nice work!View attachment 415495
After the 8 hour mark, the clay was firm enough for me to add my chop mark and drainage holds.
View attachment 415496
There is a support structure inside the pot that isn't shown. It's basically a sponge with a flat top and base.
View attachment 415497
Drainage holes and wire holes were applied. Note the gap in between the mold and the clay. This was a clear indication the pot has more or less separated from the mold.
View attachment 415498
Here is the pot removed from the mold with the support structure.
View attachment 415499
The ridge that was removed from the original pot was put back in.
View attachment 415500
The ridge that was removed from the original pot was put back in.
View attachment 415505
This was the profile rib for the ridge/coil of clay that ran around the pot base.
View attachment 415502
Cleaning up, I noticed there were some areas where the clay walls were off. This showed how the top warpage affected the opening.
View attachment 415503
More finishing was done to the exterior walls. That coil added back into the pot was like going full circle.
View attachment 415504
Top view. The pot is now ready for feet.
Pitoon
Imperial Masterpiece
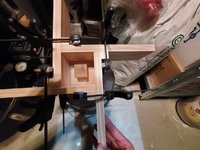
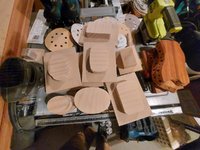
My focus is on smaller pots, mame size. Here's one I just recently did and tossed out as the plaster was old. I just got a new bag of plaster so when I get some time this weekend I will start back up with the molds.For sure, the storage space is going to be an issue if I made anymore molds. Do you have any pictures of your molds you can share?



lieuz
Chumono
Wow you really got it all figured out. That form is clean as anything!My focus is on smaller pots, mame size. Here's one I just recently did and tossed out as the plaster was old. I just got a new bag of plaster so when I get some time this weekend I will start back up with the molds.
View attachment 415548View attachment 415549View attachment 415550View attachment 415551View attachment 415552
lieuz
Chumono
Looks like you got some root stand blocks going!My focus is on smaller pots, mame size. Here's one I just recently did and tossed out as the plaster was old. I just got a new bag of plaster so when I get some time this weekend I will start back up with the molds.
View attachment 415548View attachment 415549View attachment 415550View attachment 415551View attachment 415552
19Mateo83
Masterpiece
This post is impressive. All I can say is I want one 
Pitoon
Imperial Masterpiece
I wish I didn't waste my time using that old plaster. I now have to basically start all over to make that mold. Doing a one piece mold is a lot faster that was what @ABCarve mentioned earlier in the thread.Wow you really got it all figured out. That form is clean as anything!
I have a lot of projects going on......just need more time to finish them.Looks like you got some root stand blocks going!
lieuz
Chumono
No picture update but the pots have been fired to bisque and no faults have been detected.
@Pitoon I use murphy's soap as a release agent. in your experience do you use any other that may possibly work better than the soap? I say this because the soap tends to gel up for some reason and it imprints those gel'ed up bits. The larger bits I'm able to remove, but the smaller ones also leave small imprints.
@Pitoon I use murphy's soap as a release agent. in your experience do you use any other that may possibly work better than the soap? I say this because the soap tends to gel up for some reason and it imprints those gel'ed up bits. The larger bits I'm able to remove, but the smaller ones also leave small imprints.
Pitoon
Imperial Masterpiece
Murphy's Soap is technically a cleaning vegetable oil.No picture update but the pots have been fired to bisque and no faults have been detected.
@Pitoon I use murphy's soap as a release agent. in your experience do you use any other that may possibly work better than the soap? I say this because the soap tends to gel up for some reason and it imprints those gel'ed up bits. The larger bits I'm able to remove, but the smaller ones also leave small imprints.
I use an actual mold soap from Laguna....... https://www.theceramicshop.com/product/2546/pure-lube-mold-soap-1-gallon/
lieuz
Chumono
Good to know. Thank you!!Murphy's Soap is technically a cleaning vegetable oil.
I use an actual mold soap from Laguna....... https://www.theceramicshop.com/product/2546/pure-lube-mold-soap-1-gallon/
lieuz
Chumono
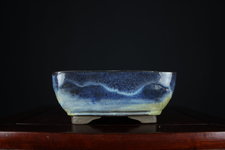
Nice job on the glaze.Pots have been fully fired and of the two, one is glazed and the other isn't here are the final products.
Size comparison.
View attachment 419525
Size comparison.
View attachment 419532
Glazed comparison.
View attachment 419526
Front
View attachment 419527
Side
View attachment 419529
Close up.
View attachment 419528
Close up.
View attachment 419530
Overview.
View attachment 419531
Pitoon
Imperial Masterpiece
Good job on those two!Pots have been fully fired and of the two, one is glazed and the other isn't here are the final products.
Size comparison.
View attachment 419525
Size comparison.
View attachment 419532
Glazed comparison.
View attachment 419526
Front
View attachment 419527
Side
View attachment 419529
Close up.
View attachment 419528
Close up.
View attachment 419530
Overview.
View attachment 419531
Similar threads
- Replies
- 5
- Views
- 258
- Replies
- 3
- Views
- 311
- Replies
- 6
- Views
- 299


