Photographers: Spill your guts here...

Photography is a craft and and art on its own. Such as bonsai. It starts in the mind, goes through the camera and finished in post processing. There a lot to learn on the way. So for those who are just starting my simple guides would be to use a long focal distance (if available), make the distance between tree and background as large as possible and use a good contrasting colour for background.
 
@Vance Wood @leatherback @Clicio @jeremy_norbury @fredtruck I think as with all things bonsai, that this is very much a what do you want to achieve scenario. I came late but I can share some ideas that may help to illustrate a few basic principles in photography. Between telephoto and wide angle lenses it is a question of silhouette/flat or interior/volume. In short a long lens (large distance from the tree) flattens an image, a wide angle lens adds volume (puts you in the image). Traditional Portraiture has used 85mm as a minimum lens length in order to control distortion of features, the longer (105mm, 135mm) accepted as the most flattering to the subject.
I watched a video by Vance Wood last week it was a perfect illustration.
If you watch this video you will notice the distortion of the garage on the left hand side which indicates the length of lens being used, 17mm maybe, in any case it is very wide (The distortion, the round barrel shaped geometry to the whole image (garage door) is a separate thing and has been all but eliminated on the higher end Wide angle lenses these days, making it harder to spot a wide angle now). You can see right into the interior of the tree as he works, if you pay attention as he turns the tree, any branch that sweeps across the front of the screen becomes very large while all back branches diminish to the same degree (the wider the lens the stronger the effect). This is the characteristic of a wide angle lens, exaggerated proportions due to distance from the lens. As the branch moves past the center frame it sits to the left but on the periphery of your vision, seen almost beside. You are now in the shot as it were, the interior is now clear and comprehensible because priority has been established. The opposite is now true for the back of the tree it has been diminished to the point of obscurity, hidden behind the front. This is the only way to take this shot, if the lens was longer and the interior laid bare like this it would never have the impact of this shot, the branches in the back carrying the same weight as the near ones crossing each other and making an indiscernible mess.
As far as " what do you want to achieve" goes it depends on the tree and you goal. If you want to highlight the trunk, the interior of the tree, then consider a lens that is wider than the one your using, the one you are dissatisfied with, it will open up any spaces you get close to. You will find though that a very wide lens will alter the branch configuration to the degree that you decrease or even eliminate negative space or far branches by the exaggeration of near ones pulling the tree out of all proportion & making it unrecognizable as your tree. Shooting distance may be limited by the distance you styled your tree at, I found a lot of major design flaws on my trees by changing my viewing angle or viewing distance, this limitation carries through to trying to get a good shot of them. If you styled your tree from a reference point of 3-6' it may not translate at 15-20' with a 135mm lens, having said that I'm no expert on bonsai, and this could pertain to crappy bonsai only, LOL.

Another thing to consider re. flat vs depth, is depth of field or f-stops, (large # = small opening, small # = large opening, I know f*%@ked isn't it) A large f-stop produces a large depth of field (area in focus) meaning everything is in focus, it also reduces the contrast, equalizing everything. Stopping down, reducing the f-number (opening the lens) produces a narrower depth of field and a higher contrast ratio, expanding the differences. A soft rear is a good thing! "I like big buts and I don't ..." The point is shooting your tree with a mid to long lens (55mm+) will start to flatten the image but some depth can be restore by using a smaller depth of field. The contrast increases in the areas that are in focus and the contrast is quickly reduced in the areas that are out of focus (Light and darks are defused across each other eliminating high and low extremes and muddying the mid-tones), the sharp crisp lines of the foreground jump against the slightly softened back of the tree, it does not take much.

Lighting is very important and also plays a big par in maintaining/accentuating the 3D quality of the subject. Depth and volume, photography as with life drawing, the light should break within the form!
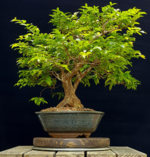
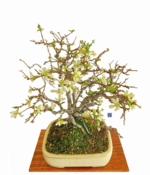
1607466584879.png1607466864403.png
1607467252913.png1607467271829.png

No offence in citing these, quite the opposite. While all four are well lit with good backgrounds, clear and in focus, they work fine in showing a pest, a problem, or a design, it is pretty obvious role that the quality of the light plays in the success of these first two shots. If you look at the rear edge of the table that leatherback shot you will see that it is soft, not out of focus, soft focus. This is enough to place a back branch behind, that is receding in space, a subtle difference which creates space.

I think side light, back light and top light are essential to 3D in a 2D medium.
Take a look at your trees in the morning when the sun is low, walk around until they are backlit, now take a tour to your right and then to your left. I bet you don't get back around front again.
Okay with beer in hand look at your trees in the evening against the sun as it sets, it's almost the same thing.
 
@Vance Wood I think as with all things bonsai, that this is very much a what do you want to achieve scenario. I came late but I can share some ideas that may help to illustrate a few basic principles in photography. Between telephoto and wide angle lenses it is a question of silhouette/flat or interior/volume. In short a long lens (large distance from the tree) flattens an image, a wide angle lens adds volume (puts you in the image). Traditional Portraiture has used 85mm as a minimum lens length in order to control distortion of features, the longer (105mm, 135mm) accepted as the most flattering to the subject.
I watched a video by Vance Wood last week it was a perfect illustration.
If you watch this video you will notice the distortion of the garage on the left hand side which indicates the length of lens being used, 17mm maybe, in any case it is very wide (The distortion, the round barrel shaped geometry to the whole image (garage door) is a separate thing and has been all but eliminated on the higher end Wide angle lenses these days, making it harder to spot a wide angle now). You can see right into the interior of the tree as he works, if you pay attention as he turns the tree, any branch that sweeps across the front of the screen becomes very large while all back branches diminish to the same degree (the wider the lens the stronger the effect). This is the characteristic of a wide angle lens, exaggerated proportions due to distance from the lens. As the branch moves past the center frame it sits to the left but on the periphery of your vision, seen almost beside. You are now in the shot as it were, the interior is now clear and comprehensible because priority has been established. The opposite is now true for the back of the tree it has been diminished to the point of obscurity, hidden behind the front. This is the only way to take this shot, if the lens was longer and the interior laid bare like this it would never have the impact of this shot, the branches in the back carrying the same weight as the near ones crossing each other and making an indiscernible mess.
As far as " what do you want to achieve" goes it depends on the tree and you goal. If you want to highlight the trunk, the interior of the tree, then consider a lens that is wider than the one your using, the one you are dissatisfied with, it will open up any spaces you get close to. You will find though that a very wide lens will alter the branch configuration to the degree that you decrease or even eliminate negative space or far branches by the exaggeration of near ones pulling the tree out of all proportion & making it unrecognizable as your tree. Shooting distance may be limited by the distance you styled your tree at, I found a lot of major design flaws on my trees by changing my viewing angle or viewing distance, this limitation carries through to trying to get a good shot of them. If you styled your tree from a reference point of 3-6' it may not translate at 15-20' with a 135mm lens, having said that I'm no expert on bonsai, and this could pertain to crappy bonsai only, LOL.

Another thing to consider re. flat vs depth, is depth of field or f-stops, (large # = small opening, small # = large opening, I know f*%@ked isn't it) A large f-stop produces a large depth of field (area in focus) meaning everything is in focus, it also reduces the contrast, equalizing everything. Stopping down, reducing the f-number (opening the lens) produces a narrower depth of field and a higher contrast ratio, expanding the differences. A soft rear is a good thing! "I like big buts and I don't ..." The point is shooting your tree with a mid to long lens (55mm+) will start to flatten the image but some depth can be restore by using a smaller depth of field. The contrast increases in the areas that are in focus and the contrast is quickly reduced in the areas that are out of focus (Light and darks are defused across each other eliminating high and low extremes and muddying the mid-tones), the sharp crisp lines of the foreground jump against the slightly softened back of the tree, it does not take much.

Lighting is very important and also plays a big par in maintaining/accentuating the 3D quality of the subject. Depth and volume, photography as with life drawing, the light should break within the form!
View attachment 343453
 
@Vance Wood @leatherback @Clicio @jeremy_norbury @fredtruck I think as with all things bonsai, that this is very much a what do you want to achieve scenario. I came late but I can share some ideas that may help to illustrate a few basic principles in photography. Between telephoto and wide angle lenses it is a question of silhouette/flat or interior/volume. In short a long lens (large distance from the tree) flattens an image, a wide angle lens adds volume (puts you in the image). Traditional Portraiture has used 85mm as a minimum lens length in order to control distortion of features, the longer (105mm, 135mm) accepted as the most flattering to the subject.
I watched a video by Vance Wood last week it was a perfect illustration.
If you watch this video you will notice the distortion of the garage on the left hand side which indicates the length of lens being used, 17mm maybe, in any case it is very wide (The distortion, the round barrel shaped geometry to the whole image (garage door) is a separate thing and has been all but eliminated on the higher end Wide angle lenses these days, making it harder to spot a wide angle now). You can see right into the interior of the tree as he works, if you pay attention as he turns the tree, any branch that sweeps across the front of the screen becomes very large while all back branches diminish to the same degree (the wider the lens the stronger the effect). This is the characteristic of a wide angle lens, exaggerated proportions due to distance from the lens. As the branch moves past the center frame it sits to the left but on the periphery of your vision, seen almost beside. You are now in the shot as it were, the interior is now clear and comprehensible because priority has been established. The opposite is now true for the back of the tree it has been diminished to the point of obscurity, hidden behind the front. This is the only way to take this shot, if the lens was longer and the interior laid bare like this it would never have the impact of this shot, the branches in the back carrying the same weight as the near ones crossing each other and making an indiscernible mess.
As far as " what do you want to achieve" goes it depends on the tree and you goal. If you want to highlight the trunk, the interior of the tree, then consider a lens that is wider than the one your using, the one you are dissatisfied with, it will open up any spaces you get close to. You will find though that a very wide lens will alter the branch configuration to the degree that you decrease or even eliminate negative space or far branches by the exaggeration of near ones pulling the tree out of all proportion & making it unrecognizable as your tree. Shooting distance may be limited by the distance you styled your tree at, I found a lot of major design flaws on my trees by changing my viewing angle or viewing distance, this limitation carries through to trying to get a good shot of them. If you styled your tree from a reference point of 3-6' it may not translate at 15-20' with a 135mm lens, having said that I'm no expert on bonsai, and this could pertain to crappy bonsai only, LOL.

Another thing to consider re. flat vs depth, is depth of field or f-stops, (large # = small opening, small # = large opening, I know f*%@ked isn't it) A large f-stop produces a large depth of field (area in focus) meaning everything is in focus, it also reduces the contrast, equalizing everything. Stopping down, reducing the f-number (opening the lens) produces a narrower depth of field and a higher contrast ratio, expanding the differences. A soft rear is a good thing! "I like big buts and I don't ..." The point is shooting your tree with a mid to long lens (55mm+) will start to flatten the image but some depth can be restore by using a smaller depth of field. The contrast increases in the areas that are in focus and the contrast is quickly reduced in the areas that are out of focus (Light and darks are defused across each other eliminating high and low extremes and muddying the mid-tones), the sharp crisp lines of the foreground jump against the slightly softened back of the tree, it does not take much.

Lighting is very important and also plays a big par in maintaining/accentuating the 3D quality of the subject. Depth and volume, photography as with life drawing, the light should break within the form!
View attachment 343453View attachment 343456
View attachment 343457View attachment 343458

No offence in citing these, quite the opposite. While all four are well lit with good backgrounds, clear and in focus, they work fine in showing a pest, a problem, or a design, it is pretty obvious role that the quality of the light plays in the success of these first two shots. If you look at the rear edge of the table that leatherback shot you will see that it is soft, not out of focus, soft focus. This is enough to place a back branch behind, that is receding in space, a subtle difference which creates space.

I think side light, back light and top light are essential to 3D in a 2D medium.
Take a look at your trees in the morning when the sun is low, walk around until they are backlit, now take a tour to your right and then to your left. I bet you don't get back around front again.
Okay with beer in hand look at your trees in the evening against the sun as it sets, it's almost the same thing.
Oleg, let me put it this way:
I am and have been a professional photographer for more than 40 years. Fashion including Vogue, Mary Kay and Elle magazine; advertising including Coca-Cola, GM, PepsiCo and Fiat.
Bonsai for me is a hobby, a pleasure, an escape.
Photography is work.
As I don't sell trees and just show them here to exchange ideas, views and horticultural techniques, my pictures don't have to be perfect. I don't want to call an assistant, put up the Profoto strobes and reflectors just to take a quick picture of my lousy bonsai.
Photography is my work, bonsai is my pleasure.
Thanks for your input about photography, many will appreciate it, and I am sure you know a lot about it.
But some others, like me, don't bother so much anymore.
 
Last edited:
...depth of field or f stops (I know f*%@ked isn't it) A large f-stop produces a large depth of field (area in focus) meaning everything is in focus...

I am so sorry, but you have messed it up for good.
The bigger the number, the smaller is the opening, so f:22 means a very small circle while f:2.8 means a very large circle.
The smaller is the orifice, the bigger is the depth of field (areas in the foreground and background apparently in focus).
The bigger is the orifice, the shallower is the depth of field, producing blurry backgrounds for instance.
So a large f stop (bigger number) produces a shallow depth of field, and not the opposite as you have said.
I won't go into the math, but we're dealing with the area of the iris (a circle) and every full f stop down let in the double of the light; going up every f stop let in half of the light.
Usually (classic numbers):
1.4, 2, 2.8, 4, 5.6, 8, 11, 16, 22, 32
Be well and good shoots!
 
Last edited:
So a large f stop (bigger number) produces a shallow depth of field, and not the opposite as you have said.

Now I messed it up!
Hahaha.
Please let me correct myself:
So a large f stop (bigger diaphragm opening) produces a shallow depth of field.
 
Now I messed it up!
Hahaha.
Please let me correct myself:
So a large f stop (bigger diaphragm opening) produces a shallow depth of field.
I know you know this this is just to help others:

Smaller the f number (f1.4, f1.8... etc) the bigger the aperture opening and the shallower the depth of field. And the faster the shutter speed because the sensor gets more light (because the aperture is open wide).

Bigger the f number (f32, f28... etc.) the smaller the aperture opening and the deeper the depth of field. And the slower the shutter speed because the sensor gets less light (because the aperture is almost closed).

And for light with Flash f-numbers it is the opposite.... 🤣 🤣 🤣
Thanks! You are more didactic than me 😉
 
Will actually created a resource on this topic as well.
 
Oleg, let me put it this way:
I am and have been a professional photographer for more than 40 years. Fashion including Vogue, Mary Kay and Elle magazine; advertising including Coca-Cola, GM, PepsiCo and Fiat.
Bonsai for me is a hobby, a pleasure, an escape.
Photography is work.
As I don't sell trees and just show them here to exchange ideas, views and horticultural techniques, my pictures don't have to be perfect. I don't want to call an assistant, put up the Profoto strobes and reflectors just to take a quick picture of my lousy bonsai.
Photography is my work, bonsai is my pleasure.
Thanks for your input about photography, many will appreciate it, and I am sure you know a lot about it.
But some others, like me, don't bother so much anymore.

It looks like my post was posted 1 1/2 times, could admin take down the second post # 43.
Clicio, part of my original post was omitted the second time it was posted. the missing part reads;

"No offence in citing these, quite the opposite. While all four are well lit with good backgrounds, clear and in focus, they work fine in showing a pest, a problem, or a design, it is pretty obvious role that the quality of the light plays in the success of these first two shots. If you look at the rear edge of the table that leatherback shot you will see that it is soft, not out of focus, soft focus. This is enough to place a back branch behind, that is receding in space, a subtle difference which creates space.

I think side light, back light and top light are essential to 3D in a 2D medium.
Take a look at your trees in the morning when the sun is low, walk around until they are backlit, now take a tour to your right and then to your left. I bet you don't get back around front again.
Okay with beer in hand look at your trees in the evening against the sun as it sets, it's almost the same thing."

Clicio said;
"Thanks for your input about photography, many will appreciate it, and I am sure you know a lot about it.
But some others, like me, don't bother so much anymore."

I wasn't scolding you for not doing the work man! LOL and I hope some do appreciate it.
"If you want to highlight the trunk, the interior of the tree, then consider a lens that is wider than the one your using, the one you are dissatisfied with, it will open up any spaces you get close to."

This post was written as general knowledge to be taken as is (there are quite a few people who do very good photography here, none of the examples cited were mine) or taken piecemeal to aid in what they are presently doing.
 
I am so sorry, but you have messed it up for good.
The bigger the number, the smaller is the opening, so f:22 means a very small circle while f:2.8 means a very large circle.
The smaller is the orifice, the bigger is the depth of field (areas in the foreground and background apparently in focus).
The bigger is the orifice, the shallower is the depth of field, producing blurry backgrounds for instance.
So a large f stop (bigger number) produces a shallow depth of field, and not the opposite as you have said.
I won't go into the math, but we're dealing with the area of the iris (a circle) and every full f stop down let in the double of the light; going up every f stop let in half of the light.
Usually (classic numbers):
1.4, 2, 2.8, 4, 5.6, 8, 11, 16, 22, 32
Be well and good shoots!
Clicio, nothing I have said in my post is wrong or misleading, you didn't need to re-explain, I said; (large # = small opening, small # = large opening, I know f*%@ked isn't it) A large f-stop (I was refering to the #) produces a large depth of field (area in focus) meaning everything is in focus, it also reduces the contrast, equalizing everything. Stopping down, reducing the f-number (opening the lens) produces a narrower depth of field and a higher contrast ratio, expanding the differences.

Aperture and orifice are the same thing, however F-stop and aperture are not the same thing. f-stop is a ratio.

Ahh... there was something else... something about your post and your aperture... damn slipped my mind, never mind.
 
Ahh... there was something else... something about your post and your aperture... damn slipped my mind, never mind.

😅hahaha, I need to correct myself. But you are right, because I was discussing this statement:
"A large f-stop (I was refering to the #) produces a large depth of field (area in focus)"
By a large f-stop you mean the n# is closer towards the f:64.
Now I see.
"A large f-stop" was interpreted by me as a large aperture, a large diafragm.
So yes, the higher the number, the largest is the depht of field.
We both agree on that.

By the way, if you care to take a look...

 
Yeah I know, it's the nature of the beast. I would suggest that you take it one step at a time, do what you do and then add something from this thread.
Here is a very basic start:
A dedicated area makes it fast, easy, and consistent. it could be as simple as a small table in front of a plain wall, wall's wrong, hang a sheet or two.
Cameras these days correct color so long as all lights are the same type, results should be good or recoverable. (incandescent use all incandescent, fluorescents & LED's etc. should be the same type, brand and color temperature rated as K (4000 K eg.)
 
Back
Top Bottom