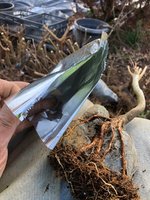
Opening this year's new ROR tridents

At one stage I got hold of a catering pack of foil which was not only a bulk pack but also appeared to be thicker and stronger. Currently using ordinary household foil from the supermarket. Try to get the thicker and stronger foil if you have an option. It is surprising how easily a small root will pierce the foil while I'm wrapping the roots. Needs to be thin and flexible enough to mould into all the hollows and cavities of your rock without breaking while still strong enough to hold the roots on the rock.
Standard rolls are wide enough to fold the foil in half to wrap with a double layer on all but the biggest rocks. I still wrap with around 2-3 layers of the doubled foil. In 12 months the outside layer is virtually dissolved so having several layers is worth the little extra foil.

Some more of the field grown trees out this afternoon but a bit too late for more photos.
This is great, I'm definitely trying it!

Do you add any soil or medium in the foil pouch at all?
 
Last edited:
Do you add any soil or medium in the foil pouch at all?
No need for soil inside the wrap. In fact that may be detrimental. The aim is to keep the roots as close to the rock as possible. New roots will grow just with the moisture trapped between rock and wrap. I often get masses of new roots growing and need to remove many to preserve the spaces between roots to see the rock.
With this method it is not even necessary to have long roots. Just wrap the roots as best you can. wrap the ENTIRE rock with foil but leave the bottom open (and the top where the trunk is, obviously). The roots will continue to grow down until they reach soil. Note that adequate moisture is required as the tree must make do with what's between foil and rock until they reach the bottom. That's why mine stay in the nursery for the first summer - water twice a day to ensure the rock and roots stay damp at all times.

Another tip:
When starting a ROR soak the rock first so you are putting the tender roots onto a wet rock rather than a dry lump of stone.
thank you so much for sharing this idea.
 
A couple of photos that may help clarify some aspects of this procedure.
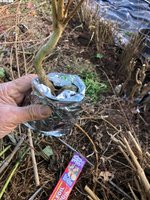
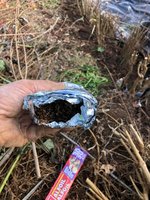
After the first year there will probably be many new, white roots growing over the surface of the rock. New roots develop easily in the damp space between foil and rock surface. Keep some (or all?) if you think they may be needed. In this case I'm removing most as there's already good root volume and placement. Too many roots will eventually obscure the rock leaving you with a root over? instead of the desired Root over Rock.
IMG_5003.JPGIMG_5004.JPG

Al foil - normal kitchen variety. I need a length that will wrap around the rock 2 - 3 times so start with a generous length.
IMG_5005.JPG
Fold the length of foil to fit the HEIGHT of the rock. In this case folded in half.
IMG_5006.JPG
Wrap around the rock and roots. At the initial seedling placement you may need a couple more hands to hold all the roots where you want them while wrapping the foil so the roots do not get away.
IMG_5007.JPG
You should end up with a foil wrapped rock open at the top so water can get in and at the bottom so water and roots can escape into the soil.
IMG_5008.JPGIMG_5009.JPG
Elastic tape or some other material can be used to push the roots harder against the rock but only works where the rocks are rounded with no hollow points.
IMG_5010.JPGIMG_5011.JPG
 
Today I dug and pruned the rest of the field grown ROR tridents.
Most of these have had just 1 year in the grow bed. Some were not well enough grown last year and were sent back to gain more thickness.

Nice rock, nice roots, shame about the trunk.
IMG_5015.JPG

A bigger ROR
IMG_5016.JPG

Nice trunk and great roots on a good rock. This one will likely be priced at the upper end.
IMG_5017.JPG

Bigger with great roots that complement both the rock and the trunk angles. A fairly large chop in the trunk but it has given a useful bend up toward the top of the trunk.
IMG_5022.JPG

Another nicely shaped trunk with good roots hugging the rock. The small leader part way down the trunk is ideally placed to shorten the trunk and add extra bends if someone wants to look to the long term.
IMG_5023.JPG

Please note that I've showed most of the good ones and only a few of the less attractive results. There were 17 trees in this field grown batch. All will eventually make reasonable ROR but some will need extensive and time consuming remediation to get achieve good.
Whenever we add an extra element to a bonsai it multiplies the difficulty of getting a good result. Good ROR not only needs a good trunk with good branches (same a any bonsai). It also needs a good rock with good roots well placed to complement both rock and trunk shape. Then the trunk and branching needs to be styled to complement the rock and roots.
Check the first pic on this post again to see how much a less than ideal trunk lets down the whole arrangement and we have not even started developing branches and apex yet.

The reason for pointing this out is to encourage beginners not to put all the eggs in one ROR. My recommendation is to start with 2 or 3 (or more) and hope that 1 turns out better.
 
I think these are really cool and thank you for sharing the aluminum foil technique. I think that it's a pretty innovative way to do this.

My only issue is that some of the rocks you've used are rather small imo and as the trees grow, I'd think the tree might completely engulf them or just look out of balance with each other. Ie too big a tree on too small a rock.
I believe these will be kept as small ROR trees so the balance will be preserved.

@Shibui I will give this a try if any of the cuttings I did over the weekend took. Very inspirational post with results.
 
My only issue is that some of the rocks you've used are rather small imo and as the trees grow, I'd think the tree might completely engulf them or just look out of balance with each other. Ie too big a tree on too small a rock.
Great observation. This is a real issue with all ROR. My first attempt was with Ficus ROR - 3 trees on a good sized rock. Within 10 years the rock was completely covered in fused roots. Turned out to be a large sumo ficus but not ROR any more.
Having enough roots to be interesting but not too many that will swallow the rock over time is the key.
Knowing when to slow growth to prevent this happening too quick is another factor. Some of the early attempts at smaller tridet ROR were planted in the grow beds. Just 1 season of growth made the trunks bigger than the rocks. I have gradually learned which are big enough to cope and which need to be developed more slowly in pots instead.
The trees on the smaller rocks will be developed slowly to maintain balance between rock, roots, trunk and tree. I have enough going to hope that at least 1 will work out well.
 
Back
Top Bottom