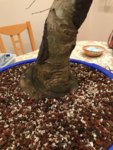
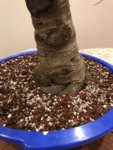
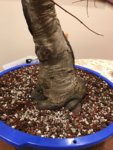
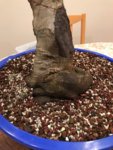
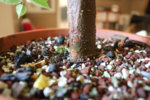
My very big, very ugly, very problematic JM.

I've read or heard about Walter Pall and a tree he had for very long with bad nebari. He eventually decided to just layer it above the bad nebari and create a new one with proper techniques. He mentioned that he regretted not starting sooner / immediately to layer it. If I remember right it even was a maple too, but I'm not too sure.
 
If this is your very ugly maple.. Please share the pretty stock you are working on!

As for layering.. Do I read it well you are concerned it goes wrong? I feel that on japanese maple you cannot mess up a layer.. I found them to be very responsive..

My point was this tree has quite a few problems between the base, the scars and the dead spot in the trunk. I try not to purchase material that requires so much fixing. The lowest scar is huge and Was not even healing when it arrived.

As for layering, I have mixed results. I’m sure it’s a problem with my technique but I get mixed results, sometimes just callous, sometimes roots only on one side. It’s a risk that needs to be taken but I am hesitant.
 
Easier said than done, but have you considered ground-layering it to improve the base?
Yeah, do that ground layer and don’t look back. Be confident in your technique and you’ll be fine.

Maybe someone should start a thread for trees we have starting from the humble beginnings of showing up on our doorstep with the apex sticking out of a jagged hole of the top of two shipping boxes taped together
Think we have a couple already...?
https://www.bonsainut.com/threads/m...pa-mark-torpa-the-growing-grounds-avoid.7521/
https://www.bonsainut.com/threads/marc-torppa-the-growing-grounds-and-or-don-blackmond-gbb.32342/
 
Ground layer than perhaps graft on some roots using approach and / or thread grafts to fill in any gaps. I know Sergio has done a progression using an approach graft to add a more balanced look. Ground layer would be first option though.
 
I see what everyone is saying, it is a great tree and would be really fun to work on. however, i also am like who did all these strange, strange things to the tree? random cuts, poorly pasted wounds, nebari crafted by a 3 gallon pot's circular mold, what happened? i am confident you can make this thing amazing. perhaps consider airlayering the trunk or root grafting to make new nebari?
 
As for layering, I have mixed results. I’m sure it’s a problem with my technique but I get mixed results, sometimes just callous, sometimes roots only on one side. It’s a risk that needs to be taken but I am hesitant.

there is rarely such an overwhelming consensus in suggestions/advice. It sounds to me like a ground layer is the obvious move for this tree.

i’m with you on the hesitation. Personally, i would bring this tree to a local expert or club, and sit along side somebody who has layered thousands of times while doing it.

I’m layering a deshojo this year with a 1.5” trunk. A local expert will be standing over me watching my every move, from tool sterilization right up to putting the tree back in my car ?
 
It is the aftercare that is most critical, more than the procedure itself; which is pretty simple. I’d almost want it to spend the summer in a greenhouse getting rotated every week. Good luck with it Brian. It has potential, but challenges too.
 
This will work into a pretty nice bonsai, as the wounds heal and you get rid of those extremely messed up roots. A GROUND LAYER is a lot easier than an air layer to do. Basically, you wound the tree juust above the current mess of swollen tangled roots. The cuts can be extensive, like is done with an air layer, or less so, with smaller "windows" of bark and cambium removed laterally around the trunk. Then you just backfill the pot with a few inches of soil and keep moist. Ideally, the new roots will push into the new soil.

To accelerate this, you can repot the tree, removing some of the existing roots, then do the ground layer treatment before potting back up, ensuring the ground layer is below the soil on repot. The removal of the lower roots will probably accelerate the new roots from the ground layer...

If you're hesitant, seek help, in person, from someone that has done this--seeing it done makes the process less stressful for you.
 
there is rarely such an overwhelming consensus in suggestions/advice. It sounds to me like a ground layer is the obvious move for this tree.

i’m with you on the hesitation. Personally, i would bring this tree to a local expert or club, and sit along side somebody who has layered thousands of times while doing it.

I’m layering a deshojo this year with a 1.5” trunk. A local expert will be standing over me watching my every move, from tool sterilization right up to putting the tree back in my car ?
There is expert in layering? Isn't there already a whole thread devoted to the science of layering on here? I feel if you have a gap big enough and clean out the cambium to the heart wood and use pumice as the medium. Everything else is depend on the tree. Grafting on the other hand....
 
If it's still in that colander, you can throw it in the ground for a year and layer it in the ground.
It looks like you got it near healthy enough to throw roots straight away.
Ground power can only help.
It Will also keep the tree stable as you saw off the top.

I would use a radialdisk made out of plywood and apply it like they do the Pillory on Vance.
But set it atop another 1/2 to 3/4in ply as a spacer, that can be removed later to get your saw in to cut off your tree.

I have 2 of these in my yard now. An elm and a Mulberry, I'll be removing them this spring (fingers crossed) before we move.

I bought a wire saw to cut them off, but I lost it.

Sorce
 
I feel if you have a gap big enough and clean out the cambium to the heart wood
ehm.. Yeah, you can cut to deep causing the sapwood to fail in places with the result: Top dying off.
It is not hard to do, but some people seem to have the wrong intuition when putting a graft in place. Either taking too little away to people acting like a beaver.
 
There is expert in layering? Isn't there already a whole thread devoted to the science of layering on here?

Maybe you learn differently than i do, or have more confidence than i do. I have a lot of respect for people with more experience and knowledge than me, and their presence is reassuring (as rockm noted), and their advice can be important or even crucial when performing procedures that one is less confident in. the aftercare is also important (as brian noted), and it’s good to get this info in person with the tree on the table infront of you.

i did not mean to suggest contacting an ‘expert in layering’, as you say.
 
If I were planning to layer this trunk, I would- 1) lift the tree from the colander and clear away the soil from the base and upper root base, and make the layer where desired. I wouldn’t remove any roots if not needed to do the layer as I want the tree to grow strongly this year. 2) be decisive when making the layer. You need to remove all the cambium and make the ring of removed cambium wide enough to prevent any bridging. You’re shooting for 360 degree root spread here and you should get it if it’s done right. I’ll usually use a grafting knife to make the cut at the top and bottom, separating the cuts by at least 2 inches. Peel away the bark and scrape away any residual cambium. I’ll usually follow up with a continuous ring of shallow bites into the wood with a knob cutter in the middle of the debarked area, 3). Dust the bark directly above the debarked area with rooting powder, 4) up pot so that the layered portion of trunk is covered by at least 2 inches of good soil, then apply milled sphagnum moss to the surface. Make sure the pot fits the existing roots well but has room for more. Also make sure the tree is tied In tightly to the pot. 5) let the tree grow wild for the year... lots of ferts, water, sun and no pruning other then working the scar calluses as needed. I’ve done this with great success and no failures on multiple palmatums with 4+ inch trunks. If a Red Sox fan can do it....?.
 
If I were planning to layer this trunk, I would- 1) lift the tree from the colander and clear away the soil from the base and upper root base, and make the layer where desired. I wouldn’t remove any roots if not needed to do the layer as I want the tree to grow strongly this year. 2) be decisive when making the layer. You need to remove all the cambium and make the ring of removed cambium wide enough to prevent any bridging. You’re shooting for 360 degree root spread here and you should get it if it’s done right. I’ll usually use a grafting knife to make the cut at the top and bottom, separating the cuts by at least 2 inches. Peel away the bark and scrape away any residual cambium. I’ll usually follow up with a continuous ring of shallow bites into the wood with a knob cutter in the middle of the debarked area, 3). Dust the bark directly above the debarked area with rooting powder, 4) up pot so that the layered portion of trunk is covered by at least 2 inches of good soil, then apply milled sphagnum moss to the surface. Make sure the pot fits the existing roots well but has room for more. Also make sure the tree is tied In tightly to the pot. 5) let the tree grow wild for the year... lots of ferts, water, sun and no pruning other then working the scar calluses as needed. I’ve done this with great success and no failures on multiple palmatums with 4+ inch trunks. If a Red Sox fan can do it....?.

Nice!

Fully agree (Although I do not do the knob cutter thing). Adding to this:

- Note that the roots come from the bark, and not from the area that you have removed the bark. So the upper cut-line will become roughly, the nebari.
- In the section above: Burry so that the upper cut is 2 inches below ground, not the bottom cut. (You want the bark to stay moist)
- No need to rush. The area you remove the bark from is allowed to fully dry out. It is in a way even preferred. I like to leave it sit for an hour in the wind to dry. Then I re-cut a sliver from the top, apply rooting hormone and cover the whole thing up
- If in a pot, it can help to slowly turn the pot, a bit every day. Root forming goes easier when the substrate is warm, and the sunny side is warmer
 
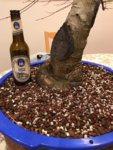
So in preparation for a layer I built a cedar box. Good dimensions and sturdy. I was also thinking about the layer more last night and my question is that with the tremendous scar where it is, where is the ideal spot for a top cut while allowing enough of a gap to prevent bridging? Just below the scar? And then start removing cambium from there down onto where the giant curly base is? Some more pics.
 

Attachments

  • 2863BB45-5EB0-4DDC-83B8-4D91B1E3DAA4.jpeg
    2863BB45-5EB0-4DDC-83B8-4D91B1E3DAA4.jpeg
    228.4 KB · Views: 102
  • DFC15F9B-2EB2-4964-8632-809FFB777382.jpeg
    DFC15F9B-2EB2-4964-8632-809FFB777382.jpeg
    241.2 KB · Views: 89
  • 0BF368AC-AEF8-42B3-9C92-FBACE8B118DB.jpeg
    0BF368AC-AEF8-42B3-9C92-FBACE8B118DB.jpeg
    214.3 KB · Views: 68
  • 6A8BBD4F-7E79-4694-9D3B-06CA05F42CCA.jpeg
    6A8BBD4F-7E79-4694-9D3B-06CA05F42CCA.jpeg
    213.2 KB · Views: 66
  • 6A9A2041-060D-47B1-91B7-404E97E63F04.jpeg
    6A9A2041-060D-47B1-91B7-404E97E63F04.jpeg
    225.1 KB · Views: 98
Make the top of the girdle (just) above that pruning wound. Were you to make it be in the wound or immediately below, you won't get roots there. Remember that the stuff that makes new roots is the cambium (none in that wound) and the carbohydrates in the phloem (inner bark - there is none in that wound and a very poor supply below).
 
This guy really doesn't corporate at all. I would think those huge scars on opposite side would be an issue for root. How does it look if the upper cut is above both scars?
 
Make the top of the girdle (just) above that pruning wound. Were you to make it be in the wound or immediately below, you won't get roots there. Remember that the stuff that makes new roots is the cambium (none in that wound) and the carbohydrates in the phloem (inner bark - there is none in that wound and a very poor supply below).
I tend to agree, but see the scar on the other side too. You’re going to have to thread the needle.
D235A128-4825-4F0A-9F57-D8BBF2A30FFA.jpeg
Get the trunk wet and see if you can find a ring of living tissue all the way around the trunk between those two cuts, then trace it with a sharpie.
1CBD487F-0622-4D6D-9F1A-588DB70712AC.jpeg77DA2B01-624A-4514-AF4C-B20E7967179F.jpegBF3BDF0C-A578-444A-8AE4-4E43F02A886D.jpeg
 
Back
Top Bottom