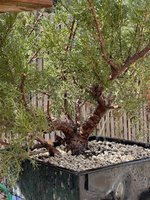
Long Term Juniper Project - Rough Nursery Pfitzer With Shimpaku Scion Grafts

Thanks for the detailed response Frank! @River's Edge ! Per usual your insight is so helpful.

1. great thought on timing, I hadn’t considered wrapping the shoot first. It makes so much sense though.
2. perpetration has been a main focus of main over the last few years, wether that be wrapping and wiring trees, repotting or even in my wood working. Partially why I want to try a more prep focused bonsai task.
3. After care and desiccation is my biggest concern being in the high desert southwest. Little to no humidity here.
4.def planning on proper tape wrap and was thinking cut paste would be my added sealing agent.
5. I’m curious what size scions and the woodiness of the scion you prefer best?
6. do you have a knife brand you recommend? I don’t own one yet.

I will also look for the article you speak. Maybe I can find the print magazine issue or possibly it’s online?

thanks Again Frank!
1.I would consider the bag approach for your climate. Easier to maintain humidity on the scion.
2. scion placement is important, select side of branch not top or bottom.
3. Scion cut is important for long and short face as well as the end angle of short cut.
4. Scion needs to be placed at a slight angle to optimize possible contact with cambium.
5. Most videos or written descriptions neglect to mention the two small horizontal cuts above the graft which act to reduce auxin levels from the apical bud on the host branch. This aids in the success of the scion graft.
6. As the graft shows signs of growth it is important to begin cutting back the outer foliage on the branch the graft has been placed on, as well as very slowly decrease the humidity in the bag. Small holes poked every couple of weeks until the graft is adapted to fresh air and lower humidity levels. ( Aftercare tips)
Assuming that you have the host and donor trees in good health and the timing is appropriate.
I would suggest the following sequence.
Assemble all the required materials.
Grafting Knife, latex caulk or cut paste, baggies, wire or string, sphagnum moss, Scion material, grafting tape!
1- Sharpen the grafting knife ( needs to easily shave hair off arm with little effort)
2- listen sphagnum moss and place in the bottom of bag (one corner of baggy)
3- select and cut approximately 5 inch scion material
4- cut off excess side foliage from the scion in the lower portion of the scion, as close and clean as possible.
5- cut tiny corner edge of the opposite bottom corner on the bag from the damp sphagnum placed earlier.
6- placing the scion in the baggy, insert the base stem through the tiny cut, you want the baggy corner to fit tightly over the stem.
7- enclose the baggy over the scion loosely with wire or string. leaving long enough piece of wire to attach to branch after placement.
Now here is where accuracy and timing is important!
8- cut the scion, long cut first, shorter cut second. important second cut is clean and base of scion at a slight angle so it matches the bottom of the cut on the host branch.
9-place cut tip of scion in mouth to retain humidity but not in contact with saliva;)
10- make single cut on host branch and just above make two small horizontal cuts one above the other!
11- place scion into cut with a slight angle and tight to the bottom of the cut.
12-bind tightly with grafting tape up to the bag tip where scion protrudes.
13-Seal this joint with latex caulk or cut paste. Avoid liquid sealer as it may creep into the cut faces.
14. secure baggy to branch with sphagnum moss in downward corner, scion corner above.
15. Place tree so grafts are protected from direct sunlight. One can use tape over the bag to shield scion if needed.

Aftercare!
Ensure the sphagnum remains damp ( should be able to observe small droplets of condensation in the baggy at all times. The scion should not be in contact with water sitting in the baggy.) You can use a small syringe to keep moisture levels up in the sphagnum moss.
Wait for extension growth to show that the scion has taken. The begin the slow process of poking holes in the bag and reducing some foliage on the host branch. This will strengthen the scion and its reliance on the host branch. As a guideline I would suggest a 4 to six week gradual process for bag removal and that is only begun after the graft shows obvious extension of new growth. Pruning back growth on the host branch should be undertaken very gradually as well and may take several growing seasons. I like the graft to be independent and of considerable size before reducing right back to that point. ( This is assuming the graft was done to change out the foliage, not just add a branch in a particular location.
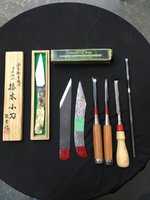
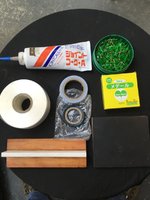
Below are the materials I use for grafting. The buddy tape is in the yellow and green box, caulking tube above left. The grafting knife in the wooden box is a presentation knife not my everyday. Everyday grafting knives are Kaneshin. grafting chisels are Japanese from Lee valley tools and filed to specific patterns for pine grafting. The tile block was constructed to match a similar tool on the advice of Brent from Evergreen to aid in scion cutting.
I will prepare a sample scion and take a picture when time allows.
 

Attachments

  • IMG_0572.JPG
    IMG_0572.JPG
    151.2 KB · Views: 22
  • IMG_0571.JPG
    IMG_0571.JPG
    142.1 KB · Views: 25
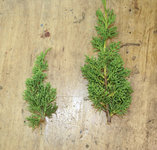
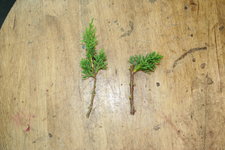
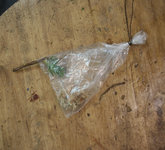
Here are a couple of photos to illustrate above.
Photo one shows two types of scions, First for traditional timing as that is the type of growth typically early spring. Second during growing season using a side shoot, note the cut tip needs to be sealed on top above side shoot.
Photo two shows trimmed scion before placement in baggy!
Photo three shows placement of scion in baggy, sphagnum below and wire placed to secure top of bag to branch.

Rough guidelines for scion size. 3-5 inches closer to 3 inch finished size, diameter of scion roughly 14 to 3/8 inch,
Long cut 3/4 inch, short cut 3/8 inch.
When the scion cuts are completed they will be much shorter in the stem portion!
Remember those cuts are just prior to placement. I try to make those cuts, complete placement and wrap within 10-15 seconds
Hope that helps!
 

Attachments

  • IMG_1573.JPG
    IMG_1573.JPG
    257.5 KB · Views: 24
  • IMG_1574.JPG
    IMG_1574.JPG
    185.4 KB · Views: 22
  • IMG_1577.JPG
    IMG_1577.JPG
    191.9 KB · Views: 27
This is so great Frank. Thank you, really. So the host plant was just purchased yesterday actually and I’m fully prepared to spend at least 2 full seasons getting the plant to excellent health before attempting the grafts. Next spring I plan on address the root bound nursery pot and the following I will probably just let grow. Unless it shows signs of vigor by then.
1.I would consider the bag approach for your climate. Easier to maintain humidity on the scion.
2. scion placement is important, select side of branch not top or bottom.
3. Scion cut is important for long and short face as well as the end angle of short cut.
4. Scion needs to be placed at a slight angle to optimize possible contact with cambium.
5. Most videos or written descriptions neglect to mention the two small horizontal cuts above the graft which act to reduce auxin levels from the apical bud on the host branch. This aids in the success of the scion graft.
6. As the graft shows signs of growth it is important to begin cutting back the outer foliage on the branch the graft has been placed on, as well as very slowly decrease the humidity in the bag. Small holes poked every couple of weeks until the graft is adapted to fresh air and lower humidity levels. ( Aftercare tips)
Assuming that you have the host and donor trees in good health and the timing is appropriate.
I would suggest the following sequence.
Assemble all the required materials.
Grafting Knife, latex caulk or cut paste, baggies, wire or string, sphagnum moss, Scion material, grafting tape!
1- Sharpen the grafting knife ( needs to easily shave hair off arm with little effort)
2- listen sphagnum moss and place in the bottom of bag (one corner of baggy)
3- select and cut approximately 5 inch scion material
4- cut off excess side foliage from the scion in the lower portion of the scion, as close and clean as possible.
5- cut tiny corner edge of the opposite bottom corner on the bag from the damp sphagnum placed earlier.
6- placing the scion in the baggy, insert the base stem through the tiny cut, you want the baggy corner to fit tightly over the stem.
7- enclose the baggy over the scion loosely with wire or string. leaving long enough piece of wire to attach to branch after placement.
Now here is where accuracy and timing is important!
8- cut the scion, long cut first, shorter cut second. important second cut is clean and base of scion at a slight angle so it matches the bottom of the cut on the host branch.
9-place cut tip of scion in mouth to retain humidity but not in contact with saliva;)
10- make single cut on host branch and just above make two small horizontal cuts one above the other!
11- place scion into cut with a slight angle and tight to the bottom of the cut.
12-bind tightly with grafting tape up to the bag tip where scion protrudes.
13-Seal this joint with latex caulk or cut paste. Avoid liquid sealer as it may creep into the cut faces.
14. secure baggy to branch with sphagnum moss in downward corner, scion corner above.
15. Place tree so grafts are protected from direct sunlight. One can use tape over the bag to shield scion if needed.

Aftercare!
Ensure the sphagnum remains damp ( should be able to observe small droplets of condensation in the baggy at all times. The scion should not be in contact with water sitting in the baggy.) You can use a small syringe to keep moisture levels up in the sphagnum moss.
Wait for extension growth to show that the scion has taken. The begin the slow process of poking holes in the bag and reducing some foliage on the host branch. This will strengthen the scion and its reliance on the host branch. As a guideline I would suggest a 4 to six week gradual process for bag removal and that is only begun after the graft shows obvious extension of new growth. Pruning back growth on the host branch should be undertaken very gradually as well and may take several growing seasons. I like the graft to be independent and of considerable size before reducing right back to that point. ( This is assuming the graft was done to change out the foliage, not just add a branch in a particular location.
Below are the materials I use for grafting. The buddy tape is in the yellow and green box, caulking tube above left. The grafting knife in the wooden box is a presentation knife not my everyday. Everyday grafting knives are Kaneshin. grafting chisels are Japanese from Lee valley tools and filed to specific patterns for pine grafting. The tile block was constructed to match a similar tool on the advice of Brent from Evergreen to aid in scion cutting.
I will prepare a sample scion and take a picture when time allows.
 
Here are a couple of photos to illustrate above.
Photo one shows two types of scions, First for traditional timing as that is the type of growth typically early spring. Second during growing season using a side shoot, note the cut tip needs to be sealed on top above side shoot.
Photo two shows trimmed scion before placement in baggy!
Photo three shows placement of scion in baggy, sphagnum below and wire placed to secure top of bag to branch.

Rough guidelines for scion size. 3-5 inches closer to 3 inch finished size, diameter of scion roughly 14 to 3/8 inch,
Long cut 3/4 inch, short cut 3/8 inch.
When the scion cuts are completed they will be much shorter in the stem portion!
Remember those cuts are just prior to placement. I try to make those cuts, complete placement and wrap within 10-15 seconds
Hope that helps!
VERY helpful Frank.
 
This is so great Frank. Thank you, really. So the host plant was just purchased yesterday actually and I’m fully prepared to spend at least 2 full seasons getting the plant to excellent health before attempting the grafts. Next spring I plan on address the root bound nursery pot and the following I will probably just let grow. Unless it shows signs of vigor by then.
So you have time to research the best juniper foliage to graft on to your host and also experiment with managing the new growth of the donor plant to create the best form of scions for the time of year you wish to graft. The Okada article will give steps to follow for growing scions and selecting the best ones for use during the growing season. Most articles and videos simply address choosing extending tips and preparing scions for the traditional; season of juniper grafting.
Prepare for practise, it takes time to improve ones results. Even the best grafters can be inconsistent despite what is often proclaimed. There are a lot of factors involved. Attention to detail is paramount.
 
First big step in this project completed. I dug into the rootball and Dam was this thing rootbound. Last year I basically took that root ball and threw it in a 15 gal pot with pumice. You can see the amount of roots that grew into that. I sawed off the bottom half leaving all the new roots In The top 1/3. I also raked out the matted root surface. I was aggressive but I left pretty much all of the foliage for recovery’s sake. I’m confident it’ll thrive. It will now live in this Andersen flat for as many years as it takes to graft on the new foliage. I may start grafting next season depending on vigor. Trunk base is big. 3-4”
EB72D831-53EB-40B0-A119-BC68D795E6FC.jpeg3F274B1B-237E-4A46-A155-817E2A1CD8FE.jpeg
2A63A562-8E0B-44BA-90E9-8685A58C04D1.jpegE34327CB-BA3A-4A31-A4F1-ED21C122D8B3.jpegA64B8C60-7B96-4C31-9358-B8A8FAD6A469.jpeg
 
Hey Frank (@River's Edge ). To what extent do you remove growth on sections of the trunk you plan on grafting? The receiving tree is doing great and growing very well, and I wondered if prepping the trunk lines by cleaning up under growth would be beneficial. Leaving most of the growth agh ends of the trunks and branches I don’t plan on grafting till next spring, but I’d love to have all of my ducks in a row when it’s time.
 
Hey Frank (@River's Edge ). To what extent do you remove growth on sections of the trunk you plan on grafting? The receiving tree is doing great and growing very well, and I wondered if prepping the trunk lines by cleaning up under growth would be beneficial. Leaving most of the growth agh ends of the trunks and branches I don’t plan on grafting till next spring, but I’d love to have all of my ducks in a row when it’s time.
I remove weak growth only leaving extension growth, after the scions have shown sign of taking then I remove extension growth to balance energy to the interior. So the normal clean up on juniper, downward weak growth, and thinner growth. Also important to fertilize into the fall and throughout the next growing season while grafting is taking place. In short the concern is vigorous health at this point, not refinement.
 
I remove weak growth only leaving extension growth, after the scions have shown sign of taking then I remove extension growth to balance energy to the interior. So the normal clean up on juniper, downward weak growth, and thinner growth. Also important to fertilize into the fall and throughout the next growing season while grafting is taking place. In short the concern is vigorous health at this point, not refinement.
I def get that, but I was actually speaking to the receiving tree. How much of the low growth and branching near the trunk do you clear out? This pic shows the trunk lines I like best. Should I remove all growth except for what’s out at the ends? This way I have long open sections of the trunk.
AA3EAB2F-1410-4F6E-83D6-24DB6C726FA8.jpeg
 
I was talking about the receiving tree! leave as much healthy foliage as you can to ensure healthy vigorous growth. Just remove the weak and thin foliage that will never amount to anything. The scion will need the support of energy flow through the branches they are grafted on to. Newly grafted scions benefit from some shade until they have joined and are drawing from the receiving tree. So the additional foliage is of dual benefit, extra energy for the Tree and shade for the newly grafted scions. As the scions progress, reduce the extension growth and shade factors to promote the growth on the scions.
 
Last edited:
I was talking about the receiving tree! leave as much healthy foliage as you can to ensure healthy vigorous growth. Just remove the weak and thin foliage that will never about to anything. The scion will need the support of energy flow through the branches they are grafted on to.
Brilliant! This makes sense! Thank you Frank!
 
Back
Top Bottom