Juniper Styling suggestions

Until you have a design in mind preserve interior growth. Then it’s all about selection.
You watching Bjorn is like me watching Dale Earnhardt racing then going to the track
in my car without years of experience. Bjorn is an accomplished artist who can blindfolded
pick out a nursery juniper then unveil and go right to a best design, often something we
woul have never thought possible and in little time at that.

I would suggest to lift from the grow bag, tilt the trunk into a good position exiting the soil at an angle
allowing the movement to evenly move back into the opposite direction ( < this less than symbol is exaggerated but is evenly moving in both directions ), then trim the roots flat while holding the trunk in the desired position.
Then, if you need to remove more roots, keep the new plane of the bottom of the roots throughout your removal.
Then replace in your grow bag.
My input is based on my experience and using bonsai soil. Missing an opportunity to begin the transition
to bonsai is a missed opportunity and a set back in time. I do not recall your substrate make up.
Ahah I've tried many times to connect with people on the Island doing bonsai but it's really hard, atm only found one guy that it's here on Bonsainut and I'm trying to find a date to setup a meeting to see if anyone shows up... Besides that all I can do for now is to watch some Bonsai videos :)

I will try to bend the branch that I was trying to grow upwards while I tilt the tree like you suggested this weekend and see how it goes!

Regarding the soil it's a bonsai soil bought on a market store but it has almost nothing to bonsai in it besides de lava rock.
I'm actually sieving (7mm/5mm/3mm) some Pumice I collected near the lagoon past weekend, planning to get some lava rock to do the same but I'm still thinking how should I prepare the soil after all the ingredients are collected lol
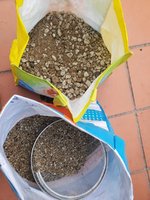
20240429_192053.jpg
 
(I'll give it a try this weekend and post progress)
If you go working on the foliage do not work on the roots.
You should give time to rest long enough to regenerate enough foliage to help with root recovery before you do a repot.

how should I prepare the soil after all the ingredients are collected lol
I start with a layer of large particles then bonsai soil above.
Try to get a blend of your ingredients that are closer to 1/4 inch, as using several sizes will result in seperating particle sizes. That's when you get pockets of different sizes then they settle. I've been using bonsaijack.com for several years now but I'm getting more 1/8" particles than I used to. My last order I used the build your own blend and it looks ok. But last individual components varied more than usual.

Is what you collected in the yellow bag?
 
If you go working on the foliage do not work on the roots.
You should give time to rest long enough to regenerate enough foliage to help with root recovery before you do a repot.


I start with a layer of large particles then bonsai soil above.
Try to get a blend of your ingredients that are closer to 1/4 inch, as using several sizes will result in seperating particle sizes. That's when you get pockets of different sizes then they settle. I've been using bonsaijack.com for several years now but I'm getting more 1/8" particles than I used to. My last order I used the build your own blend and it looks ok. But last individual components varied more than usual.

Is what you collected in the yellow bag?
I don't know if I'm going to remove any foliage, I always think that I can leave branches for jins later on..

Can't even check jacks website without VPN 😄 but my plan was to make a soil with pumice/lava rock/organic
Those sizes are about right, just got the screens today (7mm/5mm/3mm). The yellow bag is the bulk part after sieving :)
I'll do another round next weekend to get more and some more sieve again eheh
 
I've actually thought many times about doing this to the branch but it is already really thick so I was affraid to snap it and also wanted to wait some time after the repot before doing any wiring. I think it's growing vigorous so it's time to do something to it (I'll give it a try this weekend and post progress) and I don't mind waiting 5 or 10 years on the grow bag. If I could it would be already on the ground.. :(

I didn't understand what you meant by "***If it breaks, use pliers to squeeze a half circle of thick wire around/over the break like a splint so the fibers reconnect over time 😇" could you please share a video or a link if you don't mind?
Yes, what I mean is:

If you’re bending a branch that’s wired and it snaps partially (but not half to more than half way through), you can cut a short piece of wire and shape it like a “C”, place it around the branch and over the break, then squeeze it/clamp it tight over the wound to close it and encourage the fibers to connect and heal inside the branch.

IMG_5407.jpeg

I don’t have a link or video but I’ve used this method and the fibers seal inside and the branch heals :)
 
Hey guys just to report in, I managed to bend the branch with my 2 cents of wiring knowledge (you can notice in one of the wires loose) but it still looks very ugly on the inside with that U turn lol but I guess in a few years it might look much better! Thanks for the help to give me some directions 😄
I removed from the 3g fabric pot and it was full of roots and ended up taking a bit off
20240501_134158.jpg
20240501_134357.jpg

Also tried to angle it a bit but I think my job was not so great... Will try next time ;) the pumice is just to cover and try to keep it more moist

20240501_135316.jpg

Watered :)
20240501_135441.jpg
In the end I'm happy with it!
 
Hey guys just to report in, I managed to bend the branch with my 2 cents of wiring knowledge (you can notice in one of the wires loose) but it still looks very ugly on the inside with that U turn lol but I guess in a few years it might look much better! Thanks for the help to give me some directions 😄
I removed from the 3g fabric pot and it was full of roots and ended up taking a bit off
View attachment 543636
View attachment 543639

Also tried to angle it a bit but I think my job was not so great... Will try next time ;) the pumice is just to cover and try to keep it more moist

View attachment 543635

Watered :)
View attachment 543640
In the end I'm happy with it!
Roots look good. Good to address them earlier than later.
On the planting angle, don't forget that these already have genetics that force them to grow
over backwards as the ground cover that they are. Next time address the dirt a little more in the shin
and make upright more so than falling away from the viewer. I try to get more dirt out of the shin with
each repotting every 3 years on average, not all at one time. Younger procumbens can handle more of a bare rooting
and recover just fine, but once some age is on them, it is more safe to stage your shin work.
Next time remember what your roots are like now, and put in either a large pot or grow box with about an inch (2.5-3cm) of space
from roots to walls and about 4 inches deep (10cm) les the following time. Mica pots are great for this. They can be drilled, screw eyes installed in the lip
and are cheaper than pottery. Wooden grow boxes are built with plenty of drainage incorporated into the bottom, and screened over
the drainage holes. They are very low cost and can be made in very simple fashion, and custom fit. Easily drilled to guy wire as are mica pots.
You will easily be able to duplicate the root system back to todays work.
If you have movement in the wind or you can easily move your trunk in that bag, put a bamboo stake to bottom of bag and tether.
 
Back
Top Bottom