You are using an out of date browser. It may not display this or other websites correctly.
You should upgrade or use an alternative browser.
You should upgrade or use an alternative browser.
Grafting 101
- Thread starter markyscott
- Start date
markyscott
Imperial Masterpiece
this should end up in articles, nice thread.
maybe you can share some info on timing when to best make the grafts?
Thanx
Hi Dj -
Have a look at these posts and let me know if you still have questions about timing.
https://www.bonsainut.com/threads/grafting-101.26456/page-2#post-429216
https://www.bonsainut.com/threads/grafting-101.26456/#post-429119
woops, guess this shows i shouldnt be posting while at work..Hi Dj -
Have a look at these posts and let me know if you still have questions about timing.
https://www.bonsainut.com/threads/grafting-101.26456/page-2#post-429216
https://www.bonsainut.com/threads/grafting-101.26456/#post-429119
0soyoung
Imperial Masterpiece
Any green layer you see is cambium. With some species it isn't green, or isn't always green.Hi Drew -
I'll let Oso chime in - I don't have a background in horticulture, but he seems pretty knowledgeable on the subject. I typically count layers from the outside. You should have the bark or cork, the living phloem which differentiates into bark and cambium and then the vascular cambium. So it's the third layer in from the outside. In my experience it can be white to green in color and is variable in width depending on the species. Black pine tends to have a pretty thick cambium whereas in other species such as boxwood it can be paper thin. Oso might have some more general recognition criteria.
One can always test by scratching the bark with a finger nail (or thumbnail if you are not thumbless
The white wood that @markyscott pointed out is the newest wood, I think.
And this brings up a question I've not answered for myself yet - why is cambium green. The green color is from chlorophyll. So why is it in the cambium -it doesn't get much light?, I wonder.
discusmike
Omono
Thanks for the post Mark,I have always steered clear of scion grafting but have had success with approach grafting,I'm getting geared up for my first attempt this season so this post is helpful n on time,thanks
Yes the green part here (young branches) is the cambium and what has to lined up. (which in practice is not so important to know because by bringing the outer edges flush there is almost always enough contact between the two cambiums unless there is a huge difference between the diameters of the scion and the stock, in which case you just move the scion in laterally a little).Any green layer you see is cambium. With some species it isn't green, or isn't always green.
One can always test by scratching the bark with a finger nail (or thumbnail if you are not thumbless). The bark of all species tends to cleanly lift off from the xylem at the cambium. Even though it can be a bit difficult at grafting time, it is too easily done during the growing season!
The white wood that @markyscott pointed out is the newest wood, I think.
And this brings up a question I've not answered for myself yet - why is cambium green. The green color is from chlorophyll. So why is it in the cambium -it doesn't get much light?, I wonder.
So from the inside out, we have the Pith, the Heartwood, the Sapwood (the white part) The cambium (the green part) the Phloem and the Bark.
markyscott
Imperial Masterpiece
Thanks for the feedback Oso and Michael - I stand corrected. Go with the green layer.
markyscott
Imperial Masterpiece
One more thing about the scion cut that makes it a bit hard to get right. The bottom edge of the scion must be at a right angle. If it is not, then, you have to re cut.
If the bottom edge is not square, it means that the two cuts you've made are not exactly on opposite sides of the scion. In other words, one side of the scion wedge cut is thicker than the other. If this happens, when you stick it in to the understock cut there will be a gap along one side of the graft and chances are good that it will fail.
On the best grafts, all the cut surfaces of the scion will make contact with the cut in the understock without having to force the cut closed with the grafting tape.
bwaynef
Masterpiece
What can I do in order to improve my grafts and their chance at success? I've just half-bareroot-repotted a large JBP into Boon Mix. It wasn't terribly healthy when I got it, but it seems like its budding well this spring. I plan on leaving it alone this year (except sun, fertilizer, and water), so in the spring (2018) I won't have scion material that was decandled the previous summer. Should I wait until spring of 2019?
Last edited:
markyscott
Imperial Masterpiece
What can I do in order to improve my grafts and their chance at success? I've just half-bareroot-repotted a large JBP into Boon Mix. It wasn't terribly healthy when I got it, but it seems like its budding well this spring. I plan on leaving it alone this year (except sun, fertilizer, and water), so in the spring (2018) I won't have scion material that was decandled the previous summer. Should I wait until spring of 2019?
Hi bwaynef - I'm sorry I missed your question. If it's budding well and you just repotted it, I would not graft this season. A good rule of thumb is that if you repot, don't graft and if you graft, don't repot. So let it grow this season and recover. Then evaluate next spring - you may have suitable buds by then. It's important to start with healthy material and the buds should be strong, but not too strong.
markyscott
Imperial Masterpiece
Ok - so we've talked about detached scion grafting. That technique I use for pines and junipers. I don't think I've ever tried it on broadleaf trees. On those, I've only ever done thread and approach grafting. I sometimes do approach grafting with pines and junipers as well. But let's talk about thread grafting. This is a very important technique to master if you're growing maples and other broadleaf trees. Once I practiced this technique, I've had nearly 100% success rate. It works very well.
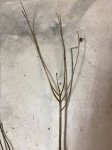
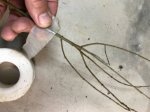
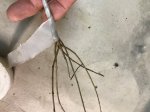
The technique starts in the summer - months BEFORE you plan to graft. You have to plan ahead and let a shoot extend. This does a couple of things - the shoot will get strong AND it will get long enough to position where you want it. Before the wood lignifies in late summer, wire the lenghtened shoot and gently bend it into position. I often use a "double-helix" coil - that I wire the shoot with two lengths of wire, the second is placed 1/2 way in between the coils of the first. This will provide some extra protection for the shoot when you bend it. And when you bend it, go slow - you don't want any cracks or for the wood to split. If it does, give up and cut the shoot off. Wait until next season to try. Once bent, you should have something like this:

Then just wait until spring. You want to graft before the buds begin to move. You don't want them to swell too much or you'll have to drill a wider hole. On this tree the goal was to graft a new leader on the straight trunk section below the swollen branch union.
The technique starts in the summer - months BEFORE you plan to graft. You have to plan ahead and let a shoot extend. This does a couple of things - the shoot will get strong AND it will get long enough to position where you want it. Before the wood lignifies in late summer, wire the lenghtened shoot and gently bend it into position. I often use a "double-helix" coil - that I wire the shoot with two lengths of wire, the second is placed 1/2 way in between the coils of the first. This will provide some extra protection for the shoot when you bend it. And when you bend it, go slow - you don't want any cracks or for the wood to split. If it does, give up and cut the shoot off. Wait until next season to try. Once bent, you should have something like this:

Then just wait until spring. You want to graft before the buds begin to move. You don't want them to swell too much or you'll have to drill a wider hole. On this tree the goal was to graft a new leader on the straight trunk section below the swollen branch union.
markyscott
Imperial Masterpiece
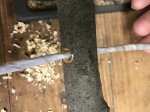
Pick a drill bit slightly larger than the width of the shoot at the bud just above the point where you want to graft. Carefully drill a hole through the trunk where you want the new branch. The ENTRANCE wound on the trunk should be where you want the grafted shoot to emerge. You'll see why when you do this once - exit wounds are messy. Check your angle carefully and drill at slow speed. Try to avoid burning the cambium.
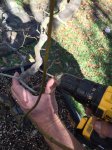
Clean up the hole with a grafting knife. You want nice, fresh edges.
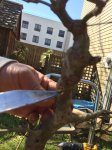
Here's how the hole should look when you're finished.


Clean up the hole with a grafting knife. You want nice, fresh edges.

Here's how the hole should look when you're finished.

markyscott
Imperial Masterpiece
Now, carefully thread the long shoot through the hole. Be very careful to not rub off the buds as you push them through the hole. When you reach the point where you'd like to attach the graft, rub the bark off the shoot and expose the cambium. There'll be a small gap around the shoot in the hole because you've made the hole large enough to accommodate the buds, but don't worry about that - we'll fix it in just a minute.

Now, cut a little wedge out of a branch clipping and use it to force the exposed cambium on the shoot against the hole. You want the shoot to be tight up against the cambium exposed on the side of the hole.

Should look like this when you're done. Note how the first set of buds is close to where the graft union will be. This is important because you want branching close to the trunk.

Then cover it all up with cut paste.

Good to go.

Now, cut a little wedge out of a branch clipping and use it to force the exposed cambium on the shoot against the hole. You want the shoot to be tight up against the cambium exposed on the side of the hole.

Should look like this when you're done. Note how the first set of buds is close to where the graft union will be. This is important because you want branching close to the trunk.

Then cover it all up with cut paste.

Good to go.
justBonsai
Omono
Nice guide. Looking forward to the approach grafting articles.Now, carefully thread the long shoot through the hole. Be very careful to not rub off the buds as you push them through the hole. When you reach the point where you'd like to attach the graft, rub the bark off the shoot and expose the cambium. There'll be a small gap around the shoot in the hole because you've made the hole large enough to accommodate the buds, but don't worry about that - we'll fix it in just a minute.
View attachment 134467
Now, cut a little wedge out of a branch clipping and use it to force the exposed cambium on the shoot against the hole. You want the shoot to be tight up against the cambium exposed on the side of the hole.
View attachment 134468
Should look like this when you're done. Note how the first set of buds is close to where the graft union will be. This is important because you want branching close to the trunk.
View attachment 134469
Then cover it all up with cut paste.
View attachment 134471
Good to go.
I plan on doing extensive approach grafting on my coast live oak to improve my branch placement.
markyscott
Imperial Masterpiece
As spring buds extend below the graft union, rub them off.


Below the union, let them grow.

You want all the growth on the branch past the graft, not in front of it. You want lots of extension to thicken the branch. No pruning, pinching, defoliating, wiring, our any other kind of bonsai nonsense. As Ratso Rizzo would say - we're grafting here!


Below the union, let them grow.

You want all the growth on the branch past the graft, not in front of it. You want lots of extension to thicken the branch. No pruning, pinching, defoliating, wiring, our any other kind of bonsai nonsense. As Ratso Rizzo would say - we're grafting here!
markyscott
Imperial Masterpiece
Watch your grafts throughout the growing season. When you see this, it's time to act:

You're looking for callousing where the shoot exits the trunk and a noticeable difference in thickness - the shoot is now thicker where it EXITS the trunk than where it ENTERS. This means that the newly grafted shoot is starting to take nutrients up on its own. One might be tempted to remove it now - but resist this temptation. Now it's time to wean the graft from the branch.
Here's what I mean - first, take a sharp knife and scrape the bark and cambium off on opposite sides of the branch.
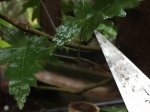

Then take a small wire and wrap it tightly around the branch. You want it tight so that as the branch grows, it will girdle itself.

This will force the shoot to take nutrients through the graft union rather than the stem of the shoot. This strengthens the union and reduces the reliance on the vascular system of the shoot. This is the first step to seperate the graft.

You're looking for callousing where the shoot exits the trunk and a noticeable difference in thickness - the shoot is now thicker where it EXITS the trunk than where it ENTERS. This means that the newly grafted shoot is starting to take nutrients up on its own. One might be tempted to remove it now - but resist this temptation. Now it's time to wean the graft from the branch.
Here's what I mean - first, take a sharp knife and scrape the bark and cambium off on opposite sides of the branch.


Then take a small wire and wrap it tightly around the branch. You want it tight so that as the branch grows, it will girdle itself.

This will force the shoot to take nutrients through the graft union rather than the stem of the shoot. This strengthens the union and reduces the reliance on the vascular system of the shoot. This is the first step to seperate the graft.
markyscott
Imperial Masterpiece
After you start to wean the branch, continue to monitor it. If the tree is growing strong, it might only be a couple of weeks or a month before you need to intervene. If the tree is not growing strong, you may have to wait another season. Just wait and let the tree tell you what to do. In the example above, here is the graft union two weeks later.
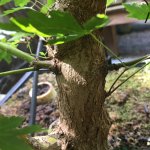
Check it out. The new shoot is well calloused. The shoot exiting the graft is noticeably thicker the donor branch. The wire girdling the branch where it enters the trunk is strongly cutting in. These are all signs that the graft has taken. In fact, I'm quite sure that if I removed it now it would not even notice.
So when I'm ABSOLUTELY sure it will be fine, I wait another month or two before I remove it. Then I just cut it off with a branch cutter and we're good to go.
That's the basics of thread grafting. Super easy technique.
markyscott
Imperial Masterpiece
markyscott
Imperial Masterpiece
markyscott
Imperial Masterpiece
Similar threads
- Replies
- 2
- Views
- 304
- Replies
- 9
- Views
- 824
- Replies
- 8
- Views
- 701

