Chamaecyparis “Golden Mop” #1: Progression Series

Messages
386
Reaction score
413
Location
Richmond, VA
USDA Zone
7b
This tree started its life as a nursery tree that no one wanted because it was a single-trunk tree. It was then purchased very inexpensively from the nursery 31 years ago in March 1992 and so began its bonsai journey.

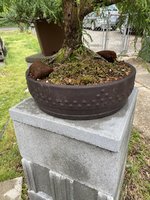
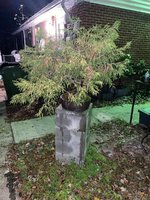
In October 2019, about 27 years later, I acquired the tree from our bonsai society’s President as payment for an outdoor sink/repotting bench I built for her. She sent me these older images of the tree prior to repotting it into a larger drum pot…
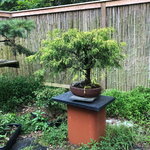
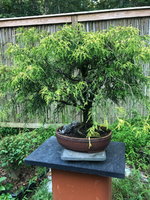
83550E44-D201-4C85-A458-6DB7A6BFF74A.jpeg
642849C7-89F8-4285-9C1B-3D65F78EBB5A.jpeg

The tree was mostly overgrown when I received it, but I accepted the challenge.
 
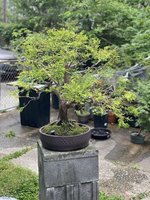
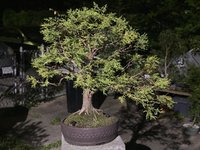
Here is the tree in my garden in May 2020, right after COVID turned the world upside down and shook its pockets empty.

AB2A4FDC-8C4B-42C2-9835-F6EF53F6A58A.jpeg
D933AEC2-B18C-45F0-AC94-B7BA272E2DE6.jpeg
C5F4780F-EF28-4DDF-B030-B502ABB627F7.jpeg
A189A996-E48A-4A72-B47B-08C28501EB98.jpeg

The tree has an amazing structure and I couldn’t wait to start working on it.

The plan was to style the tree this year, but in April 2020, like most of us, I lost my job. My new focus was finding a job, not finding the bonsai hiding inside of this shrub.

I was able to get a new job in August 2020, but my demanding schedule left little time for bonsai. The tree grew unrestricted for 3 years…😖🌳

November 2020, the 2nd year growth is starting to brown so I went in and cleaned the dead foliage and branches. Didn’t have time to do anything else…

F8CFA137-8821-47A6-8293-A0D1C17482E7.jpeg

Afterward, the tree was placed on the ground to prepare it for winter…

View attachment 490306
 
February 2023:

Finally got the time to work on the tree again, so I started by removing all of the longest, leggy branches to bring the tree back into some sort of shape. Most branches were completely removed and cut paste applied to promote proper healing…

IMG_5898.jpeg
IMG_6395.jpeg

The next step was to jin the remaining branches that needed to be removed, to give the tree an even more rugged look…

IMG_6402.jpeg
IMG_6403.jpeg

After the work was done, the tree was placed back on its pedestal to recover…

IMG_7306.jpeg
IMG_7307.jpeg

The tree is very sparse, but it should fill in nicely and hopefully, will backbud…

IMG_7368.jpeg
IMG_7369.jpeg
 
May 2023:

The tree has started to fill in VERY nicely and is barely showing the “golden” foliage, which makes me smile…
IMG_9053.jpeg

The pictures don’t do this tree justice, as it is fairly difficult to photograph.

I’ve started pinching the tree to shape, as well as adjusting the position of some of the branches, as I’m going for an informal broom style, with one defining branch.

Here’s a shot of it at night…
IMG_9121.jpeg

June 2023:

The tree continues to grow well and the more I pinch, the more it fills in…
IMG_9641.jpeg

The next step is to clean up and remove a few more branches, as I kept a few redundant branches to have more options. Whichever branches backbud are retained and the other will be removed/jinned.

The height of the tree is 32” from soil to apex and I’m on the lookout for a larger drum pot (or other rugged looking pot) 16-17” in diameter, as I want to keep this tree in a round pot. If you have any ideas on where I can get one, please let me know.

Next update coming soon!!!
 
August 2023:

Wire was starting to bite on certain branches, so the wire was removed. Other branches were wired/rewired and moved into position.

The tree was then heavily pinched for the last time this season. The large “defining” branch on the left of the tree was removed, which really highlights the dome shape of the canopy, which is filling in nicely.

IMG_1296.jpeg

Still hoping/praying that the tree will back-bud closer to the trunk, but not holding my breath. This tree will be quite the challenge to maintain as a bonsai.

Also, pictures do not do this tree justice. It is very difficult to photograph so I’m planning to have a professional photographer friend of mine come out to take some better pictures of the tree.

Also, still taking suggestions of where to locate a larger drum pot for this tree. 18-20” diameter would work, as this tree is roughly 32” tall from soil to apex.

Next update coming soon…
 
This is a cool tree. And I think you’ve done well with it.

I often hear people say “the pictures don’t do it justice”, and I get it. It’s hard to create photos that accurately depict our trees.

But, if there’s one thing I’ve learned from Bjorn, it’s this: the photos do justice when the tree is styled properly.

Anytime I take a photo and it doesn’t look right, I try to go back to my styling basics.

For example, take a closer look at this branch. Here’s what I see:
IMG_4952.jpeg

It appears to show crossing branches, wide angles and more than 2 branches coming from one spot.

One visual trick that always helps me is this: reduce the angles of your branches and create fans. Like this:

IMG_4951.jpeg

Same branch, more visually appealing.

I think if you reduced your multiple branches protruding from one spot, decreased crossing branches and created fans, you might find the pictures begin to do justice of your awesome tree!

✌🏻
 
This is a cool tree. And I think you’ve done well with it.

I often hear people say “the pictures don’t do it justice”, and I get it. It’s hard to create photos that accurately depict our trees.

But, if there’s one thing I’ve learned from Bjorn, it’s this: the photos do justice when the tree is styled properly.

Anytime I take a photo and it doesn’t look right, I try to go back to my styling basics.

For example, take a closer look at this branch. Here’s what I see:
View attachment 505613

It appears to show crossing branches, wide angles and more than 2 branches coming from one spot.

One visual trick that always helps me is this: reduce the angles of your branches and create fans. Like this:

View attachment 505616

Same branch, more visually appealing.

I think if you reduced your multiple branches protruding from one spot, decreased crossing branches and created fans, you might find the pictures begin to do justice of your awesome tree!

✌🏻
Great piece of advice, though this tree’s issue is the lack of back budding deeper into the tree.

I’ll take some pictures of each branch to see if they can in fact be fanned out, but most are so long and leggy that the tree would look odd and the foliage would be too far away from the trunk.

When the fall gets here, I’ll be doing the last wiring of the tree for this year and I will put your advice to good use.
 
if there’s one thing I’ve learned from Bjorn, it’s this: the photos do justice when the tree is styled properly.
I'm not disagreeing, but Bjorn is also a skilled amateur photographer in addition to being a bonsai master. Knowing how to photograph a tree is also critical to your photos capturing the tree.
 
I'm not disagreeing, but Bjorn is also a skilled amateur photographer in addition to being a bonsai master. Knowing how to photograph a tree is also critical to your photos capturing the tree.

I don't think that undermines the fact that a photograph can help to spot flaws. When you write on a computer, printing the document can similarly help with proofreading. There's something about changing the medium that allows you to see a work with fresh eyes.
 
What I’ll do is shoot a video of me walking around the tree so everyone gets a better idea of how the branches look.

Keep in mind, the tree is still in development and was unfortunately left to grow for nearly 3 years during my career at a major hospital here in my home town.

It’s raining today, but I’ll shoot the video soon…
 
I'm not disagreeing, but Bjorn is also a skilled amateur photographer in addition to being a bonsai master. Knowing how to photograph a tree is also critical to your photos capturing the tree.

Bjorn is a fantastic photographer and he has lots of cameras/lenses that would likely work better than my iPhone 11 Pro camera(s).

Also, the wiry foliage on this tree is so light and airy, the “portrait” setting on the camera cannot focus in on some of it, but other bits seem to blend together. I sometimes take 5-10 photos just to get one that is usable.

I think the video I’m planning to take will be able to better show the structure of this tree…
 
This is a cool tree. And I think you’ve done well with it.

I often hear people say “the pictures don’t do it justice”, and I get it. It’s hard to create photos that accurately depict our trees.

But, if there’s one thing I’ve learned from Bjorn, it’s this: the photos do justice when the tree is styled properly.

Anytime I take a photo and it doesn’t look right, I try to go back to my styling basics.

For example, take a closer look at this branch. Here’s what I see:
View attachment 505613

It appears to show crossing branches, wide angles and more than 2 branches coming from one spot.

One visual trick that always helps me is this: reduce the angles of your branches and create fans. Like this:

View attachment 505616

Same branch, more visually appealing.

I think if you reduced your multiple branches protruding from one spot, decreased crossing branches and created fans, you might find the pictures begin to do justice of your awesome tree!

✌🏻

These branches aren’t actually crossing, they are fanned out evenly and the “crossing” is actually an optical illusion of a front and back branch that appear to overlap.

Since it has finally stopped raining here, I’ll shoot a video tomorrow and post it here, if I’m able to…🤔
 
When the fall gets here, I’ll be doing the last wiring
Nice going Vinnie.
Forgive me if this is repeat, but the last time I wired my golden hinoki in the Fall the front half of the tree looked horrendous over Winter until new growth pushed.
Even then it still had a lot of brown colour in the cream and yellow coloured foliage.
The wiring previous to that was in September and it did well.
Be particularly careful rotating the frawns.

All of the major wiring has been done, I’m just “maintenance” wiring as needed due to this tree not back-budding very well.

I’m going to continue fertilizing with high “P” fertilizer, and I’m considering ordering this 9-58-8 fertilizer I found online…

IMG_1408.jpeg
 
All of the major wiring has been done, I’m just “maintenance” wiring as needed due to this tree not back-budding very well.

I’m going to continue fertilizing with high “P” fertilizer, and I’m considering ordering this 9-58-8 fertilizer I found online…

View attachment 505838

Trees aren't like humans. You can't make them fatter by feeding them more. You can only make them stunted and discolored by feeding them too little. I doubt there is a plant that can make use of a fertilizer that's 58% phosphorus. The rest will just go to waste.
 
These branches aren’t actually crossing, they are fanned out evenly and the “crossing” is actually an optical illusion of a front and back branch that appear to overlap.

Since it has finally stopped raining here, I’ll shoot a video tomorrow and post it here, if I’m able to…🤔

A common mistake, and one that I've made myself, is to take a picture of a tree from too high. Your camera height should be somewhere between the rim of the pot and the lower branches. If you can't see the soil, you're too low. If you're looking down on the apex, you're too high.
 
A common mistake, and one that I've made myself, is to take a picture of a tree from too high. Your camera height should be somewhere between the rim of the pot and the lower branches. If you can't see the soil, you're too low. If you're looking down on the apex, you're too high.
Agree with this point. I think this tree should photograph just fine. Get further away from the tree and zoom in.
 
A common mistake, and one that I've made myself, is to take a picture of a tree from too high. Your camera height should be somewhere between the rim of the pot and the lower branches. If you can't see the soil, you're too low. If you're looking down on the apex, you're too high.
This tree is pretty tall (32”) so when I get down lower to take the picture, the apex seems to vanish.

Keep in mind I’m using my iPhone 11 Pro to take the pictures. What I normally do is use the 2x zoom lens and step back until the tree is just in the frame, then capture the shot.

I’ll step outside now to take a few pictures using the advice you’ve provided…
 
Back
Top Bottom