Azalea Wars 1 - Waterwashing Roots - Satsuki and other Azaleas - From an Inquisitive person

Gosh, I’m always mystified with the different information I get from various sources, online, books by “experts” articles written by practitioners.

For only one example, well two, and not to take this as a knock please, it’s just an example of the confusion I have faced in the past five years with bonsai advice.

Recently a very respected BNutter wrote:
  • “Never, ever “blast” the nursery soil out with high pressure water. You’ll kill gajillions of root hairs. Tease out as much soil as you possibly can, and then gently swish the root mass in a five-gallon bucket of lukewarm water to remove the rest.”
Seems pretty straightford…. I’ve also heard this advice from a number of other sources…Yet in only one counter example after reading all the articles and books and posts I could find on azaleas in the PBM library of articles/ BN/Internet (Crazy? Yep. Well I was laid up for 18 months with a broken chest, so what else did I have to do?)

… International Bonsai #54 Developing Informal upright style Azalea Bonsai was the first article I found after a 5 minute search.

“….Care of roots. After pruning the branches The roots should be cleaned out. First remove old soil with a root hook or chopstick. Remove thick roots with a concave pruner or knob cutter. The gently remove further soil gently with a chopstick….“

Now wait for it….

“The final soil should be removed with a high pressure hose or a strong spray from a garden hose. The roots should be bare without any old soil. Cut the roots to fit into a training container.” (The second advice doesn’t mention temperature of the wash water.)

I should note here this wasn’t a one off. I’ve read this before in satsuki articles before.

So being very inquisitive of nature and one who doesn’t like absolutes, I tried out both methods over the past years, just to see which method worked best. Tub washing with a chopstick and a gentle flow on the water wand and using my watering wand up to full bore at times with a chopstick to clear alway all of the soil. Both lived and both responded similarly over time.

I used whatever temperature came out of the water faucet. It was usually pretty darn cold.

The only exceptions on recover times were when dead patches of roots were discovered, or big roots impeding a good nebari were reduced. As would be expected, these trees where the roots were impaired or need to be cut back took longer to recover, yet recover they did. In similar time frames with others that had their roots reduced.

Keep in mind it is my normal practice to trim the roots on initial rootwashing/repotting so that the azaleas have a good start on a nebari. Roots first after all. This sometimes lead to some solid root mass reductions. If this occurs Sphagnum moss is gently packed into key places of the nebari/roots in an effort to enhance growth.

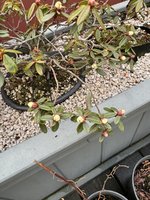
A couple recent images, just for ground truth. Both methods.

View attachment 437900 View attachment 437898

Now one could always say to me, “Sure, it worked for you in a couple cases, but…. that was only a couple azaleas. Maybe you got lucky or were sloppy in observing.” Hmm…. Absolutely don’t expect any give on my part here. Why?

Over the past four years I’ve done both procedures to over a hundred different azaleas. Multiple ages from 3 to over 20 yoa.

obtw: Since I was getting similar results by last year I flat gave up root washing in a tub, except for certain cases, in lieu of hose root washing. It’s generally faster and where the grower has used a gritty blend of media, like Riverbend or lots of bark chips like Kusa-farm and Nuccios this is pretty much the very best option.

Here’s the upper deck with over 50 rootwashed (either way) azaleas.

oh yes, I plant all of my rootwashed azaleas in 90/10 Kanuma/Pumice. It works even in the torrential rains in a PacNW spring. This may or may not work for you. Your tree your choice of media.

View attachment 437901

Of course aftercare is very important. I don’t do anything special. If its cool outside they might go into a cold frame or on the greenhouse shelf for a couple days until the weather moderates. Then up on the bench basically in morning sun and afternoon shade. Sometimes I water, sometimes not.

One thought: Does that mean everyone, especially the first timer should waterwash their azalea roots with a waterwand up to on full force and a chopstick in hand this?

Whoa! Not so fast if you are new to this. I’d recommend going slow for the first couple azaleas. Use a tub, chopstick and a gentle flow on your water wand, just to get a really long close up view of the lay of azalea rootland. After all, one should crawl and then walk before attempting running. But after that… Katie bar the door!

After all that I’m a bit more hesitant to accept blanket advice and absolutes in bonsai. I listen take it in and test out the ideas, then make up my own mind from there on.

Oh yes! In another case I was told on BN by another very respected member…”One can not, absolutely not grow azalea whips without a greenhouse.” (This was before I installed two myself. I still dont use it to grow whips…).

And….being very inquisitive of nature and one who doesn’t like absolutes, I tried to grow whips on my own… check out the bench

View attachment 437902

Ok I hope everyone takes this thread in good humor and with an open mind. I’m certainly not trying to demean anyones expertise, knowledge or years of working with bonsai. I totally respect you all and appreciate the chance to participate with so many awesome, incredible folks! I’m just pointing out what all of us know… sort of… that bonsai isn’t a perfect art…. Often it depends.

cheers! Now I gotta get back to work, those darn trees don’t wire themselves!
DSD sends
New here and appreciate the advice. I have acquired a nice Satsuki azalea and it is growing quite well in my garage at the moment. Looking forward to getting it outside soon with my other trees...
 
This can be a kinda complex answer depending on cultivar, type/drainage of pot use and winter storage method. Here’s a short rundown covering most of the bases.

This is what I’ve figured out works for me in my backyard.

A. Pot: Please use a deeper pot for any azalea, think training pot depth % wise. Shallow pots may be a really great way to pot maples, and aesthetically pleasing for those of us with an intensely bonsai haute couture bent, but shallow pots are not conducive for healthy azaleas. (btw: All potters I have worked with, with one exception, for some odd reason hate making deep pots… must be genetic.. or perhaps just harder.)

B. Media - 90/10 Kanuma/Pumice.

C. Timing - Late winter early spring - If emergency repot be sure to properly protect during the winter. Narrow leafed azaleas are potted early, rounder leaved later.

D. Young rootwashed <7 yoa azaleas first potting - two years to up pot
  • Media - Fine Kanuma with medium - larger Kanuma as a base layer.
  • Pot - Tokoname clay pot with added larger drain holes (not tie down size) - drilled into all all “four corners” to enhance drainage.
  • Winter storage - out of the weather, cold frame or greenhouse, especially first year. In any event protect from wind and direct sunlight
Hope that helps. Happy rootwashing!

Cheers
DSD sends
 
Hi DSD! Thanks for this guide; I plan to do as advised on a dwarf Rhododendron that I acquired recently, putting it into kanuma for the first time (recognizing that there are likely some differences from true azaleas, but very little bonsai knowledge for rhododendrons). The plant is quite leggy, and my primary goal for the next few years is to drive the foliage back into the interior. Given this mild winter (cold snap excepted), it has already begun to open it’s flower buds, and I think a few leaf buds have begun to swell. I am curious if you would recommend repotting soon.

I was considering cutting off the flower buds to drive more energy into the interior of the plant. Should I do that now, and then keep an eye on the leaf buds for a repot signal?
 

Attachments

  • IMG_1434.jpeg
    IMG_1434.jpeg
    321.9 KB · Views: 20
Nice color blooms! Look almost yellow at this stage. Also ready to bloom, if so no, not the right time.

The decision considering this tree is what to do first?

If the goal is to cut the tree back hard, the best time is right after blooming this year. If that’s the primary goal, best not to root wash until next year given the tree recovers. Hard cut back is a risky operation with differential results, but can easily be done with an established rhody with a reasonable expectation of success. Thus keeping it in the present media… given all is ok would be best.

On the other hand, if changing the media is most important. It should be done this year, but I would not try a hard cut back until next year
I’d let it bloom, settle down, then decide if there is enough gap left before summer weather. Usually takes 6-8 weeks to fully recover. Keep in semi shade for the first couple weeks afterwards.

In our experience most, not all, rhododendrons and some azaleas love to drop their inner leaves at the drop of the hat and push new growth. It will be interesting to see how this tree fairs over the years.

PS This rhody has a bit of Lace Bug damage from last year. Larvae are likely present in the leave. Keep on the look out. (Check under leaves for black frays spots.). If persists after bloom one may need imidicloprid (granules) especially if the tree is kept in a sunny environment.

cheers
DSD sends
 
Last edited:
On the other hand, if changing the media is most important. It should be done this year, but I would not try a hard cut back until next year
This is always the challenge, eh? Work the top, or work the bottom. The plant is currently potted in a mix of pumice and pine bark, which should be a fairly reasonable substrate, as the latter is acidic. No drainage/percolation issues. In addition to just the soil though, the roots are a little bit awkward and not so nicely stabilized within the pot. I added some janky stabilization on top, as well as some sphagnum to the exposed roots, but this is one of my considerations for repot first.
In our experience most, not all, rhododendrons and some azaleas love to drop their inner leaves at the drop of the hat and push new growth. It will be interesting to see how this tree fairs over the years.
This has been the case with this tree, which is why I would like to drive foliage inward as a high priority. I think, given your advice to work only the top or the bottom, this is my top priority, as I could see the legginess getting away from me quite easily. Despite the inner leaves dropping, there seems to be healthy backbuds on the interior I can cut back to (perhaps in stages) which will hopefully promote them to grow out. I also have built in redundancy, as there are a handful of extra branches that I don't "need".

In the case that I do a cutback without a repot this year, would you recommend cutting the flower buds, or allowing them to bloom? I've heard that some will cut the buds to conserve energy for a strong push of growth.
PS This rhody has a bit of Lace Bug damage from last year. Larvae are likely present in the leave. Keep on the look out. (Check under leaves for black frays spots.). If persists after bloom one may need imidicloprid (granules) especially if the tree is kept in a sunny environment.
Thanks as always for the advice! What did you see that made you think lace bugs?
 
This is always the challenge, eh? Work the top, or work the bottom. The plant is currently potted in a mix of pumice and pine bark, which should be a fairly reasonable substrate, as the latter is acidic. No drainage/percolation issues. In addition to just the soil though, the roots are a little bit awkward and not so nicely stabilized within the pot. I added some janky stabilization on top, as well as some sphagnum to the exposed roots, but this is one of my considerations for repot first.
I remember this tree now.
One easy solution to this nebari issue is to get a yogurt or cottage cheese container of sufficient size.
Cut ring with top 1-2” place around nebari and wire cut ends of ring together.
Cut 3-4 4”ish long pieces of 2mm aluminum wire.
Bend top to clench around plastic ring
Bend bottom at 30* angle away from ring.
Place these aluminum “stakes” into media and pull ring tight.
Fill ring with media. Top with moss.
Btw really good tactic to build young nebari, but don’t tell anyone. 😎

This has been the case with this tree, which is why I would like to drive foliage inward as a high priority. I think, given your advice to work only the top or the bottom, this is my top priority, as I could see the legginess getting away from me quite easily. Despite the inner leaves dropping, there seems to be healthy backbuds on the interior I can cut back to (perhaps in stages) which will hopefully promote them to grow out. I also have built in redundancy, as there are a handful of extra branches that I don't "need".

This would be my preferred alternative. Best to cut and see what happens. It’s an experiment after all.
In the case that I do a cutback without a repot this year, would you recommend cutting the flower buds, or allowing them to bloom? I've heard that some will cut the buds to conserve energy for a strong push of growth.
Let the tree bloom. Just as it starts to push the new growth, get the pruners and let ‘er rip. Please use t
Top Jin. Any stubs bigger than 3/8” wait till Top Jin dries and cover with green top cut putty. It’s marked for conifer in ads, but is also for azaleas.
Thanks as always for the advice! What did you see that made you think lace bugs?

Check out the speckled leaves.

You are most welcome.

Cheers
DSD sends
 
Advanced Repot for Older Azaleas - Using a larger azalea as an example

Once an azalea, satsuki, kurume etc, has been potted up in a media, (peat, ericaceous, kanuma etc), for over ten years the core or shin needs a complete change out.

Lack of doing so gave the rise to the urban legend that azaleas only last about 40 years, then slowly fade away.

That’s because the shin eventually gets compacted with skyfall, fertilizer remnants etc to a point that even aerating will not solve the issue for more than a couple months.

Below is an example of a years old neglected azalea brought in for a rework. Note the few leaves and buds. Also lack of inner buds. We are in the process of pulling back the surface media with chopsticks. Notice the thick layer of sky fall and detritus on top after a compressed inch of surface muck was already removed

Impossible to totally know what the media is. Looks like bark, assorted sized kanuma and pumice…

IMG_1049.jpeg


After further soji … and more of the same tight compacted media….it was determined a full media removal was needed to bring the tree back to health. Note this is Not a decision to be taken without internal examination and experienced eyes.

At this point a fork rig was made to allow us to work both sides of the shin. Alternating between sides over time. Here’s the bottom.

IMG_1050.jpeg

One can see a light repot attempt was made a few years back of kanuma/pumice.

IMG_1052.jpeg

Once outer media was removed deep media removal was done. Near the point water washing would begin, the rootball was sprayed with water and covered. This gave us time to inspect and set up the pot for quick action once rootwashing was completed.

The pot was very nice, yet it was determined lacking in drainage/tie down holes. After careful measuring, the location for three new holes was marked. Now the interesting part. Drilling. The inside of the pot was chocked up with pieces of wood at both the location of where the new hole would be and a countbalance area to keep the pot from shifting while drilling.

IMG_1058.jpeg

One person drills. The other sprays water on the bit to cool and lube the cut. With Dewalt ceramic bits you drill on an angle first, get a cut, then move slowing upright.

IMG_1056.jpeg

All holes successfully drilled and 3 tie down wires were added. Braiding the wires in center, given clearance, prevents tying off two different wires as every wire is secured to all the wires. All that is needed later is each fastening on nebari be tightened “around the clock” twice.

IMG_1066.jpeg
As the operation was inside due to avoid the rain, we moved outside and root washed and chopsticked the nebari. This took quite awhile.

IMG_1063.jpeg

Job complete and inside again, we prepped the pot with media. (Medium and small Kanuma:pumice:piochar = about 87:8:5%j
The bottom of the nebari was packed with media.

IMG_1067.jpeg

The tree was firmly settled and tied down. Next, more media was carefully paced into every nook and crannie of the nebari and surface leveled.

Outside again to a sun break. The tree was thoroughly watered twice.

IMG_1069.jpeg

Last and of key importance, pre soaked yamagoke (mountain moss) was firmly packed around the pot, into the nebari and into the rest of the surface. (Note the moss is not sprinkled on the surface and patted down for this job!)

Finally all was watered once again done, tree packed up. Now it’s clean up time!

IMG_0505.jpeg

Tree at owners deck.

A final note. If one looks closely they will note one side of foliage missing. The tree was never rotated in is past five years and placed near a structure. For azaleas this is crucial. New owner is working hard to keep the bare side sun ward about 1/2 the time and small branches are sprouting. Hope for the future!

cheers
DSD sends
 
Last edited:
Thanks for the write up. I can't look at azalea roots without imagining their strong smell.
 
Important Note!

btw Please note the pressure regulator just before the pressure washing nozzle on the above image! That’s a pro tip from @Chuah to keep the flow down and not damage the roots.

Ciders
DSD sends
 
F
Important Note!

btw Please note the pressure regulator just before the pressure washing nozzle on the above image! That’s a pro tip from @Chuah to keep the flow down and not damage the roots.

Ciders
DSD sends
Thank you John. From what I learned, in Japan they sell a water jet gun with 700 psi pressure specifically for cleaning azalea roots. Most of our power washer is about 2000 psi, and thus I used the Ryobi regulator to control the pressure when blasting the old azalea soil. It works well for me.

These days we can buy battery operated car washing jet guns rated at 300, 500 and 700 psi. I bought one with 300 psi, it did not do the job, not enough power to dislodge the old soil. I suppose the Japanese have done their homework and settled at 700 psi as optimum for azalea!

The attached photo is the 300 psi gun, it did nothing dislodging soil in a foeld grown azalea.

1711769587924.jpeg

The azalea in the last two photos, before and after, were cleaned with a power washer with a pressure reducer. It only took a few minutes.

1711769423848.jpeg

1711769917156.jpeg
 
Nice! Thanks Hoe.

I appreciate you adding this additional information.

Have a full dozen to do next week if the rest of the worklist gets done in time.

Cheers
DSD sends
 
Back
Top Bottom