Bigger Kiln, Bigger pots-- New challenges and progress.

ForrestW

Mame
Messages
142
Reaction score
548
Location
Columbus NC
USDA Zone
8a
This is kind of a long post/ series of posts– mostly for potters but anyone who is curious about bigger pots/bigger kilns feel free to read on. (note– bigger for an electric kiln– gas kilns and especially wood kilns are often MUCH bigger.)

My ceramic journey has been a little over 20 years now and it's ever evolving. Currently I am still a full time Art Teacher, and so my studio time can come in spurts. Over the last few years I have been trying to increase the size of pots I can make and that has involved obtaining or making a variety of things such as very large throwing bats, (which attach to the wheel head to allow more space) large foam boards and sheetrock boards that will stay nice and flat while working on the pots. You need a strong wheel– the wider you expand the bat the more torque it puts on the motor of the wheel. I have an older Brent CXC wheel that is rated to center 100 lbs. of clay, but it will struggle at times working the clay on the outer parts of my large bats. I currently have a nice 24” slab roller, pug mill to recycle clay and extrude 2” coils and a typical extruder I use for my feet and the coils I put where I attach the slab to the wall. All of those allowed me to get up to 26” pots but the kiln was the limiting factor.

This past year I started looking online for a used kiln that would allow me to expand my size. I currently have a 28”x 18” electric kiln, a 28” x 27” electric kiln (both L&L my preferred multizone kiln) and I built a Hybrid Gas, Wood kiln I can fire solo and I built it for Crossdraft Soda firing. (My other body of work) Sadly when I built that one I was doing a different genre of work and it's not ideal for bonsai pots– the downdraft gets much more even temperatures but less pronounced effect from the soda glaze. That one has a wear chamber of 27” x 27” x 32” tall.

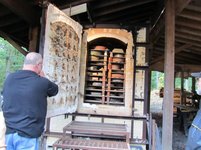
This past fall I found a used kiln that was advertised as the Olympic 3027 which has an oval wear chamber of 42” x 30” x 29” and was only about 2 hours away. There were no pictures as the kiln was stored deep in a storage trailer and the owner was not able to unload it herself. She had an invoice from 2018 where she took that kiln into Olympic and had some brick repair, new elements, and a new control box– as well as fixing the lid hardwear.

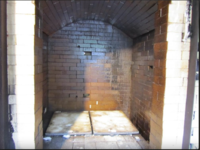
So I went there with my trailer to take a look. It had never been used since it was fixed by Olympic but many of the bricks were damaged badly when she packed it into the moving trailer. It was missing some wires to connect the box, no stand, or lid hardware or shelves, but it was a decent price and So I decided to try and finish the repairs myself.

PXL_20231124_195701202.jpg

PXL_20231124_195447687.jpg
 

ForrestW

Mame
Messages
142
Reaction score
548
Location
Columbus NC
USDA Zone
8a
I went to the Olympic headquarters in Georgia in December and bought some custom kiln bricks for repair and a small stack of stock ones I could custom cut for unknown mistakes (which turned out to be wise). I bought a variety of random parts as well and was excited to find out that they do sell full shelves for this kiln. They cost an arm and a leg each but they are 37” x 26” and I think would be best for trying to keep a nice flat bottom on a big wide round or oval. Time will tell how long they last before warping but I picked up 3 of them, as well as some 11”x 26” rectangles so that I could use some of my other ½ shelves to make additional stacks.

I am fairly knowledgeable about kiln maintenance and have worked on my other kilns for years, but I did want to solicit the help of a good friend and kiln tech to tackle the job. We started with brick repairs and focused mainly on the key ones that supported the elements. Sometimes if you have a break in the brick above the element it is more cosmetic than critical, and sometimes you can do more damage than good trying to get them all. I did not realize how much custom shaving you needed to do with replacement bricks but they really need to line up clean and plum. We ended up having to use a large threaded rod to make a cut in the track for the elements to sit in on the extra bricks, but I was surprised at how easy that part went. After fixing the bricks. We finished assembling and tightening the walls. I drilled a few holes in the bottom and installed a vent under the kiln and hooked it up to my existing vent on the adjacent kiln.
Then we had to use the wiring diagram they provided to connect the 4 relays to the 10 elements. Unfortunately, when they replaced the elements 6 years ago, one of them was broken off where it turned from the kiln to connect outside. So we expanded the coil a little bit using a torch to heat the elements and re-twisted the end to feed it through for connection.

Once we got the computer box wired up properly we needed to wire it to the electric panel. One of the unknowns about this kiln was if it was a cone 6 kiln or a cone 10 kiln. Its original design was a cone 6 kiln but Olympic could not tell me what elements they put in 6 years ago, and it has a new computer and 3” bricks. One would require a 70 amp breaker, the cone 10 would require a 100 amp breaker. Sadly after getting it all wired up with a 100 amp breaker the breaker was broken and we could not test it. So we hooked it up to the 60 amp breaker on my other kiln just to test it and see if there were any other issues (By now it's 10 at night) and it fired up well, using a tool we were able to read the full load at 80 amps. So that implied they wired it to be a cone 10 kiln (much better– even for firing at cone 6) The next day I went out and got a new 100 amp breaker and finished wiring it up. I did the first empty firing that day to cure the elements/bun off anything. It cycled exactly as it should have.

PXL_20240325_210046070.jpg
PXL_20240325_210105447.jpg
PXL_20240326_000102115.jpg

PXL_20240325_230536750.jpg

PXL_20240326_020039587.jpg
 

ForrestW

Mame
Messages
142
Reaction score
548
Location
Columbus NC
USDA Zone
8a
So I kiln washed all the shelves and loaded up the whole kiln with kiln shelves and post and a bunch of cones. If cycled perfectly but fired about ¾ of a cone hot– and my clay can bloat if it goes more than about a ½ cone hot. PXL_20240329_200027611.jpg
PXL_20240329_200533897.jpg
PXL_20240329_201025120.jpg
 

ForrestW

Mame
Messages
142
Reaction score
548
Location
Columbus NC
USDA Zone
8a
During this same time I was trying to make the pots to fill this larger, new kiln and I am determined to only put the wear on tear on those giant expensive kilns when I have a large enough pot to fill that shelf. The throwing of the rings went well as I already have 3 bat at 29” across and have been throwing 25-26” rings already. But the slab was an ordeal. My slab roller is only 24” wide and is really only intended for about 22” slabs. I took my clay wear boards and tools to another studio to roll out a 35”x 25” slab, however my foam boards were only 24” wide so the extra ½ had to hang over on each side.

I went to lowes and bought another large foam board– and cut it bigger, and I still need to get more sheetrock. Over the week I made 3 pots in the 28-31” range. I made some other works as well, as I do not want to fire the kiln ⅔ full… PXL_20240326_201042622.jpg

PXL_20240327_192730046.jpg
 

Attachments

  • PXL_20240328_170617161.jpg
    PXL_20240328_170617161.jpg
    142.6 KB · Views: 32

namnhi

Masterpiece
Messages
2,676
Reaction score
4,804
Location
Houston TX
USDA Zone
8b
Looks like fun but just not sure if this will pass OSHA inspection. LOL.
 

ForrestW

Mame
Messages
142
Reaction score
548
Location
Columbus NC
USDA Zone
8a
A few weeks later I had my first batch dry and was ready for use. I loaded up all my pots for a bisque firing– and sadly my biggest pot cracked (was going to be about 30-31” across) It has been a long time since I lost a pot like that, but there is a lot of stress on a pot during the firing and I reminded myself that there will likely more losses at this size– but unfortunately you can not recycle the clay after a bisque firing. I will likely try and glaze that pot and try to seal the crack with glaze and if it survives, sell it as a second. I had enough other work that made it through that I went ahead and glazed all those pots and fired the kiln. I did a cone 5 program with a 10 minute hold which ended up firing near spot on to my cone 6. Thankfully all the rest of the pots came out clean and flat. The two biggest ones came out 29 ½” and 28 ½”. PXL_20240409_151702945.jpg
 

namnhi

Masterpiece
Messages
2,676
Reaction score
4,804
Location
Houston TX
USDA Zone
8b
Very nice. N
During this same time I was trying to make the pots to fill this larger, new kiln and I am determined to only put the wear on tear on those giant expensive kilns when I have a large enough pot to fill that shelf. The throwing of the rings went well as I already have 3 bat at 29” across and have been throwing 25-26” rings already. But the slab was an ordeal. My slab roller is only 24” wide and is really only intended for about 22” slabs. I took my clay wear boards and tools to another studio to roll out a 35”x 25” slab, however my foam boards were only 24” wide so the extra ½ had to hang over on each side.

I went to lowes and bought another large foam board– and cut it bigger, and I still need to get more sheetrock. Over the week I made 3 pots in the 28-31” range. I made some other works as well, as I do not want to fire the kiln ⅔ full… View attachment 540365

View attachment 540366
Very nice. No extra support under the LARGE pot.
 

ForrestW

Mame
Messages
142
Reaction score
548
Location
Columbus NC
USDA Zone
8a
I realized when loading the kiln that even with the large shelves, by the time I add the post I only have about 34” x 23” space for the biggest pots (and they start much bigger than they finish) The lid – which is still intact, has a little flaking happening so I need to put a row of shelves on the top just below the lid to avoid anything falling on the pots and sticking to the glaze. So, this summer I hope to buy a new lid allowing me to make one pot on the top that can be closer to 35” x 26”. I also ordered a new 30” Bailey Slab roller that will be here around early June to help make those large slab bases in my own studio.

Well, I am excited that I eliminated the main obstacle to making bigger pots. Like any new jump there will be other issues but I hope this summer while on break I can put more time into this, and see what I can do. I am pondering jumping into some big slab built pots, but I do love throwing– it's the part I look forward to most.

Well, for those who read this far– I hope you enjoyed my recap, and if you make big pots, or have some tips or pointers I am always interested in learning more. PXL_20240412_204056001.jpg
PXL_20240412_015356031.jpgPXL_20240412_203657672.jpg
 

ForrestW

Mame
Messages
142
Reaction score
548
Location
Columbus NC
USDA Zone
8a
Very nice. N

Very nice. No extra support under the LARGE pot.
Historically I have lots of supports under the base during the high fire, but not during the bisque firing as its 450 degrees below the maturing temperature, but I may start during the bisque firing as well. I have not had this issue on 25-26" pots (but with every extra inch of pot, more stress is added).
 

Maiden69

Masterpiece
Messages
2,350
Reaction score
3,638
Location
Boerne, TX
USDA Zone
8b
That thing is a monster! I always thought there was more insulation between the bricks and the stainless outer shell to prevent the heat from dissipating due to outside variations... interesting. I have helped build smaller brick kilns and almost always guys use a type of ceramic batt with mortar backing the bricks.

Can't wait to see what else comes out of this thing, both pots above look great, love the glaze on the top one and the shape of the second one. Maybe in a few years I will have something big enough to use a pot this big. Hopefully before I get too old and can't carry them anymore.
 

mwar15

Omono
Messages
1,113
Reaction score
2,317
Location
Willamette Valley, Oregon
USDA Zone
8B
Great post! How do you flip large pots. Even 2 pieces of foam board and a 26” pot is tough on arms.
 

penumbra

Imperial Masterpiece
Messages
9,465
Reaction score
16,129
Location
Front Royal, VA
USDA Zone
6
Pots are great, goes without saying.
Your kiln rebuild is very well done. It brings back many memories of my 12 years in kiln ( wheels, slab rollers, mixers and pugs) repairs. I have rebuilt these large Olympic kilns and I always liked the brand and especially this model. Just wanted to say good job .... and best of luck.
Miss those days but I am just too tired to be tearing down and rebuilding kilns anymore. My back was sore for 3 days when I replaced elements and one of my kilns last year.
 

WNC Bonsai

Omono
Messages
1,914
Reaction score
2,179
Location
Western NC
USDA Zone
7b
I saw his big pot at the BRBS meeting yesterday and loved it but as I told him I’m glad I don't have a tree big enough to require one that big. You‘d need a forklift to move the tree around! I have another one Rob made that is about 18” diameter and it is too heavy for my back to handle. I guess I will ahve to hire a helper a couple of times each year just to schlep it in and out of the green house.
 

BrightsideB

Omono
Messages
1,251
Reaction score
1,768
Location
Canton, Georgia
USDA Zone
7a
Very cool Rob! Bummer about the crack but the pots looks great! A pot I spent some time on cracked in the last glaze fire. Such a drag but it’s the right of passage with this. Thanks for sharing!
 

Colorado

Masterpiece
Messages
3,148
Reaction score
8,355
Location
Golden, Colorado
USDA Zone
5b
Damn man you are a true pro!

What kind of foam board do you use for these big pots?
 
Top Bottom