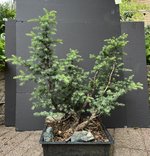
Yamadori Mt Hemlock (Tsuga mertensiana) No. 2 The Circular Raft… or is it The Clump?

Deep Sea Diver

Imperial Masterpiece
Messages
5,196
Reaction score
10,770
Location
Bothell, WA
USDA Zone
8b
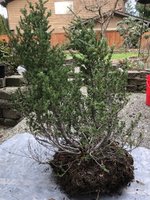
This is the second high alpine yamadori Mt Hemlock we acquired today. It‘s ”subtrunks” seem to emanate from one central trunk. Will need some excavation to confirm this WAG.

The tallest tree is about 35” and the entire group comes up at an angle. Looks like it was growing on a mountain side. It’s almost as if a boulder rolled down and bent the central trunk to one side and sub trunks grew up around the rock.

At first I almost passed on this tree. I looks like a small forest with krumholtz on a couple sides of the forest. It’s a challenging piece.

Again, any comments are welcome, especially on horticulture, media, timing and styling.

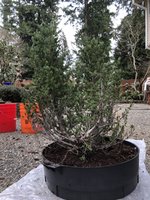
At first I had to find something to act as a big Anderson flat. The rootball was way bigger then the Anderson flats we have. Luckily the my better half had saved one of the trays of an old plastic composter we’d donated. However the holes on bottom were too small, The first job was to drill these out to 1/4. This will assure the pot will properly drain.
33E74FEA-B373-4A72-89BC-F2107AB44038.jpeg…drilling out the center first.

Here’s images from all around the tree. The group is potted temporarily in bark (until 3/8” pumice arrives 2/4/22 in the composer tray. It’s a bit more upright then the original plant was.
FB11ABA5-DBA0-44A1-B775-560B88FC95DF.jpeg00D98F1F-D395-4A0B-ACC4-6ED4B9976B02.jpeg41CECB8B-3B97-438C-9173-8DAFD41AF810.jpeg841B69B2-8F54-4E04-9019-A2F3404C77AA.jpeg

cheers
DSD sends
 

Attachments

  • 47A35149-A194-4709-A55E-14CD683E972E.jpeg
    47A35149-A194-4709-A55E-14CD683E972E.jpeg
    521 KB · Views: 131
Last edited:
I like it, love Hemlocks especially Mt Hems! Can't wait to see what you do with this moving forward.
FYI... I was at Sky Nursery the other day in Shoreline and they had 1cu ft bags of Pumice for $17.99 there were 4 bags but I took one of them.
 
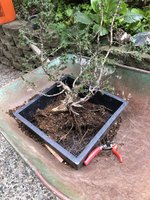
Well Dan and I did one cut and left it at that. Signed then the group has been sitting, gathering strength. So today I decided to repot. More cuts, a bit of wire. Just steps.
Next steps.
- Grow strong and bring down the leggy leggy growth to scale.
- Repot in something smaller next year or in two years.

62591B6A-5150-43E3-ADB9-E0D1018BAC12.jpeg

Cheers
DSD sends
 
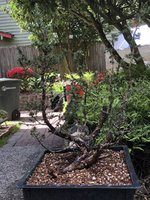
9 May 22. Downsizing the pot… Already?

(Late post… just did not have time earlier!).

When the Clump was potted up there was a lot of empty space in the container and I did not have a smaller container. The clump responded really well to the initial potting. (Since then I secured a whole raft of Anderson Flats. Too many in fact.)

In the interim the Clump was trimmed lightly and wired.

After a year, when the round buds were green once again, I chopstick - probed the rootball to determine its size. These data revealed the Clump would fit nicely in an Anderson flat.

Moving trees from one container to another so soon after a repot can be fraught with danger. It was a proceed with caution scenario. Wires were carefully removed. The tree was lifted out of the big container and placed right into an Anderson Flat. The rootball was repositioned and all roots inspected.

IMG_8745.jpeg

Actually this container was much better sized, if not a bit roomy.

All exposed roots were carefully inspected. The dead root tips were successively cut back by short cuts, stopping when live tissue showed. The right side wire support was replaced and the tree was tied down, secure once again.

Next the media was washed and checked. (Somewhat controversial step, yet I have recycled lots of media in the past four years. Usually we reheat the recycled media to 450F for 90 minutes if it’s a mix from different trees. Or if the media has been in a pot for a long time. Not in this case.)

Next the media was carefully placed around the rootball and rinsed in again in stages. Here’s what this looked like.

IMG_8747.jpeg….IMG_8746.jpeg

Once done, the Clump was placed on on the ground with a bed of strips of 1/2” cedar underneath.

IMG_8748.jpeg

This location gets a few hours of morning sun and few hours of late afternoon sun. The tree(s) in this location are shaded, using upright wheelbarrows during the harsh summer sun.

btw: The Clump is rotated every couple weeks to get all around sun exposure.

Cheers
DSD sends
 
Last edited:
25 October - Check in and future steps.

There was a couple every early heat waves this year… yet the Clump took these in stride… with the help of the shade from the wheelbarrows.

Here’s what the tree looks like today. Seems healthy and robust. It has pushed a lot of vibrant blue green foliage, unlike the Twins, which are more dark green. (This may be due to the Twins getting more sun.)

FullSizeRender.jpeg

Here’s a close up of the foliage.

IMG_0149.jpeg


Future Plans: During last week’s workshop with Aarin Packard we tossed out ideas.

The first was to style the Clump as it is now. This seemed a bit ordinary… and we tossed around ideas. Aarin came up with this one that I really liked. It’s a bit off the beaten path, but is very appealing and somewhat technically challenging

Sort of like this, but at a much higher angle.

FullSizeRender.jpeg

Likely both thick branches (center and far right) will be fully or partially jinned.

The first two steps will be.

1. Style the trunks up
2. Put the tree on a stand up on the appropriate angle. Kind of like this:

FullSizeRender.jpeg

It’s on the worklist…. Likely a couple weeks or more before I can get to this job…frost predicted tomorrow so working on pre winter prep work right now!

… and that’s all for now Folks!

Best
DSD sends
 
Back
Top Bottom