Absolutely.
The soil is perfect and most of the time Jack puts in a metal chopstick in the orders.
I would just recommend the 3 gallon size is all.
When you've started getting a solid bottom to your root ball this guy >
@BrightsideB < makes some nice pot
")
I appreciate the Bnutters who have purchased my pots for their collections! And I appreciate @19Mateo83 unboxing review! I wanted to start a thread that I could post some photo’s on to show a few of the newly added pots I put into my Etsy store. They usually go pretty quick so I figured I...

www.bonsainut.com
Steve and Sandy run a nice joint there in Clermont. I've been to a single workshop in my time in bonsai
and it was there that I went with Adair Martin as the artist teaching the class.
I brought my JWP with me and Adair said he'd be happy to add it to his collection lol.
I've bought a couple trees from Steve from JWP to Sekka hinoki and Kishu.
Bonsai by the Monastery in Conyers, GA is a decent source of pots.
I used to use their Master Soil Blend exclusively, but they closed their online store a few years back.
Won't even ship a pot.
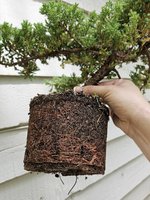
Your root ball does not look too packed, but eager to be helped out.
If when you water (when it is ready), the water pools before soaking in, it is too packed, at least on top.
So you're going to need some wire to secure your root ball to the pot, and some screen to cover the
large drainage holes. Should have no problem finding these around Atlanta.
View attachment 543943
Here is an REB10 mica pot. If you look closely above and below the drainage hole
you'll see I've drilled the bottom, holes for the anchor wire. 2 holes around each drainage hole.
You can get away with just a layer of typical window screen cut to fit bottom and cut your anchor
wires ends on angle so to pierce through screen from bottom. The roots will engulf the screen
and full coverage screen has it's own issue of removal at next repot, but you're going to be working
those roots anyway, so not a big issue. Start with 2 feet of anchor wire for each side. That should give
you 10" to work with front and 10" back, above the soil line to twist. Better too much than not enough.
If the wire begins wrapping around itself as you're twisting
in a single location, kind of knotting up, it will break, and you'll have to start over. So lift, then twist, repurchase pliers
grip, lift and twist to keep a Y spinning till snug G's ruin the fun. I use either copper household wire that has no nicks
or aluminum wire. I use 14/2 household copper wire or aluminum bonsai wire, in whatever size is equivalent to 10 gauge copper.
The butterflies to hold screen pieces over drainage holes, I use whatever is recycled from other projects but long enough
to make the double loop and exit the bottom of the pot and flatten out 3/4" on bottom side, give or take is good.