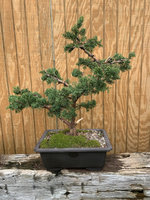
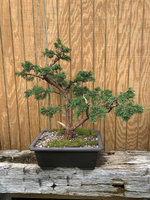
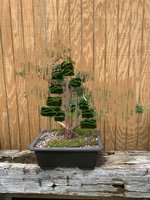
Largish shimpaku juniper -- first styling

Joe Dupre'

Omono
Messages
1,720
Reaction score
3,783
Location
Belle Rose, La.
USDA Zone
9a
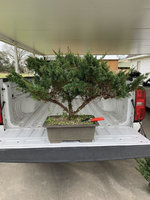
Last Thursday a friend and I drove up to Underhill Bonsai in Folsum, La. I bought a largish shimpaku juniper and a double trunk smaller specimen. The larger tree had apparently never been styled--- only ground grown for a couple of years and then potted up for a year or two. This tree was $100 which is much more than I had ever spent on a tree. I would say it was worth every penny.

I pruned off about 25% of the foliage, guy wired a few branches and wired a couple more. The center trunk was leaning WAY back, so I pulled it out of the pot, teased the roots some and put it back in a more upright position. The foliage obviously needs to compacted closer to the trunk, but I think it was a good start. After potting and wiring, it seemed to need a bit more lean. Easily fixed on the next repot. Here's a little before and after.
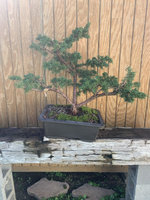
unnamed (40).jpgshimpaku.jpg
 
Nice . Unsure what your plan is but I would consider growing and styling . Sacrificial piece like one of the lower branches . Then air layer that of the parent tree . Eventually after it’s helped . The trunk . With styling you can layer off something that is fairly advanced . I have one that was dug from a yard . That is getting that treatment .
 
Nice . Unsure what your plan is but I would consider growing and styling . Sacrificial piece like one of the lower branches . Then air layer that of the parent tree . Eventually after it’s helped . The trunk . With styling you can layer off something that is fairly advanced . I have one that was dug from a yard . That is getting that treatment .
" Unsure what your plan is,,,, Hey, join the crowd. LOL This was the absolute first styling .....just trying to get the feel for the tree and what to do next. I'm not big on "classic" bonsai styling, so this unusually shaped specimen is nothing new to me. Instead of inflicting severe styling changes on trees, I tend to coax the trees along until some kind of appealing design comes to mind. I definitely want to compact the foliage. I can foresee narrowing the front view by 30% or so. I can also foresee bringing the apex down 8-10 inches or so. My final design may not appeal to the majority, but one thing's for sure, it will eventually appeal to me..................the absolute goal.
 
Lots here to work with! Not sure about the base of the trunk though. Looks like a graft of some sort from the picture. Is this your front for now?
 
Lots here to work with! Not sure about the base of the trunk though. Looks like a graft of some sort from the picture. Is this your front for now?
I'm pretty sure Underhill starts all of its shimpakus with cuttings. I don't see any evidence of a graft.

Yes, this the front for now. What you can't really see is the center trunk is still leaning back at about 15 degrees from vertical ( reduced from about 40 degrees originally) . Cutting so much foliage off, I didn't want to subject the tree to a radical repotting to get everything just right. That will come at the next repotting, with hopefully more backbudding and lusher foliage.
 
If this was mine I’d be air layering in several places to end up with trees with better movement.
Worth considering, for sure. I'm more of a one-off kind of tree designer. I love the challenge of making a silk-ISH purse out of a sow's ear. Like I said, classic bonsai design is not big in my book. My style is not for everyone, but it works for me.
 
I've been going over a possible design for this tree since I bought it. Last night, while drifting off to sleep, I realized that the smaller, left branch kept creeping into my mind as not "belonging". This morning, I put the tree on the turntable turned it round and round with and without a towel over the offending branch. 10 minutes of this and "the Line" hit me. Out came the tools and this is the result. MUCH better to my eye. The cut-off branch was not a good candidate for air layering. It still needs to grow out and be shaped more and the long bottom branches shortened, but I feel I have a better start on the final design. Quite a transformation from the bush on the tailgate of the truck.


shim branch removed 1.jpgshim branch removed 2.jpg
 
I've been going over a possible design for this tree since I bought it. Last night, while drifting off to sleep, I realized that the smaller, left branch kept creeping into my mind as not "belonging". This morning, I put the tree on the turntable turned it round and round with and without a towel over the offending branch. 10 minutes of this and "the Line" hit me. Out came the tools and this is the result. MUCH better to my eye. The cut-off branch was not a good candidate for air layering. It still needs to grow out and be shaped more and the long bottom branches shortened, but I feel I have a better start on the final design. Quite a transformation from the bush on the tailgate of the truck.

When I saw the tree after your first styling removing the left branch is exactly what I was thinking of. I think you’ve made the right decision.
Additionally, you could reduce the remaining branch and take off the two wired branches at the end. This will create a more defined conical silhouette to tree.
But, as always; it’s your call. No rights, no wrongs.
Yep, when I removed the left branch, the right branch looked way out of proportion. I may leave it long for now to let the tree catch up on its energy reserves.
 
Ruddigger, that design looks like it would be quite a stretch from what it is now. I would have to completely rebuild the tree. Thanks for the input.
I do like Ruddigger’s suggestion. One short-cut towards his design would be to plant another sapling next to the current tree and try to graft it to the existing branch. But chances of succes are mediocre at best.
 
I am just newbie but I love Joe’s passion for his designs. After all aren’t you supposed to please yourself. I am going to try to do the same, after I try to get the fundamentals correct. You just have to go for it!!!
 
One tight bend on the right branch to build the sub-formal and what he drew is immensely achievable (and possibly the best use of the material, particularly if you're intent on keeping the base and not focusing on what can be airlayered from the ends). You'd have to cut a channel and bend it that way, ...or maybe you could get by with splitting the trunk to allow the bend. Neither are dangerous to the tree really.
 
I'm really not fond of a straight trunked formal upright design, especially a straight trunk with a straight branch beside it. While the trunk is pretty straight down low, it gets a lot more interesting higher up. I'm OK with a tree that doesn't conform to the norms as long as it appeals to me.........and this one does.
 
I'm really not fond of a straight trunked formal upright design, especially a straight trunk with a straight branch beside it. While the trunk is pretty straight down low, it gets a lot more interesting higher up. I'm OK with a tree that doesn't conform to the norms as long as it appeals to me.........and this one does.

That’s all that matters.
 
Back
Top Bottom