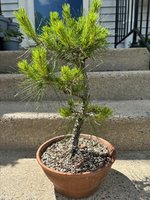
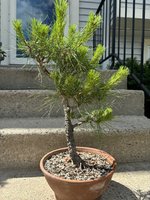
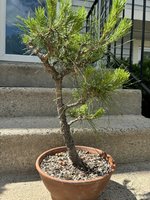
Young JRP in development

tanlu

Shohin
Messages
311
Reaction score
26
Location
Washington, DC
USDA Zone
7a
I haven't posted in years, given all of my interesting material has been and still is in the ground in upstate NY at my parents' house. I moved this spring to northern VA and I decided, for a number of reasons, to take 2 trees with me. I potted them in bonsai soil and wood chips in terracotta pots. One of them is this young JRP. I collected it as a small seedling and have been giving it the good 'ol clip and grow treatment for both the foliage and roots over the past 13 years, so the trees had a compact root system by the time they were potted. I planned to make this a bunjin style tree but the branches and trunk have gotten thicker than I wouldn've liked and lack movement. However, the bark is starting to get interesting and I'm hoping some guy wires can allow me to lower some branches and the apex, whatever that ends up being.

My questions are:
  • Which branch should become the apex?
    • Should it be the current apex or would the tree be better suited to a more compact
  • Which branches should I keep or remove?
  • What would be a good planting angle?
  • Where is the front of the tree?

All opinions are welcome, but those with considerable knowledge and experience with pines would be most helpful!
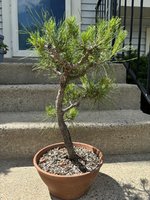
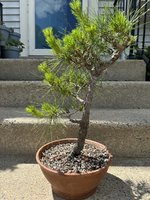
IMG_5747.jpegIMG_5748.jpegIMG_5749.jpegIMG_5750.jpegIMG_5751.jpeg
 
You have done a good job of developing the trunk but I can see some things I would consider flaws in any bonsai.
The upper trunk seems to be a little thicker than below - inverse taper.
The upper branches are very thick which does not help with perspective or visual flow.

I find it difficult to properly assess trees from 2D images so please take the following with a couple of grains of salt and always check that any online advice actually fits with the real tree before picking up the cutters.

I can't see any quick fix for the upper section. In cases like this I then look lower to see what options there are for a chop and replace the apex. The second branch looks to have some possibility as a replacement trunk line to add taper and add a bend to the trunk. You will need to check the sub branches on it to see if they can also become branches of the new trunk.
If you were to go ahead with that reduction I suspect the front would be somewhere between image 4 and 5

Front is usually chosen with reference to:
1. roots - best view of the nebari
2. Trunk - best view of bends and taper.
3. Branches - best view of branches - side, back, side, etc.
4. Features - anything special you'd like to show off
5. Faults - anything you want to hide (put that toward the back)

Sometimes all the above features line up well but more often you'll need to compromise and pick a side where not all the features are best but are the best you can manage.

Planting angle is also a compromise between the best view of the trunk and branches and the best view of the nebari. With older trees like this it is often not viable to change the planting angle because that will put some roots out of the soil and others buried too deep to see. You will need to check the roots to decide if change is viable. Sometimes change of angle can be achieved by removing some higher roots on one side if there are more good roots below them.
 
Here is an option.
1. Remove the lower 2 branches.
2. Make a wedge and pull down that heavy branch to the right making a bit of a cascading branch from it.
3. Remove the heavy branch going toward the back left.
4. Begin to train the other branches as shown in green arrows.
5. Consider tilting the whole tree to the left.
DF45FC67-1BED-4876-974C-5E6F6247331B.jpeg
 
I'd suggest totally different from @Brian Van Fleet Remove everything above the first branch (or second) to make it more compact. It may induce some buds along the trunk as well. A wedge in the middle to get some movement could also help.
 
This is the kind of feedback I was looking for, so thank you to those who have responded! Each of you have made valid points and this helps me think through what my options are. I’m definitely not in a rush to chop given the season and that the tree has just been potted a few months ago. I don’t even have the right tools yet. I lost my branch cutter and root cutter during the move down here.

I was also hoping @Brian Van Fleet would reply given his experience with this subject! I’ve been following your posts for years and typically agree with your statements. No surprise, your suggestion is right in line with what I envisioned.

Now, I have very limited experience working with developed material, so you’ll have to excuse my basic questions.

  • What do you mean by “Make a wedge”?
  • I’d like to make a few interesting jin out of the branches I remove. Do you make stubs, wait a few months to let the wood dry, and then do the carving, or do you do these steps all in one session? I’ve read the former is recommended but have seen the latter performed on YouTube as well as during bonsai demos on pine material.
Wedge; really a wedge-cut, where you split the trunk open along the natural fibers. It’s best to start by using a gouge or chisel and tap at the place you want to start the cut, then carefully (make a wish) and pull it open. I wrap the trunk below with raffia to avoid tearing it too deep, and then carefully wire everything to hold it in place. Remember that JRP are considerably more brittle than the other pines we work with, so work carefully and go slow. Here is an example of the wedge cut on a Shimpaku, same principle.
E3015FB1-581A-4A48-9550-3ADD1644CA44.jpeg

And yes, I do leave stubs on branch cuts of pines, as it helps reduce some of the sap flowing down the trunk. Here is an example of a couple stubs left on a black pine. As the callus expands, I reduce the stubs.
19A47329-D432-4CF8-B639-E10A930EBF1D.jpeg
 
Wedge; really a wedge-cut, where you split the trunk open along the natural fibers. It’s best to start by using a gouge or chisel and tap at the place you want to start the cut, then carefully (make a wish) and pull it open. I wrap the trunk below with raffia to avoid tearing it too deep, and then carefully wire everything to hold it in place. Remember that JRP are considerably more brittle than the other pines we work with, so work carefully and go slow. Here is an example of the wedge cut on a Shimpaku, same principle.
View attachment 551059

And yes, I do leave stubs on branch cuts of pines, as it helps reduce some of the sap flowing down the trunk. Here is an example of a couple stubs left on a black pine. As the callus expands, I reduce the stubs.
View attachment 551061
Thanks for the photos and thorough explanation! That's a nice little black pine you go have there.

More questions:

- What's the best time of year to do this or any serious trunk bending work, for that matter? I de-candled the tree a little over a week ago and can already see very tiny second flush buds forming at the terminals.

- Would it work to tease the tear for the wedge in a desired direction? For example, I'm thinking I could use pocket knife to cut the first half inch in the middle and then continue along the natural fibers, as you've mentioned. I can see how this might not look natural though, but wondered if this was done in practice.

- Does the crevice caused by the tear eventually close at the bottom as the tree heals or do you apply cut paste?

- How long do you keep the raffia on?
 
- What's the best time of year to do this or any serious trunk bending work, for that matter? I de-candled the tree a little over a week ago and can already see very tiny second flush buds forming at the terminals.
Early fall or spring.

- Would it work to tease the tear for the wedge in a desired direction? For example, I'm thinking I could use pocket knife to cut the first half inch in the middle and then continue along the natural fibers, as you've mentioned. I can see how this might not look natural though, but wondered if this was done in practice.
Yes, the cut just gets the tear started in the right direction.

- Does the crevice caused by the tear eventually close at the bottom as the tree heals or do you apply cut paste?
Mostly it closes, but it will have some character. Maybe tomorrow I’ll get a shot of one I did on a JBP 10+ years ago.

- How long do you keep the raffia on? A year or so
 
Back
Top Bottom