Shinpaku progression / skills check in 2021

Messages
1,689
Reaction score
3,643
Location
Eastern MA
USDA Zone
6B
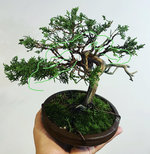
I wanted to test myself a bit. Both in terms of design and wiring skill - no class, no group, no hand holding, no safety net. Using material nice enough it’ll sting badly enough that I’ll remember the mistake forever if I make one.

I essentially just finished as it’s shown here. I, of course, forgot to take a true “before” picture - I have to admit that as I was cleaning the park last night I was amazed as that brilliant white wood came out. I suppose this is sort of cheating since the jins were already done.
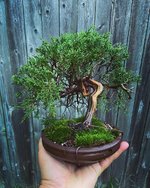
38EBCBE3-0300-415F-84B9-F906CB5D5B1B.jpeg

This tree caught me immediately when I saw it. Truly do I not want to mess up.

To that end, I really focused on how to use what I had rather than how to cut, because I can undo things that aren’t cuts. I ended up cutting two small branches.

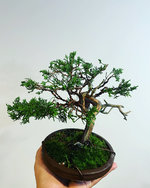
Anyways, I feel mostly good about my wiring skill, but I’m curious how people feel about my first pass at shaping here. Full contrast. Shohin. No hi
F8F3D0D3-B47D-4836-87F5-3CC8B4F83782.jpeg
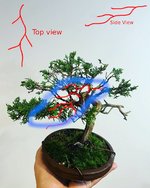
Personally, looking at it now, I think I will lower those two branches in the middle left. They look out of place as is, do you agree? That space just feels a little off.

I wouldn’t mind doing some finer wiring but I didn’t have finer copper wire than this.

Anyways! What do you think? Good / bad / ugly? Where can I improve and what direction would you take it in / would you have taken it in instead?
 
Following for the comments.

What is going on in the middle, right where the gin in turning down again?
looks like a big bulge there that is taking away the focus from the nice gin and movement

Maybe the bottom little branch going in front of the trunk in your last pic can be removed.
 
From what I’ve learned is , it’s important for your principal branch to set the thematic of your styling , and I’m not sure where that is.
it’s good for styling to follow the trunk, this is a twisty trunk so you need some curvature that is continuing into your branches.
Needs more pad development, I would have rather seen this just get pruned then wired one more foliage is fuller. Seems like you really pruned a lot vs maybe could have just pruned the downward foliage then wired to get more easily discerned pads.
 
The trunk and Shari show good potential. It looks wired, but still unstyled.

Form pads with branches by setting them in positions like fingers radiating out from your upturned palm. Then trim off the foliage in crotches of branches, and the stuff that grows downward. Create an apex just below the highest Jin. Make sure you have branches radiating outward from the trunk on all sides so the tree has a bit of a rounded silhouette from all sides.

Here is a markup showing what I would do with your tree’s branches, the silhouette I would go for, and an example:
571FC579-C5B9-45B8-BF91-8E05A6691769.jpegB0471A43-65DB-45AE-B8DD-8FE1A7B1452D.jpeg
 
You need to do the two-handed pinching of the end scales in lots of places now. Not so much to improve the appearance today as to getting to a proper starting point for the new foliage to grow from. All growth is terminal, and if that terminal is already further out than the finished canopy or cloud, then all that new growth will be wasted. Even if it isn't further out now you still need to encourage the ramification necessary for the pristine, close-knit surface we value Shimpaku for.
j1.JPG

It can be done with a scissors because it doesn't matter if you have a brown tip this early in the game, you just want all the foliage present to be at a starting point below the finished canopy surface.
 
The trunk and Shari show good potential. It looks wired, but still unstyled.

Form pads with branches by setting them in positions like fingers radiating out from your upturned palm. Then trim off the foliage in crotches of branches, and the stuff that grows downward. Create an apex just below the highest Jin. Make sure you have branches radiating outward from the trunk on all sides so the tree has a bit of a rounded silhouette from all sides.

Here is a markup showing what I would do with your tree’s branches, the silhouette I would go for, and an example:
View attachment 398858View attachment 398859

Awesome thanks, this makes sense and tracks! I’ll take another look.

I’ll see if I can post a 360 video at some point here too, what you’re saying about the apex rings true.

Luckily, I really didn’t prune much at all - so there’s some flexibility to take some steps backward, sideways, or wherever too, I think.
 
I wouldn't cut anything else now, in fact, my first thought was, this is a little late to be cutting anything. We must consider EVERY reaction to our actions, the only reaction to cutting now is less net health to get through winter.

We teach "wire in fall", which is appropriate, but we're still stuck in this "demo" world where we believe we must prune and wire all at the same time to style a tree.

The strongest periods of growth are in spring, and after the heat of summer, so pruning should be limited to just prior to these times, to set up the branch structure we will wire in fall.

This allows time for a positive reaction of new growth, structured well, and strong enough to remove any highly offending 3's in the tufts at wiring. But being new growth, they won't even reach the "point of no return" for another 2-3 years, so you shouldn't have to remove anything at wiring.

For me, development goes, cut large "offending" or trident causing trunks/branches in spring, since you lose the most, you get the most time to regain that health.
Cut medium sized, secondary and tertiary offenders off in summer, less loss, less season time to regain health.
And cut off minimal useless growth to allow application of wire nowish.

I think you can apply this loosely over the next few years and result in some branches worth wiring into place.

I feel like there may be better movement at a different front.

Around the horners?

Sorce
 
Your tree has plenty of wire on it. Now you just need to develop the pads. Pads need to be layered into place. The structure you have would be more appropriate for a deciduous tree.

Wiring the branches down and splaying them out so that they can reach sunlight easily will cause the tree to backbud. Leave the tips to grow runners/whips. Once backbudding is happening, shorten the growth so that it starts to tighten up the silhouette.

DO NOT PINCH for density. Not yet. Some of the branches you'll need to create the final tree don't exist yet.

Nice selection by the way!
 

Attachments

  • baun-shimp.jpeg
    baun-shimp.jpeg
    140.2 KB · Views: 85
Your tree has plenty of wire on it. Now you just need to develop the pads. Pads need to be layered into place. The structure you have would be more appropriate for a deciduous tree.

Wiring the branches down and splaying them out so that they can reach sunlight easily will cause the tree to backbud. Leave the tips to grow runners/whips. Once backbudding is happening, shorten the growth so that it starts to tighten up the silhouette.

DO NOT PINCH for density. Not yet. Some of the branches you'll need to create the final tree don't exist yet.

Nice selection by the way!

This makes sense, thank you! I feel like I have the academic "this is what I want to accomplish" knowledge and this is all helping the "but how do I actually form the tree to do what I want" question. I should do more virts, just in general.

I'm going to stare at this longer and give it another go at shaping soon. As you call out, all the wire is there, it's really just a matter of moving the branches into place. I really didn't remove much of anything, I know it looks a bit plucked chicken at the moment, but all but two small branches (which you can't really see in the photos anyways) were kept.
 
Your 1st branch is made up of 5 or more branches, 2 of which are up turned, one comes back across the trunk.
This 1st branch eventually will be a massive pad fit for a big tree, and will have a fat knuckle where these branches radiate from.
IDK how much of the branch that is coming across the trunk can be moved, but it has the most, close in foliage to build on.
Remember, when a pad is built on a flaw, you have a flawed pad.
The longer you build on that flaw, the harder and more ugly the fix becomes.

One of the up turned branches on the 1st branch, "appears" to flow into, or be the apex branch from this angle.
 
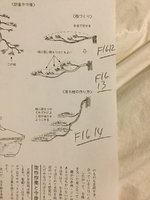
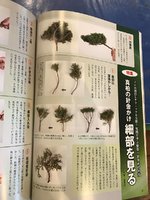
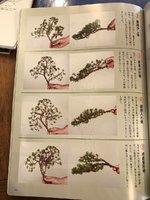
You've probably seen the first. The first time I saw the 2nd & 3rd, it finally clicked for me. (Remember, they're in Japanese so left-to-right.)
 

Attachments

  • padDevelopment.jpg
    padDevelopment.jpg
    151.5 KB · Views: 73
  • JuniperCleaning-1.jpg
    JuniperCleaning-1.jpg
    220.9 KB · Views: 65
  • JuniperCleaning-2.jpg
    JuniperCleaning-2.jpg
    189.6 KB · Views: 80
You've probably seen the first. The first time I saw the 2nd & 3rd, it finally clicked for me. (Remember, they're in Japanese so left-to-right.)

Yes, that's helpful and I think I need to get some size 20 and 22 wire perhaps. Picking juniper as a "test species" was certainly an interesting choice on my part, since they're what I've worked on the absolute least - even if you think it's basic, I'm interested in seeing it! It's like, sort of clicking, and I know what I'm looking at isn't what I wanted, and this is helpful. As others have said, more growing to do on this one, too, so I'm kind of trying to figure out how it will fill in over time.

Those two stray branches that were called out are there primarily because it felt like there was a gap that needed to be filled - I need to find a different want to fill it, it seems. I think there will probably be some cutting decisions to make, but I suppose I was trying to cheat a bit by getting the general form and working my way back to cutting off unnecessary branches from there, which is a bit backwards too, I think.

I know back budding will be playing a major role here so thinking about those pictures and how back budding will actually be USED is very helpful!
 
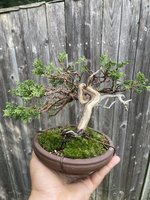
Ok I had a moment and fiddled with it a bit. After this I’ll let myself look at books / YouTube but I figure it can’t be great to shape this ten times in succession and should probably let it rest.

Definitely still work to be done, but curious if you think I’m moving in the right direction. I found one branch I’m thinking of clipping

you can see two layers of pads on the left, a third one starts above that but the photo really makes it look jumbled which means it needs work. the branch in that area that looks like what is growing straight up is the one I’m thinking of removing, lots of coarse growth at the end and I can’t seem to figure out what to do with it. Seems like I need it though, otherwise there’s a big gap in the back.

Apex needs work and it gets thin moving to the right. Question of - do I wait for it to fill in with growth or try to fill it in with what I have?

977C48FE-8857-4E09-8C84-DF93D38C9F91.jpeg

in any case, it seems more compact with more defined pads beginning to show…. I can say it FEELS like I could use another branch somewhere but that’s probably more a creativity problem
 
Here’s the video I promised. I fiddle with the branch that’s bugging me at the end


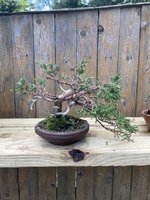
Here’s the back

bit of a mess

My guess is I’m still letting the branches sprawl too much maybe, and there are definitely branches that look wrong to me that I moved in place specifically because of the foliage cover more than anything else. I feel like I squished it down OK but didn’t squeeze it in at all.

since this was a major revision I held off on cleaning much up from this iteration. Don’t want to cut too much off too soon.

41886064-C906-4749-877A-96D22516D113.jpeg
 
One more I took because I swear this thing looks better in person. I usually feel like saying that is kind of a cop out and that photos more tell you where you may want to focus rather than “it just didn’t come out good” but man do I believe people believe it when they say it

9A5B2819-4773-423E-BA1F-5E2166608B43.jpeg
Zoomed in from further away you can see the pads a bit better tho

986C1FE4-3179-43F3-9174-718B2F924564.jpeg
 
it’s a great tree with great potential. But ive got to say, I think you’ve got the angle wrong. The main trunk is too straight up and down and the foliage seems in conflict with it. When the time is right I’m also seeing what @Japonicus is seeing. Too many branches coming from single points. It’ll only create problems long term. I think between @Brian Van Fleet and @bwaynef advice it’ll come into its own. Gotta just execute. You got this. Just take your time. 😂 (not my forte)
 
Yeah, I see what you mean and I think I'm trying to delay necessary decisions and have my cake and eat it too while I muddle through this. Some cuts will need to be made.

Good wiring practice for the moment but more thought required - I was struck by some inspiration last night but now I'm feeling that it needs rethinking. No reason to rush.

Interestingly, this is the same kind of problem that got me to take my first 1:1 class. I hadn't wired anything yet and was just staring at a well developed juniper branch (the other juniper I post in the tree thread sometimes) that I didn't want to cut off. It was the first thing to go when we worked on it. At the very least that juncture needs work.
 
Last edited:
Back
Top Bottom