Lazylightningny
Masterpiece
I’m far from a bonsai expert. In fact, this is only my seventh season doing this. So why am I posting a tutorial? What qualifies me to write one?
Probably 60-70% of the trees on my shelves are junipers, and I’ve killed many, so I have learned a few things about them. And I consider this a beginner task, which every bonsai practitioner needs to perform, even on stick-in-a-pot trees. There’s nothing complicated or controversial about it. It’s just a simple task that has to be done.
There are two basic types of juniper foliage: scale and needle. An example of scale type foliage is the one found on Shimpakus. Needle junipers include Juniperus rigida, or Needle juniper, common on Japanese bonsai shelves. Needle junipers never grow scale-type foliage. Please refer to this tutorial I wrote in 2016 on juniper types and properties for more information (https://www.bonsainut.com/resources/juniper-species-varieties-and-cultivars.26/). However, scale-type junipers typically show needle foliage when young, or when stressed. Unless you have a stable, very mature juniper, your trees most likely have an abundance of sharp needles. As the tree grows, it naturally sheds needles, just like pines, and these dead needles need to be removed.
There are 3 reasons why we remove dead needles, and one side benefit:
There are two ways to remove needles: the majority of needles will be removed with tweezers. First, cover your soil with a cloth or hand towel. You don’t want a bunch of dead organic material clogging up your inorganic bonsai soil. Then, one by one, grab the needle with the tweezers and gently pull away and down from the branch. Make sure you view the twig from all angles- it’s easy to miss needles. Most needles will come away easily, but others may take a thin layer of the outer part of the branch with it. I can’t really call it bark, because these areas where you will find needles haven’t barked up yet. Some needles will be more stubborn; they may take a deeper layer of tissue with it, exposing the green cambium. This is bad. It opens the tree to infection and the twig could potentially die. For those needles, cut them right at their base with a pair of fine, sharp scissors. You will learn to recognize these needles. They are either yellowed (not quite dead), or more robust than older dead needles, and haven’t started to deteriorate yet. Start at the top of the plant so you can remove the fallen needles as you methodically work your way down. You will be surprised when you are done at the amount of dead needles that have collected on your towel. It’s tedious work, so if you find yourself breaking twigs and pulling up cambium, that means you’re rushing and it’s time to put the tree down and come back to it another day. Take your time and do a good job.
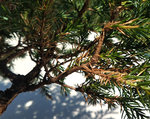
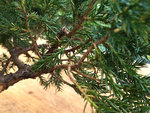
The following photographs are of a Parson’s juniper in my collection, with a before and after close up of a section clogged with dead needles. I did a rough initial styling of the tree in 2017, then put it back in the ground for a couple of years. During that time it filled in nicely, so I lifted it last summer, bare rooted it, and placed it in a pond basket for further development. While it was in the ground, it had produced an abundance of dead needles that now need to be removed. This can be done at any time of the year.
Let me know what you think, and if your methods differ from mine.


Probably 60-70% of the trees on my shelves are junipers, and I’ve killed many, so I have learned a few things about them. And I consider this a beginner task, which every bonsai practitioner needs to perform, even on stick-in-a-pot trees. There’s nothing complicated or controversial about it. It’s just a simple task that has to be done.
There are two basic types of juniper foliage: scale and needle. An example of scale type foliage is the one found on Shimpakus. Needle junipers include Juniperus rigida, or Needle juniper, common on Japanese bonsai shelves. Needle junipers never grow scale-type foliage. Please refer to this tutorial I wrote in 2016 on juniper types and properties for more information (https://www.bonsainut.com/resources/juniper-species-varieties-and-cultivars.26/). However, scale-type junipers typically show needle foliage when young, or when stressed. Unless you have a stable, very mature juniper, your trees most likely have an abundance of sharp needles. As the tree grows, it naturally sheds needles, just like pines, and these dead needles need to be removed.
There are 3 reasons why we remove dead needles, and one side benefit:
- Growth: Pulling dead needles opens up interior foliage to more light, thereby increasing the chances of interior back budding. Also, I frequently pull a needle and find a small bud under it. Removing the needle will give the bud a better chance of thriving once exposed to the sun.
- Health: Dead needles hold mold. Especially in areas where there is an abundance of small dead needles, mold spores thrive in the moist detritus and could negatively impact the health of your tree. Sometimes fungicides cannot penetrate these areas if they are dense enough. You will see mold as small black spots on the twig or needle.
- Aesthetics: a tree full of dead needles reflects poorly on your ability to grow and maintain a bonsai tree. It looks messy. Clean the tree up and it will look much better. You certainly won’t see any dead needles on a tree being shown.
- Side Benefit: Correct hidden defects in your tree. You will be going over each twig in detail, so you will see parts of your tree that you don’t normally see. Things such as pruning stubs can be cleaned up, detect insect infestations, that old piece of wire you forgot about, and more.
There are two ways to remove needles: the majority of needles will be removed with tweezers. First, cover your soil with a cloth or hand towel. You don’t want a bunch of dead organic material clogging up your inorganic bonsai soil. Then, one by one, grab the needle with the tweezers and gently pull away and down from the branch. Make sure you view the twig from all angles- it’s easy to miss needles. Most needles will come away easily, but others may take a thin layer of the outer part of the branch with it. I can’t really call it bark, because these areas where you will find needles haven’t barked up yet. Some needles will be more stubborn; they may take a deeper layer of tissue with it, exposing the green cambium. This is bad. It opens the tree to infection and the twig could potentially die. For those needles, cut them right at their base with a pair of fine, sharp scissors. You will learn to recognize these needles. They are either yellowed (not quite dead), or more robust than older dead needles, and haven’t started to deteriorate yet. Start at the top of the plant so you can remove the fallen needles as you methodically work your way down. You will be surprised when you are done at the amount of dead needles that have collected on your towel. It’s tedious work, so if you find yourself breaking twigs and pulling up cambium, that means you’re rushing and it’s time to put the tree down and come back to it another day. Take your time and do a good job.
The following photographs are of a Parson’s juniper in my collection, with a before and after close up of a section clogged with dead needles. I did a rough initial styling of the tree in 2017, then put it back in the ground for a couple of years. During that time it filled in nicely, so I lifted it last summer, bare rooted it, and placed it in a pond basket for further development. While it was in the ground, it had produced an abundance of dead needles that now need to be removed. This can be done at any time of the year.
Let me know what you think, and if your methods differ from mine.


