MMJNICE
Chumono
This is a progression thread that is open to opinion of styling and care of this tree. I bought this nursery stock tree 4 years ago with it being little more then a long 6 foot stick in a pot with a mass of foliage 3/4th up the trunk. First thing I did was hard chop down to 13" inches to a shoot and tried to develop branching with zero succes. For the first year nothing really happened. Next spring i repotted the tree into the current pot in Acadama and bonsai chunky bonsai soil from an online store that was heavy in lava and pumice with a pretty severe root pruning for an oak and uncovered the very wide but weird base with two thick roots kinda crossing each other before fine roots that could sustained the tree where discovered. Over the next couple of years i learned that if I let the tree run a bit with longer shoots I could cut back and get finer ramification back behind the cut points. Doing all the cuts on the tree at one time to encourage a second flush somewhat partially defoliating the tree but leaving the leafs behind the cuts untouched. Doing selective pruning didn't give me good results by cutting one shoot and not another. With this technique slowly I begin getting branches and at most three flushes of growth a session. I wish I took pictures when I first started the tree but to be honest I didn't see this tree for having any promise. I've definitely learned that little by little if you keep at a tree you will hammer out a fairly presentable tree that resembles a bonsai if you don't give up. This tree all of a sudden started to look like a decent representative in miniature of what this trees look like growing in the open ground. Sort of a flame tree shape but with a slant. 


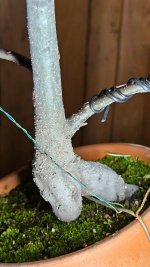
I know it needs more work and branches on the right side of this picture that's something I'll be working on this coming growing season. Also the root base is covered to start a decent root spread even though it's got a weird base nice radial roots are still possible with this tree and I'm going to try. Also not sure what side i like more or what angle. The more straight up and down or slanting at its current angle. the tree is definitely a work in progress. But i see a decent future for it.
I know it needs more work and branches on the right side of this picture that's something I'll be working on this coming growing season. Also the root base is covered to start a decent root spread even though it's got a weird base nice radial roots are still possible with this tree and I'm going to try. Also not sure what side i like more or what angle. The more straight up and down or slanting at its current angle.
the tree is definitely a work in progress. But i see a decent future for it.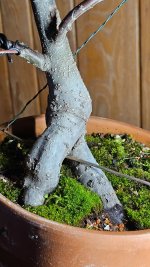
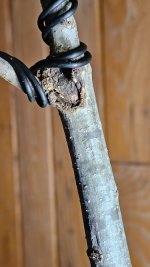


 . Drill or make small holes where roots desired then fill with rooting compound and cover as for ground layer; If no roots grow hole will heal over.

